VUE之路由Props、replace、编程式路由导航、重定向
目录
1、路由_props的配置
2、路由_replaces属性
3、编程式路由导航
4、路由重定向
1、路由_props的配置
1)第一种写法,将路由收到的所有params参数作为props传给路由组件
只能适用于params参数
// 创建一个路由器,并暴露出去

// 第一步:引入createRouter
import {createRouter,createWebHistory,createWebHashHistory} from 'vue-router'
// 引入一个个可能呈现组件
import Home from '@/pages/Home.vue'
import News from '@/pages/News.vue'
import About from '@/pages/About.vue'
import Detail from '@/pages/Detail.vue'
// 第二步:创建路由器
const router = createRouter({
    history:createWebHashHistory(), //路由器的工作模式
    routes:[  //一个个路由规则
        {
            path:'/home',
            component: Home
        },
        {
            path:'/news',
            component: News,
            children:[
              {
                name: 'xiangqi',
                path:'detail/:id/:title/:content?', //用于params参数占位,加?号可传可不传
                // path:'detail',
                component:Detail,
                //第一种写法:将路由收到的所有params参数作为props传给路由组件
                props: true
            ]
        },
        {
            path:'/about',
            component: About
        },
    ]
})

export default router
component:Detail,
//第一种写法:将路由收到的所有params参数作为props传给路由组件
props: true相当于:<Detail id=?? title = ?? content=??/>
<template>
    <ul class="news-list">
        <li>编号:{

  {id}}</li>
        <li>编号:{

  {title}}</li>
        <li>编号:{

  {content}}</li>
    </ul>
</template>

<script lang="ts" setup name="Detail">
   defineProps(['id','title','content'])
</script>
<template>
<div class="news">
<!--导航区-->
<ul>
<li v-for="news in newList" :key="news.id">
<RouterLink
:to="{
name:'xiangqi',
params: { //params不能传对象和数组
id:news.id,
title:news.title,
content:news.content
}
}">
{
{news.title}}
</RouterLink>
</li>
</ul>
<!--展示区-->
<div class="news-content">
<RouterView/>
</div>
</div>
</template>
<script setup lang="ts" name="News">
import { reactive } from 'vue';
import { RouterView,RouterLink } from 'vue-router';
const newList = reactive([
{id:'dasfadadadad01',title:'很好的抗癌食物',content:'西蓝花'},
{id:'dasfadadadad02',title:'如何一夜暴富',content:'学IT'},
{id:'dasfadadadad03',title:'震惊万万没想到',content:'明天周一'},
{id:'dasfadadadad04',title:'好消息',content:'快过年了'},
])
</script>2)第二种写法,函数写法,可以自己决定将什么作为props给路由组件
适用于query参数类型的传递
 {
            path:'/news',
            component: News,
            children:[
              {
                name: 'xiangqi',
                path:'detail/:id/:title/:content?', //用于params参数占位,加?号可传可不传
                // path:'detail',
                component:Detail,
                //第二种写法:可以自己决定将什么作为props给路由组件
                props(route){
                    console.log('@@@@',route)
                    return route.params
                    }
                }
            ]
        }
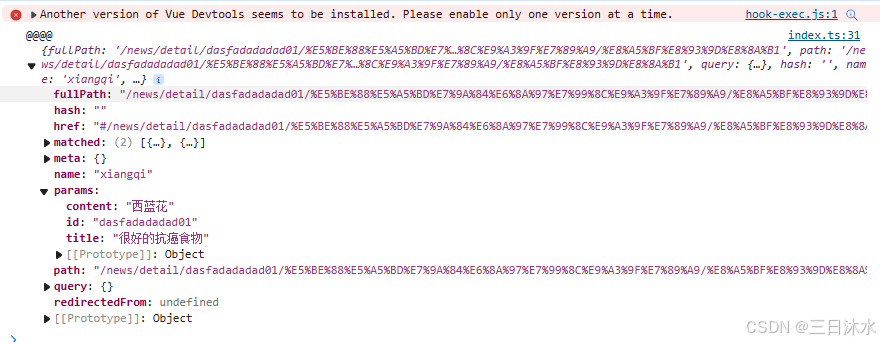
其中:console.log打印的route参数结构如下:

3)第三种写法,对象写法,只能写死,不适用
 {
            path:'/news',
            component: News,
            children:[
              {
                name: 'xiangqi',
                path:'detail/:id/:title/:content?', //用于params参数占位,加?号可传可不传
                // path:'detail',
                component:Detail,
                props:{
                    a: 100,
                    b: 200,
                    c: 300
                }
              }
            ]
        },
2、路由_replaces属性
1)作用:控制路由跳转时操作浏览器历史记录的模式。
2)浏览器的历史记录有两种写入方式:分别为push和replace:
- push 是追加历史记录(默认值)
- replace是替换当前记录
3)开启replace模式:
<RouterLink replace .....>News</RouterLink> <!--导航区-->
<div class="navigate">
<RouterLink replace to="/home" active-class="active">首页</RouterLink>
<RouterLink replace to="/news" active-class="active">新闻</RouterLink>
<RouterLink replace :to="{path:'/about'}" active-class="active">关于</RouterLink>
</div>
3、编程式路由导航
脱离<RouterLink>实现跳转
<script setup lang="ts" name = "Home">
import {onMounted} from 'vue'
import { useRouter } from 'vue-router';

const router = useRouter()

onMounted(()=>{
    setTimeout(()=>{
        // 在此次编写一段代码,让路由实现跳转
        router.push('/news')
    },3000)
})

</script>
<template>
<div class="news">
<!--导航区-->
<ul>
<li v-for="news in newList" :key="news.id">
<button @click="showNewsDetail(news)">查看新闻</button>
<RouterLink
:to="{
name:'xiangqi',
params: { //params不能传对象和数组
id:news.id,
title:news.title,
content:news.content
}
}">
{
{news.title}}
</RouterLink>
</li>
</ul>
<!--展示区-->
<div class="news-content">
<RouterView/>
</div>
</div>
</template>
<script setup lang="ts" name="News">
import { reactive } from 'vue';
import { RouterView,RouterLink,useRouter} from 'vue-router';
const newList = reactive([
{id:'dasfadadadad01',title:'很好的抗癌食物',content:'西蓝花'},
{id:'dasfadadadad02',title:'如何一夜暴富',content:'学IT'},
{id:'dasfadadadad03',title:'震惊万万没想到',content:'明天周一'},
{id:'dasfadadadad04',title:'好消息',content:'快过年了'},
])
const router = useRouter()
interface NewsInter {
id:string,
title:string,
content:string
}
function showNewsDetail(news:NewsInter){
router.push({
name:'xiangqi',
params: { //params不能传对象和数组
id:news.id,
title:news.title,
content:news.content
}
})
}
</script>编程式路由导航应用场景:
1、满足某些条件才跳转
2、鼠标划过就跳转
4、路由重定向
const router = createRouter({
    history:createWebHashHistory(), //路由器的工作模式
    routes:[  //一个个路由规则
        {
            path:'/home',
            component: Home
        },
        {
            path:'/about',
            component: About
        },
        {
            path: '/',
            redirect: '/home'
        }
    ]
})

export default router