Zinx框架的高级用法
一、使用框架提供的实用类
zinx框架已经提供了常用的IO通道类-TCP。
阅读Tcp相关类的使用文档,将之前的3个案例用TCP的方式实现。
步骤:
-
创建Tcp数据通道类继承ZinxTcpData,重写GetInputNextStage函数,内容跟之前标准输入通道类的内容完全相同,但不直接构造对象。
-
创建Tcp工厂类,重写CreateTcpDataChannel函数,只构造一个Tcp数据通道对象,返回对象指针
-
创建ZinxTCPListen对象,指定好监听端口号和工厂对象。并将其添加到kernel中。
#include <zinx.h>
#include <ZinxTCP.h>
#include <iostream>
using namespace std;

/*define class used to write stdout*/
class TestStdout:public Ichannel{
public:
    /*do nothing*/
    virtual bool Init(){}
    /*do nothing*/
    virtual bool ReadFd(std::string &_input){return false;}
    /*write to STDOUT directly*/
    virtual bool WriteFd(std::string &_output){
        cout << _output <<endl;
        return true;
    }
    /*do nothing*/
    virtual void Fini(){}
    /*return 1 which point to STDOUT*/
    virtual int GetFd(){return 1;}
    /*no impact*/
    virtual std::string GetChannelInfo(){return "test";}
    /*no next stage*/
    virtual AZinxHandler *GetInputNextStage(BytesMsg &_oInput){return NULL;}
} *poOut = new TestStdout();

class Echo:public AZinxHandler
{
public:
    /*define echo action which is get string from input, and send out it via stdout channel object*/
    virtual IZinxMsg *InternelHandle(IZinxMsg &_oInput){
        GET_REF2DATA(BytesMsg, oBytes, _oInput);
        auto pchannel = ZinxKernel::Zinx_GetChannel_ByInfo(oBytes.szInfo);

        if (NULL != pchannel)
        {
            ZinxKernel::Zinx_SendOut(oBytes.szData, *pchannel);
        }
        return NULL;
    }
    /*no next stage*/
    virtual AZinxHandler *GetNextHandler(IZinxMsg &_oNextMsg){return NULL;}
} *poEcho = new Echo();


class ExitFramework:public AZinxHandler
{
public:
    virtual IZinxMsg *InternelHandle(IZinxMsg &_oInput){
        GET_REF2DATA(BytesMsg, oBytes, _oInput);
        if (oBytes.szData == "exit")
        {
            ZinxKernel::Zinx_Exit();
            return NULL;
        }
        return new BytesMsg(oBytes);
    }
    virtual AZinxHandler *GetNextHandler(IZinxMsg &_oNextMsg){return poEcho;}
} *poExit = new ExitFramework();

class CmdHandler:public AZinxHandler
{
public:
    virtual IZinxMsg *InternelHandle(IZinxMsg &_oInput){
        GET_REF2DATA(BytesMsg, oBytes, _oInput);
        if (oBytes.szData == "close")
        {
            ZinxKernel::Zinx_Del_Channel(*poOut);
            return NULL;
        }
        else if (oBytes.szData == "open")
        {
            ZinxKernel::Zinx_Add_Channel(*poOut);
            return NULL;
        }
        return new BytesMsg(oBytes);
    }
    virtual AZinxHandler *GetNextHandler(IZinxMsg &_oNextMsg){
        GET_REF2DATA(BytesMsg, oBytes, _oNextMsg);
        if (oBytes.szData == "exit")
        {
            return poExit;
        }
        else
        {
            return poEcho;
        }
    }
} *poCmd = new CmdHandler();


class TestStdin:public Ichannel{
public:
    /*do nothing*/
    virtual bool Init(){}
    virtual bool ReadFd(std::string &_input){
        cin>>_input;
        return true;
    }
    /*do nothing*/
    virtual bool WriteFd(std::string &_output){return false;}
    /*do nothing*/
    virtual void Fini(){}
    /*return 0 which point to STDIN*/
    virtual int GetFd(){return 0;}
    /*no impact*/
    virtual std::string GetChannelInfo(){return "test";}
    /*specify next stage is echo handler*/
    virtual AZinxHandler *GetInputNextStage(BytesMsg &_oInput){return poCmd;}
} *poIn = new TestStdin();

class TestTcpData:public ZinxTcpData{
public:
    TestTcpData(int _fd):ZinxTcpData(_fd){}
    virtual AZinxHandler *GetInputNextStage(BytesMsg &_oInput){return poCmd;}
};

class TestTcpFact:public IZinxTcpConnFact{
    virtual ZinxTcpData *CreateTcpDataChannel(int _fd)
    {
        return new TestTcpData(_fd);
    }
};

/*before main func called, three globle object was created before which were poOut point to a TestStdout object, poEcho point to a Echo object and poIn point to a TestStdin object.*/
int main()
{
    ZinxKernel::ZinxKernelInit();
    /*Add stdin and stdout channel to kernel*/
    ZinxKernel::Zinx_Add_Channel(*poIn);
    ZinxKernel::Zinx_Add_Channel(*poOut);
    auto tlc = new ZinxTCPListen(7766, new TestTcpFact());
    ZinxKernel::Zinx_Add_Channel(*tlc);
    /*start loop*/
    ZinxKernel::Zinx_Run();
    ZinxKernel::ZinxKernelFini();
    return 0;
}
二、编写一组实用类
需求:定时3秒钟,周期地向标准输出打印hello world
分析:
-
怎么定时?是否可以通过fd反映超时?
-
超时之后呢?直接输出hello world?(编写实用类要面向“客户”)
-
定时的周期能否动态改?
思路:
-
创建一个ZinxTimer类继承Ichannel类,这个类通过timerfd用来产生超时事件
-
创建一个ZinxTimerDeliver类继承AZinxHandler类,这个类用来管理每次超时事件的分发和超时时间管理
-
定义一个接口(全部方法都是纯虚函数的抽象类),提供纯虚函数用来处理超时事件
1.创建TimerOutProc抽象类
-
仅提供两个纯虚函数,若有任务需要定时处理,则应该继承该类,重写这两个虚函数
-
Proc函数会在定时周期到期时被调用
-
GetTimerSec函数会在启动下一次定时任务时被调用,用来返回定时周期
class TimerOutProc {
public:
	virtual void Proc() = 0;
	virtual int GetTimerSec() = 0;
	virtual ~TimerOutProc();
};
2.创建ZinxTimerDeliver类
-
需要重写的函数中最重要的是InternelHandle
-
在InternelHandle中应该找出哪些TimerOutProc对象设定的时间到了,并执行其回调函数
-
提供RegisterProcObject和UnRegisterProcObject函数用于注册TimerOutProc对象
-
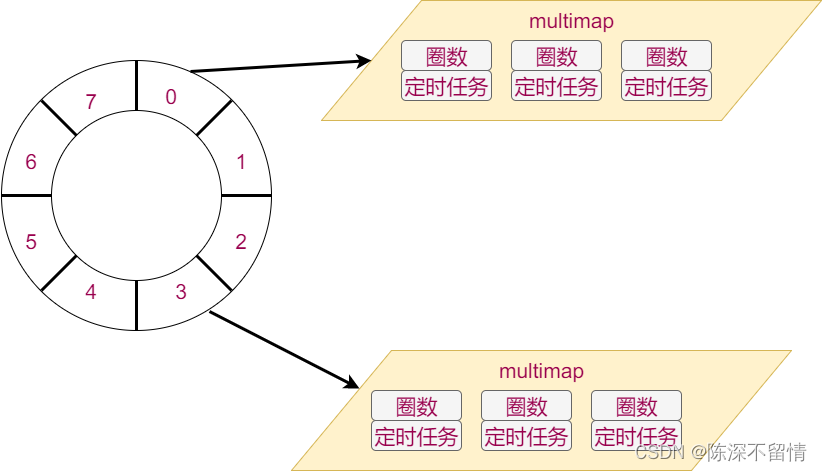
存储TimerOutProc对象时,要使用时间轮数据结构
-
对于超时的管理应该是全局唯一的,所以需要单例模式
//定时器节点
struct WheelNode{
	int LastCount = -1;
	TimerOutProc *pProc = NULL;
};

class ZinxTimerDeliver :public AZinxHandler
{
	static ZinxTimerDeliver m_single;
	//当前轮转刻度
	int m_cur_index = 0;
	//时间轮向量,每个坑中放一个multimap,multmap元素是圈数和定时器节点
	std::vector<std::multimap<int, WheelNode> > m_TimerWheel;
public:
	ZinxTimerDeliver();
	static ZinxTimerDeliver &GetInstance() {
		return m_single;
	}

	bool RegisterProcObject(TimerOutProc &_proc);
	void UnRegisterProcObject(TimerOutProc &_proc);

	// 通过 AZinxHandler 继承
	virtual IZinxMsg * InternelHandle(IZinxMsg & _oInput) override;

	virtual AZinxHandler * GetNextHandler(IZinxMsg & _oNextMsg) override;

};

bool ZinxTimerDeliver::RegisterProcObject( TimerOutProc & _proc)
{
    //计算圈数
	int last_count = _proc.GetTimerSec() / m_TimerWheel.size();

    //计算齿数
	int index = _proc.GetTimerSec() % m_TimerWheel.size();
	index += m_cur_index;
	index %= m_TimerWheel.size();

    //创建一个定时器节点存放圈数和定时器任务
	WheelNode tmp;
	tmp.LastCount = last_count;
	tmp.pProc = &_proc;

    //将定时器节点插入时间轮
	m_TimerWheel[index].insert(pair<int, WheelNode>(last_count, tmp));

	return true;
}

void ZinxTimerDeliver::UnRegisterProcObject(TimerOutProc & _proc)
{
    //去注册就是遍历查找和删除
	for (auto single_map:m_TimerWheel)
	{
		for (auto itr = single_map.begin(); itr != single_map.end(); itr++)
		{
			if (itr->second.pProc == &_proc)
			{
				single_map.erase(itr);
				return;
			}
		}
	}
}

//处理超时的核心逻辑
IZinxMsg * ZinxTimerDeliver::InternelHandle(IZinxMsg & _oInput)
{
	uint64_t counts;
	GET_REF2DATA(BytesMsg, oBytes, _oInput);

    //获取当前超时的次数,一般是1,
	oBytes.szData.copy((char *)&counts, sizeof(counts), 0);
	for (int i = 0; i < counts; i++)
	{
        //定义list存储超时的定时器节点,方便重新插入时间轮和后续回调
		list<WheelNode> wait_proc;
		for (auto itr = m_TimerWheel[m_cur_index].begin(); itr != m_TimerWheel[m_cur_index].end();)
		{
            //遍历当前齿轮内的所有节点,将圈数减一
			itr->second.LastCount--;
			if (itr->second.LastCount <= 0)
			{
				itr->second.LastCount = itr->first;
				wait_proc.push_back(itr->second);
                //删掉已经超时的定时器节点
				itr = m_TimerWheel[m_cur_index].erase(itr);
			}
			else
			{
				itr++;
			}
		}
		for (auto task : wait_proc)
		{
            //调用超时处理函数
			task.pProc->Proc();
            //将本次遍历超时的所有定时器节点重新添加到时间轮中
			RegisterProcObject(*(task.pProc));
		}
        //刻度加一
		m_cur_index++;
        //刻度超了则转回来
		m_cur_index %= m_TimerWheel.size();
	}


	return nullptr;
}
3.创建ZinxTimer
-
需要重写的函数最主要的是init和readfd
-
init函数中使用timerfd_create函数创建一个fd用于产生超时IO
-
Readfd函数中使用标准的read函数,消费每个超时IO。
-
本类只负责产生1s的超时事件,这样可以让定时器更灵活
-
产生1s的超时事件后,应该将该事件交给ZinxTimerDeliver处理
class ZinxTimer :public Ichannel
{
private:
	int m_fd = -1;
public:
	ZinxTimer();
	virtual ~ZinxTimer();

	// 通过 Ichannel 继承
	virtual bool Init() override;
	virtual bool ReadFd(std::string & _input) override;
	virtual bool WriteFd(std::string & _output) override;
	virtual void Fini() override;
	virtual int GetFd() override;
	virtual std::string GetChannelInfo() override;
	virtual AZinxHandler * GetInputNextStage(BytesMsg & _oInput) override;
};

//在init函数中创建fd
bool ZinxTimer::Init()
{
	bool bRet = false;
	int timerfd = -1;

    //选用CLOCK_MONOTONIC类型的时钟,不会受系统时间修改影响
	timerfd = timerfd_create(CLOCK_MONOTONIC, 0);
	if (0 <= timerfd)
	{
        //设置第一次超时时间和后续超时时间都是1秒
		struct itimerspec period = { {1,0}, {1,0} };
		if (0 == timerfd_settime(timerfd, 0, &period, NULL))
		{
			m_fd = timerfd;
			bRet = true;
		}
		else
		{
			close(timerfd);
		}
	}

	return bRet;
}

bool ZinxTimer::ReadFd(std::string & _input)
{
	bool bRet = false;
	uint64_t over_times = 0;
    //调用read读取超时次数(大部分情况是1),将该64位数直接拷贝到输出参数字符串中(后续使用实再拷贝出来)
	if (sizeof(over_times) == read(m_fd, &over_times, sizeof(over_times)))
	{
		_input.append((char *)&over_times, sizeof(over_times));
		bRet = true;
	}
	return bRet;
}
//返回ZinxTimerDeliver类的单例对象,表示超时事件由ZinxTimerDeliver处理
AZinxHandler * ZinxTimer::GetInputNextStage(BytesMsg & _oInput)
{
	return &ZinxTimerDeliver::GetInstance();
}
4.测试
-
创建SpeakHello类继承TimerOutProc,用来输出“hello world”
-
将SpeakHello对象注册到ZinxTimerDeliver中
-
创建ZinxTimer对象并添加到kernel
class SpeakHello :public TimerOutProc {
	// 通过 TimerOutProc 继承
	virtual void Proc() override
	{
		string hello = "hello world";
		ZinxKernel::Zinx_SendOut(hello, *poOut);
	}
	virtual int GetTimerSec() override
	{
		return 3;
	}
};
int main()
{
    SpeakHello speak;
    ZinxTimerDeliver::GetInstance().RegisterProcObject(speak);
	ZinxKernel::Zinx_Add_Channel(*(new ZinxTimer()));
}