Ubuntu软件开发环境搭建
Ubuntu软件开发环境搭建
- 安装VMware Tools
- 网络桥接
- 更新软件源
- 常用功能配置
- 时间同步
- 共享文件夹
- 双向复制粘贴
- 终端初始大小和字体设置
- 安装必要的工具
- 常用指令
安装VMware Tools
点击虚拟机->安装VMware Tools…
打开终端,cd到/media/用户名/VMware Tools/下,拷贝VMwareTools-10.3.23-16594550.tar.gz到用户目录下(在原始目录下无法解压,在VMware Tool目录下也无法解压):
解压:tar -zxvf VMwareTools-10.3.23-16594550.tar.gz,解压完成后,会出现一个名为“vmware-tools-distrib”的文件夹。
进入“vmware-tools-distrib”文件夹,运行“sudo ./vmware-install.pl”文件。
“Do you still want to proceed with this installation?[no]”此时输入yes,后面的全部选择默认即可。
安装完成后,如果遇到“Execution aborted.”错误,可以依次执行命令“rm -rf /etc/vmware-tools”“rm -rf /tmp/vm”和再次运行“./vmware-install.pl”来解决
完成这些步骤后,Ubuntu的界面应该会自动适配VMware的界面,使得操作更加流畅。
网络桥接
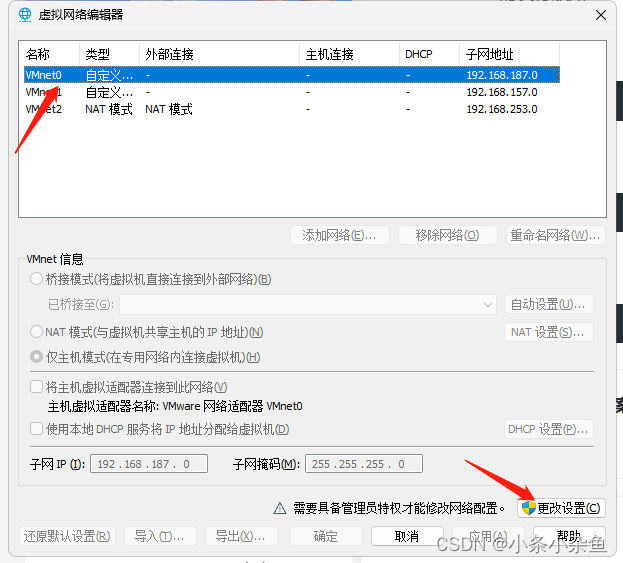
点击编辑->虚拟网络编辑器->更改设置

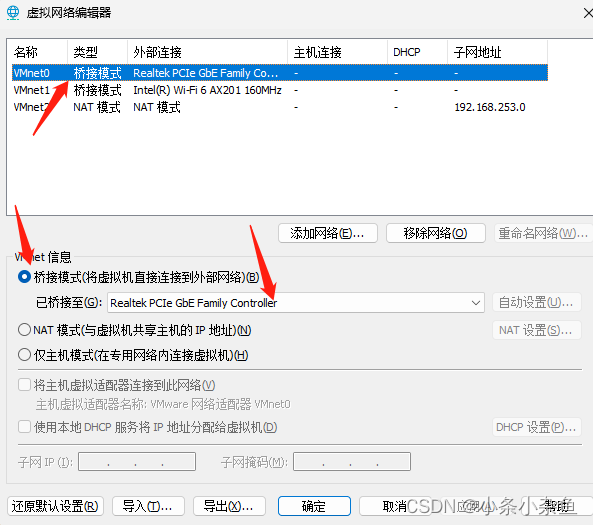
 点击虚拟机设置,配置网络:
 最后在ubuntu中设置IP即可。
更新软件源
Ubuntu自带的软件源速度慢,需要更新成国内的软件源:
在以下链接中选择对应Ubuntu版本的源即可。
阿里源:https://developer.aliyun.com/mirror/ubuntu?spm=a2c6h.13651102.0.0.3e221b116rmZ07
清华源:https://mirrors.tuna.tsinghua.edu.cn/help/ubuntu/
163:http://mirrors.163.com/.help/ubuntu.html
这里我选择阿里源(中国官方源),网址下滑可以找到各个ubuntu版本的源。
cp /etc/apt/sources.list /etc/apt/sources.list.bak
sudo vi /etc/apt/sources.list
deb https://mirrors.aliyun.com/ubuntu/ bionic main restricted universe multiverse
deb-src https://mirrors.aliyun.com/ubuntu/ bionic main restricted universe multiverse

deb https://mirrors.aliyun.com/ubuntu/ bionic-security main restricted universe multiverse
deb-src https://mirrors.aliyun.com/ubuntu/ bionic-security main restricted universe multiverse

deb https://mirrors.aliyun.com/ubuntu/ bionic-updates main restricted universe multiverse
deb-src https://mirrors.aliyun.com/ubuntu/ bionic-updates main restricted universe multiverse

# deb https://mirrors.aliyun.com/ubuntu/ bionic-proposed main restricted universe multiverse
# deb-src https://mirrors.aliyun.com/ubuntu/ bionic-proposed main restricted universe multiverse

deb https://mirrors.aliyun.com/ubuntu/ bionic-backports main restricted universe multiverse
deb-src https://mirrors.aliyun.com/ubuntu/ bionic-backports main restricted universe multiverse
apt-get update
apt-get upgrade
常用功能配置
时间同步

共享文件夹

双向复制粘贴
1 配置虚拟机客户机隔离;
 2 执行以下命令:
sudo apt-get autoremove open-vm-tools
sudo apt-get install open-vm-tools-desktop
然后重启虚拟机即可。
终端初始大小和字体设置
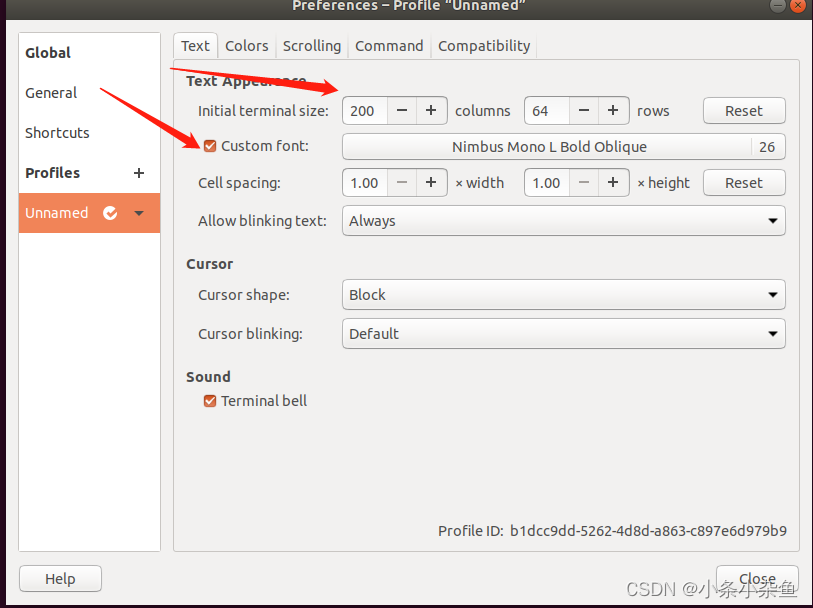
打开终端->Edit->Perfermance:

安装必要的工具
1 安装必要软件及库
sudo apt-get install make libc6-i386 lib32z1 lib32stdc++6 zlib1g-dev
libncurses5-dev ncurses-term libncursesw5-dev g++ u-boot-tools texinfo texlive gawk
libssl-dev openssl bc p7zip-full gperf bison flex diffutils git unzip zlib1g-dev liblzo2-dev uuid-dev pkg-config automake texlive net-tools vim meld cmake
sudo apt-get install build-essential texinfo libx11-dev libxpm-dev libjpeg-dev libpng-dev libgif-dev libtiff-dev libgtk2.0-dev libgtk-3-dev libncurses-dev libxpm-dev automake autoconf
2 创建/etc/ld.so.preload 文件,并执行 echo “” > /etc/ld.so.preload,以解决 64bit linux
server 上某些第三方库编译失败的问题。
3 设置pkg-config 工具搜索路径:
export PKG_CONFIG_PATH=“$PKG_CONFIG_PATH:/usr/lib/x86_64-linuxgnu/pkgconfig”
常用指令
Ctrl+Alt 释放鼠标
