【Stable Diffusion】windows 1050显卡,17年笔记本还能再战
文章目录
- 一、环境安装
- Git
- Python
- NVIDIA驱动
- CUDA
- 安装Visual Studio
- 安装CUDA
- stable-diffusion-webui
- 二、Stable Diffusion使用
- 参数
- 底模
- LORA
- 三、咒语
一、环境安装
Stable Diffusion
https://github.com/AUTOMATIC1111/stable-diffusion-webui
查看最新的流程(时间23.3.12)

模型
https://huggingface.co/models
https://civitai.com
Git
https://git-scm.com/
Python
https://www.python.org/downloads/windows/
安装3.10,勾Add Python to PAH,目录可以安装到D盘

安装完后输入python
Python 3.10.10 (tags/v3.10.10:aad5f6a, Feb  7 2023, 17:20:36) [MSC v.1929 64 bit (AMD64)] on win32
Type "help", "copyright", "credits" or "license" for more information.
换国内源,否则可能比较慢
C:\Users[name]目录下创建pip文件夹
pip文件夹里创建pip.txt,内容如下,最后改成pip.ini
[global]
index-url = http://mirrors.aliyun.com/pypi/simple/
[install]
trusted-host = mirrors.aliyun.com
NVIDIA驱动
nvidia驱动:https://www.nvidia.cn/Download/index.aspx?lang=cn
按着自己的显卡选

找到驱动版本和对应的cuda版本


CUDA
版本对应关系 https://docs.nvidia.com/cuda/cuda-toolkit-release-notes/index.html

各版本下载:https://developer.nvidia.cn/cuda-toolkit-archive
上面CUDA 12.0,找到对应的版本下载

Versioned Online Documentation - Installation Guide Windows 里有安装流程
安装Visual Studio
需要先安装vs,选的Visual Studio 2019 16.x
https://visualstudio.microsoft.com/zh-hans/vs/older-downloads/

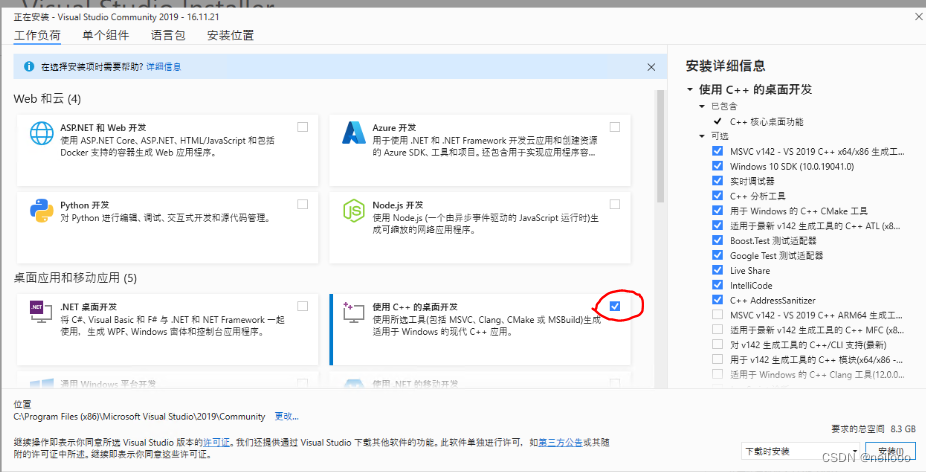
注意安装vs时选上c++组件

安装CUDA

CUDA下载后安装就可以
输入nvcc -V可以看到
nvcc: NVIDIA (R) Cuda compiler driver
Copyright (c) 2005-2022 NVIDIA Corporation
Built on Mon_Oct_24_19:40:05_Pacific_Daylight_Time_2022
Cuda compilation tools, release 12.0, V12.0.76
Build cuda_12.0.r12.0/compiler.31968024_0
stable-diffusion-webui
- 下载stable-diffusion-webui
git clone https://github.com/AUTOMATIC1111/stable-diffusion-webui.git
如果clone不了推荐去github上配置下ssh key,用下面的clone
git clone git@github.com:AUTOMATIC1111/stable-diffusion-webui.git - 显卡较差配置低显存,webui-user.bat修改如下:
set COMMANDLINE_ARGS=--xformers --medvram, 这个参数4G显存够用
--xformers能有效降低显存要求和提高速度
显存最低应该是--lowvram
参考:https://github.com/AUTOMATIC1111/stable-diffusion-webui/wiki/Optimizations - 下载一个模型
https://civitai.com, 找ChilloutMix下载,比较火的模型
放到目录stable-diffusion-webui\models\Stable-diffusion
后续添加的模型也是放到这里
这一步不做也没问题,后续会自动下载Stable Diffusion 1.5的模型,不需要SD 1.5的话可以这么做。 - 编辑根目录下launch.py文件
将https://github.com替换为https://ghproxy.com/https://github.com,即使用Ghproxy代理,加速国内Git。 - 执行webui-user.bat
(1) 根目录下生成venv,这个主要是python的环境,将目录下pyvenv.cfg文件里
include-system-site-packages = false改为include-system-site-packages = true
include-system-site-packages为true表明会使用系统中的python的site-packags。此外,重要的一点是搜索路径的先后顺序,当该选项为true时,会先搜索虚拟环境中安装的包,其次才会去系统site-packages中寻找。
(2)RuntimeError: Couldn't install gfpgan. 如果出现错误仔细找找是否少了python包,去手动安装,pip install cython
ERROR: Could not find a version that satisfies the requirement cython (from versions: none)
ERROR: No matching distribution found for cython
- 打开UI,安装成功后会有local url,浏览器打开

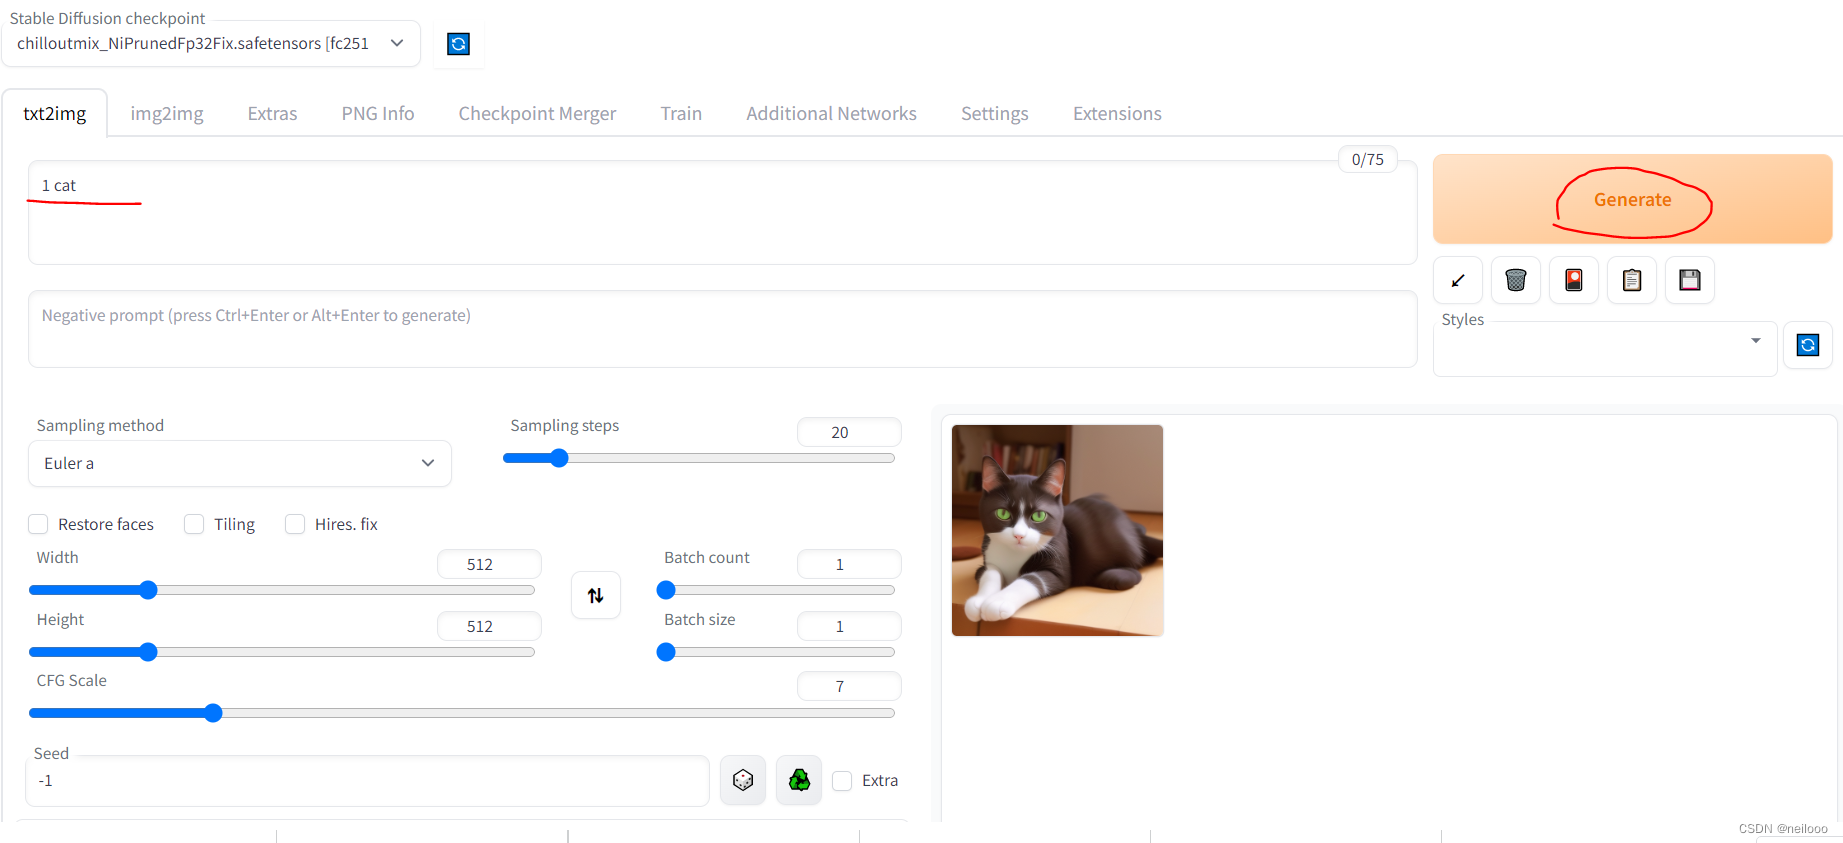
Prompt:1 cat,点Generate,能跑出来环境就OK了。

二、Stable Diffusion使用
参数
Prompt:正向词汇
Negative prompt: 反向词汇 (不期望出现的)
Sampling method:采样器,选不同的得到的效果会不同
Sampling steps:采样步数,通常20-40。
width/height:宽高,关系显存要求,高 > 宽容易出半身、全身图(设置宽高一样,有时full body/upper body会没作用,只有头部)
CFG scale:跟输入关键词的符合度,越大则AI发挥的程度越大,通常7不改。
Seed:不同seed出来的图不同。
Batch count:出N张图,出多图改这个
Batch size:并行出N张,显存要求应该是翻倍。
底模
底模决定了整体的风格和效果,如真人ChilloutMix、动漫MeinaMix。
放到stable-diffusion-webui\models\Stable-diffusion,UI左上角可以换底模

下载,civitai里过滤checkpoint就能过滤底模

LORA
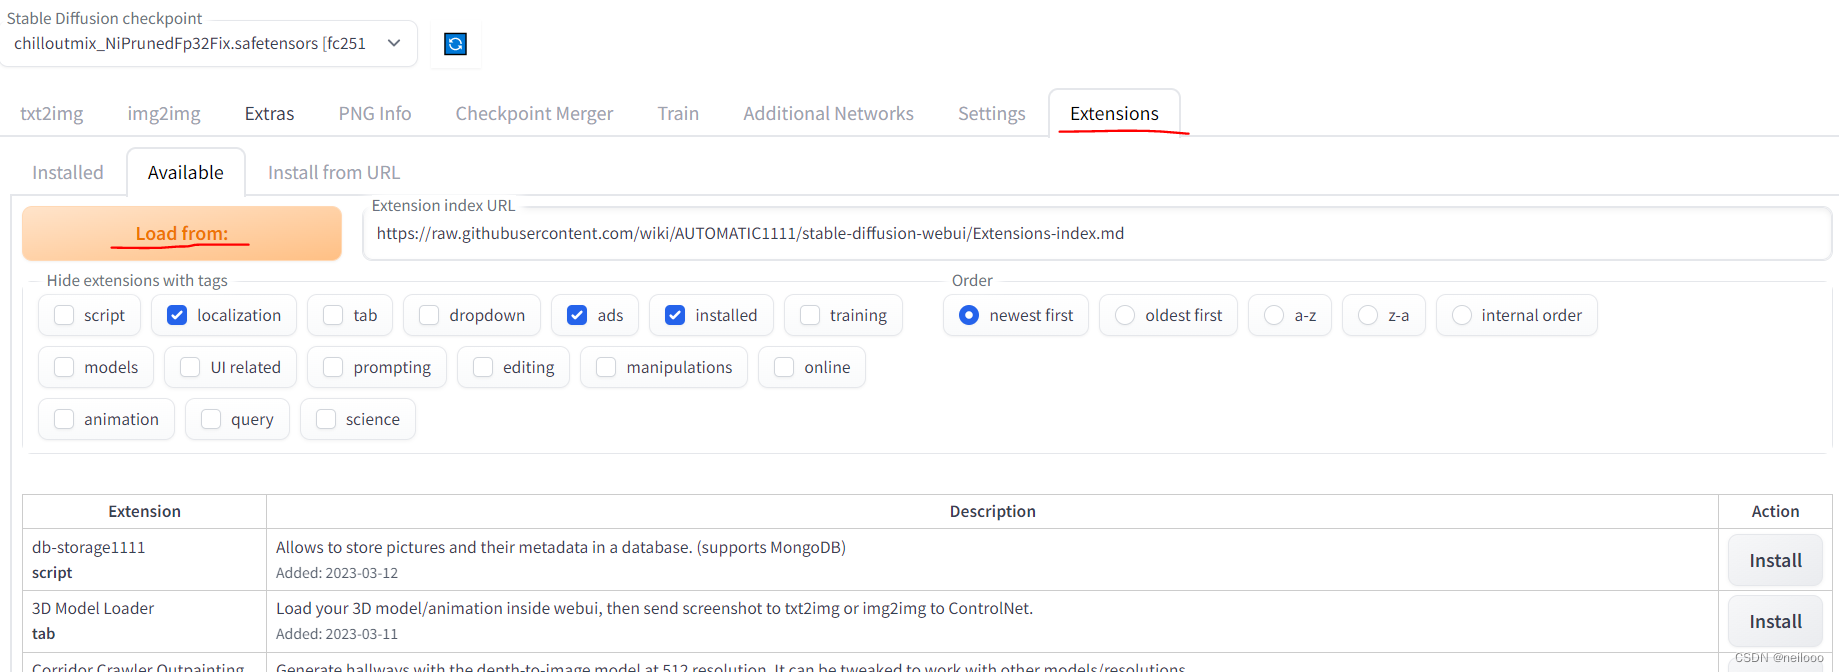
Extensions中点Load from,会显示插件,找到Kohya-ss Additional Networks,点install

Settings,点Reload UI- 回到
txt2img,看到多了Additional Networks,

- 下载lora模型
civitai里下载,放到stable-diffusion-webui\extensions\sd-webui-additional-networks\models\lora - 回到UI,点Refresh models,就可以看到,共可以加载5个lora模型,通过Weight调整权重。
三、咒语
(raw photo:1.2), (photorealistic:1.2), best quality, masterpiece, illustration, an extremely delicate and beautiful, extremely detailed ,unity ,8k wallpaper, Amazing, finely detail, masterpiece,best quality, official art, extremely detailed CG unity 8k wallpaper, absurdres, incredibly absurdres, huge filesize, ultra-detailed, beautiful detailed girl, extremely detailed eyes and face, beautiful detailed eyes,cinematic lighting, 1girl,cute, night, seafront ,(white short sleeve),white skirt,classic, pure eyes, soft lighting, high quality, film grain, elegant,cute,smile,upper body, grace, self-confident,Cyber style
Negative prompt: paintings, sketches, (worst quality:2), (low quality:2), (normal quality:2), lowres, normal quality, ((monochrome)), ((grayscale)), skin spots, acnes, skin blemishes, age spot, (outdoor:1.6), manboobs, backlight,(ugly:1.331), (duplicate:1.331), (morbid:1.21), (mutilated:1.21), (tranny:1.331), mutated hands, (poorly drawn hands:1.331), blurry, (bad anatomy:1.21), (bad proportions:1.331), extra limbs, (disfigured:1.331), (more than 2 nipples:1.331), (missing arms:1.331), (extra legs:1.331), (fused fingers:1.61051), (too many fingers:1.61051), (unclear eyes:1.331), bad hands, missing fingers, extra digit, (futa:1.1), bad body, NG_DeepNegative_V1_75T,pubic hair, glans, easynegative
Steps: 30, Sampler: DPM++ SDE Karras, CFG scale: 7, Seed: 2362839100, Size: 512x700, Model hash: fc2511737a, Model: chilloutmix_NiPrunedFp32Fix

