【RocketMQ】消息的拉取
RocketMQ消息的消费以组为单位,有两种消费模式:
广播模式:同一个消息队列可以分配给组内的每个消费者,每条消息可以被组内的消费者进行消费。

集群模式:同一个消费组下,一个消息队列同一时间只能分配给组内的一个消费者,也就是一条消息只能被组内的一个消费者进行消费。(一般情况下都使用的是集群模式)
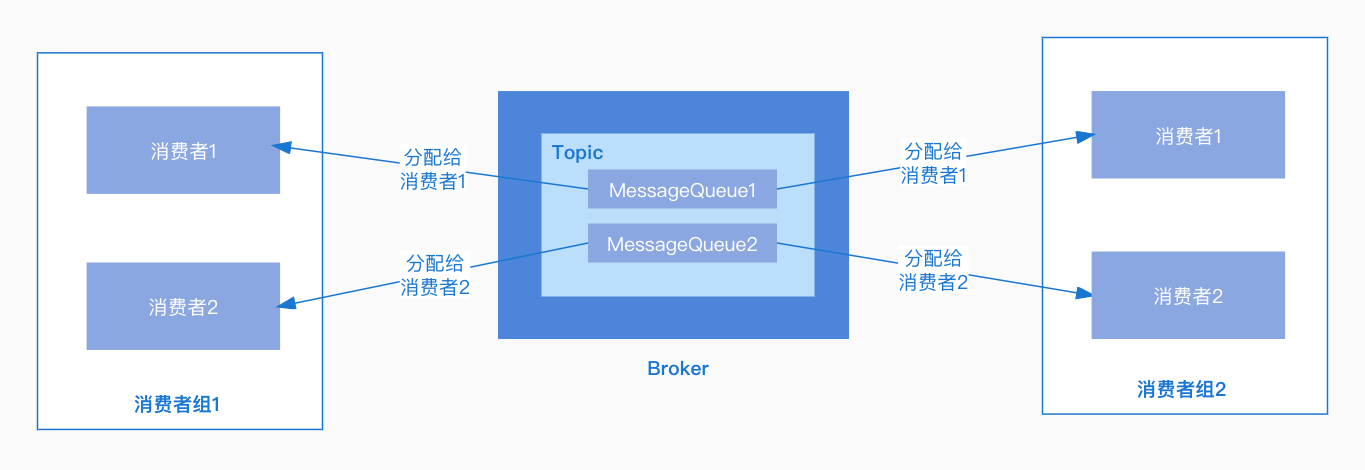
消息的获取也有两种模式:
拉模式:消费者主动发起拉取消息的请求,获取消息进行消费。
推模式:消息到达Broker后推送给消费者。RocketMQ对拉模式进行了包装去实现推模式,本质还是需要消费者去拉取,一个拉取任务完成后继续下一次拉取。
首先来看一个RocketMQ源码中基于推模式DefaultMQPushConsumer进行消费的例子,首先为消费者设置了消费者组名称,然后注册了消息监听器,并设置订阅的主题,最后调用start方法启动消费者,接下来就去看看DefaultMQPushConsumer如何进行消息消费的:
@RunWith(MockitoJUnitRunner.class)
public class DefaultMQPushConsumerTest {
    private String consumerGroup;
    private String topic = "FooBar";
    private String brokerName = "BrokerA";
    private MQClientInstance mQClientFactory;

    @Mock
    private MQClientAPIImpl mQClientAPIImpl;
    private static DefaultMQPushConsumer pushConsumer;

    @Before
    public void init() throws Exception {
        // ...
        // 消费者组
        consumerGroup = "FooBarGroup" + System.currentTimeMillis();
        // 实例化DefaultMQPushConsumer
        pushConsumer = new DefaultMQPushConsumer(consumerGroup);
        pushConsumer.setNamesrvAddr("127.0.0.1:9876");
        // 设置拉取间隔
        pushConsumer.setPullInterval(60 * 1000);
        // 注册消息监听器
        pushConsumer.registerMessageListener(new MessageListenerConcurrently() {
            @Override
            public ConsumeConcurrentlyStatus consumeMessage(List<MessageExt> msgs,
                ConsumeConcurrentlyContext context) {
                return null;
            }
        });
        // ...
        // 设置订阅的主题
        pushConsumer.subscribe(topic, "*");
        // 启动消费者
        pushConsumer.start();
    }
}
消费者的启动
DefaultMQPushConsumer实现了MQPushConsumer接口,它引用了默认的消息推送实现类DefaultMQPushConsumerImpl,在构造函数中可以看到对其进行了实例化,并在start方法中进行了启动:
public class DefaultMQPushConsumer extends ClientConfig implements MQPushConsumer {

    /**
     * 默认的消息推送实现类
     */
    protected final transient DefaultMQPushConsumerImpl defaultMQPushConsumerImpl;

    /**
     * 构造函数
     */
    public DefaultMQPushConsumer(final String namespace, final String consumerGroup, RPCHook rpcHook,
        AllocateMessageQueueStrategy allocateMessageQueueStrategy) {
        this.consumerGroup = consumerGroup;
        this.namespace = namespace;
        this.allocateMessageQueueStrategy = allocateMessageQueueStrategy;
        // 实例化DefaultMQPushConsumerImpl
        defaultMQPushConsumerImpl = new DefaultMQPushConsumerImpl(this, rpcHook);
    }
    /**
     * 启动
     */
    @Override
    public void start() throws MQClientException {
        setConsumerGroup(NamespaceUtil.wrapNamespace(this.getNamespace(), this.consumerGroup));
        // 启动消费者
        this.defaultMQPushConsumerImpl.start();
        if (null != traceDispatcher) {
            try {
                traceDispatcher.start(this.getNamesrvAddr(), this.getAccessChannel());
            } catch (MQClientException e) {
                log.warn("trace dispatcher start failed ", e);
            }
        }
    }
}
DefaultMQPushConsumerImpl的start方法中处理逻辑如下:
- 调用
copySubscription方法处理消息订阅,主要是将订阅信息包装成SubscriptionData对象,加入到负载均衡对象rebalanceImpl中 - 创建客户端实例对象
mQClientFactory,对应实现类为**MQClientInstance**,拉取服务线程、负载均衡线程都是通过MQClientInstance启动的 - 为负载均衡对象
RebalanceImpl设置消费组、消费模式、分配策略,RebalanceImpl是一个抽象类,在实例化时可以看到使用的是RebalancePushImpl类型的 - 创建消息拉取API对象
PullAPIWrapper,用于向Broker发送拉取消息的请求 - 根据消费模式,初始化消费进度存储对象
offsetStore- 集群模式:消息的消费进度保存在Broker中,使用
RemoteBrokerOffsetStore。 - 广播模式:消息的消费进度保存在消费者端,使用
LocalFileOffsetStore。
- 集群模式:消息的消费进度保存在Broker中,使用
- 调用
MQClientInstance的registerConsumer将消费者组的信息注册到MQClientInstance的consumerTable中 - 调用
mQClientFactory的start方法启动MQClientInstance - 调用
mQClientFactory的rebalanceImmediately方法进行负载均衡
public class DefaultMQPushConsumerImpl implements MQConsumerInner {
  // MQClientInstance
  private MQClientInstance mQClientFactory;
  // 负载均衡对象,具体使用的是RebalancePushImpl进行实例化
  private final RebalanceImpl rebalanceImpl = new RebalancePushImpl(this);
  // 消息拉取API对象PullAPIWrapper
  private PullAPIWrapper pullAPIWrapper;
  // 消费进度存储对象
  private OffsetStore offsetStore;

  public synchronized void start() throws MQClientException {
        // 判断状态
        switch (this.serviceState) {
            case CREATE_JUST: // 如果是创建未启动状态
                log.info("the consumer [{}] start beginning. messageModel={}, isUnitMode={}", this.defaultMQPushConsumer.getConsumerGroup(),
                    this.defaultMQPushConsumer.getMessageModel(), this.defaultMQPushConsumer.isUnitMode());
                // 先置为失败状态
                this.serviceState = ServiceState.START_FAILED;
                // 检查配置
                this.checkConfig();
                // 处理消息订阅
                this.copySubscription();
                // 如果是集群模式
                if (this.defaultMQPushConsumer.getMessageModel() == MessageModel.CLUSTERING) {
                    this.defaultMQPushConsumer.changeInstanceNameToPID();
                }
                // 创建MQClientInstance
                this.mQClientFactory = MQClientManager.getInstance().getOrCreateMQClientInstance(this.defaultMQPushConsumer, this.rpcHook);
                // 设置消费者组
                this.rebalanceImpl.setConsumerGroup(this.defaultMQPushConsumer.getConsumerGroup());
                // 设置消费模式
                this.rebalanceImpl.setMessageModel(this.defaultMQPushConsumer.getMessageModel());
                // 设置分配策略
                this.rebalanceImpl.setAllocateMessageQueueStrategy(this.defaultMQPushConsumer.getAllocateMessageQueueStrategy());
                // 设置MQClientInstance
                this.rebalanceImpl.setmQClientFactory(this.mQClientFactory);
                // 创建消息拉取API对象
                this.pullAPIWrapper = new PullAPIWrapper(
                    mQClientFactory,
                    this.defaultMQPushConsumer.getConsumerGroup(), isUnitMode());
                // 注册消息过滤钩子
                this.pullAPIWrapper.registerFilterMessageHook(filterMessageHookList);

                if (this.defaultMQPushConsumer.getOffsetStore() != null) {
                    this.offsetStore = this.defaultMQPushConsumer.getOffsetStore();
                } else {
                    // 消费模式判断
                    switch (this.defaultMQPushConsumer.getMessageModel()) {
                        case BROADCASTING: // 广播模式
                            // 消费进度存储在消费者本地,从本地获取
                            this.offsetStore = new LocalFileOffsetStore(this.mQClientFactory, this.defaultMQPushConsumer.getConsumerGroup());
                            break;
                        case CLUSTERING: // 集群模式
                            // 消费进度需要从Broker获取
                            this.offsetStore = new RemoteBrokerOffsetStore(this.mQClientFactory, this.defaultMQPushConsumer.getConsumerGroup());
                            break;
                        default:
                            break;
                    }
                    // 设置消费进度
                    this.defaultMQPushConsumer.setOffsetStore(this.offsetStore);
                }
                // 加载消费进度
                this.offsetStore.load();
                // 如果是顺序消费
                if (this.getMessageListenerInner() instanceof MessageListenerOrderly) {
                    this.consumeOrderly = true;
                    // 创建顺序消费service:ConsumeMessageOrderlyService
                    this.consumeMessageService =
                        new ConsumeMessageOrderlyService(this, (MessageListenerOrderly) this.getMessageListenerInner());
                } else if (this.getMessageListenerInner() instanceof MessageListenerConcurrently) {
                    this.consumeOrderly = false;
                    // 非顺序消费,使用ConsumeMessageConcurrentlyService
                    this.consumeMessageService =
                        new ConsumeMessageConcurrentlyService(this, (MessageListenerConcurrently) this.getMessageListenerInner());
                }
                // 启动消费服务
                this.consumeMessageService.start();
                // 将消费者信息注册到mQClientFactory中,key为消费者组名称,value为消费者也就是当前对象
                boolean registerOK = mQClientFactory.registerConsumer(this.defaultMQPushConsumer.getConsumerGroup(), this);
                if (!registerOK) {
                    this.serviceState = ServiceState.CREATE_JUST;
                    this.consumeMessageService.shutdown(defaultMQPushConsumer.getAwaitTerminationMillisWhenShutdown());
                    throw new MQClientException("The consumer group[" + this.defaultMQPushConsumer.getConsumerGroup()
                        + "] has been created before, specify another name please." + FAQUrl.suggestTodo(FAQUrl.GROUP_NAME_DUPLICATE_URL),
                        null);
                }
                // 启动MQClientInstance
                mQClientFactory.start();
                log.info("the consumer [{}] start OK.", this.defaultMQPushConsumer.getConsumerGroup());
                // 状态更改为运行中
                this.serviceState = ServiceState.RUNNING;
                break;
            case RUNNING:
            case START_FAILED:
            case SHUTDOWN_ALREADY:
                throw new MQClientException("The PushConsumer service state not OK, maybe started once, "
                    + this.serviceState
                    + FAQUrl.suggestTodo(FAQUrl.CLIENT_SERVICE_NOT_OK),
                    null);
            default:
                break;
        }

        this.updateTopicSubscribeInfoWhenSubscriptionChanged();
        this.mQClientFactory.checkClientInBroker();
        this.mQClientFactory.sendHeartbeatToAllBrokerWithLock();
        // 进行负载均衡
        this.mQClientFactory.rebalanceImmediately();
    }

}

public class MQClientInstance {
   // 注册消费者
   public synchronized boolean registerConsumer(final String group, final MQConsumerInner consumer) {
        if (null == group || null == consumer) {
            return false;
        }
        // 将消费者组信息添加到consumerTable中
        MQConsumerInner prev = this.consumerTable.putIfAbsent(group, consumer);
        if (prev != null) {
            log.warn("the consumer group[" + group + "] exist already.");
            return false;
        }

        return true;
    }
}
主题订阅处理
在copySubscription方法中,从defaultMQPushConsumer获取了设置的主题订阅信息,在前面的例子中可以看到向defaultMQPushConsumer中添加了订阅的主题信息,所以这里获取到了之前添加的主题信息MAP集合,其中KEY为主题,VALUE为表达式,然后遍历订阅信息集合,将订阅信息包装成SubscriptionData对象,并加入到负载均衡对象rebalanceImpl中:
public class DefaultMQPushConsumerImpl implements MQConsumerInner {
    // DefaultMQPushConsumer
    private final DefaultMQPushConsumer defaultMQPushConsumer;
    private void copySubscription() throws MQClientException {
        try {
            // 获取订阅信息,KEY为主题,VALUE为表达式
            Map<String, String> sub = this.defaultMQPushConsumer.getSubscription();
            if (sub != null) {
                for (final Map.Entry<String, String> entry : sub.entrySet()) {
                    // 获取主题
                    final String topic = entry.getKey();
                    // 获取表达式
                    final String subString = entry.getValue();
                    // 构建主题信息对象
                    SubscriptionData subscriptionData = FilterAPI.buildSubscriptionData(topic, subString);
                    // 加入到负载均衡实现类中
                    this.rebalanceImpl.getSubscriptionInner().put(topic, subscriptionData);
                }
            }

            if (null == this.messageListenerInner) {
                this.messageListenerInner = this.defaultMQPushConsumer.getMessageListener();
            }

            switch (this.defaultMQPushConsumer.getMessageModel()) {
                case BROADCASTING:
                    break;
                case CLUSTERING:
                    // 获取重试主题
                    final String retryTopic = MixAll.getRetryTopic(this.defaultMQPushConsumer.getConsumerGroup());
                    SubscriptionData subscriptionData = FilterAPI.buildSubscriptionData(retryTopic, SubscriptionData.SUB_ALL);
                    // 订阅重试主题
                    this.rebalanceImpl.getSubscriptionInner().put(retryTopic, subscriptionData);
                    break;
                default:
                    break;
            }
        } catch (Exception e) {
            throw new MQClientException("subscription exception", e);
        }
    }
}
创建MQClientInstance
MQClientInstance中有以下几个主要的成员变量:
pullMessageService:对应实现类为PullMessageService,是用来拉取消息的服务
rebalanceService:对应的实现类为RebalanceService,是用来进行负载均衡的服务
consumerTable:消费者组信息,key为消费者组名称,value为注册的消费者,上面可知在start方法中调用了registerConsumer方法进行了消费者注册
RebalanceService和PullMessageService都继承了ServiceThread,在MQClientInstance的start方法中,分别调用了pullMessageService和rebalanceService的start方法启动拉取服务线程和负载均衡线程:
public class MQClientInstance {
    // 拉取消息Service
    private final PullMessageService pullMessageService;
    // 负载均衡service
    private final RebalanceService rebalanceService
    // 消费者组信息,key为消费者组名称,value为注册的消费者
    private final ConcurrentMap<String, MQConsumerInner> consumerTable = new ConcurrentHashMap<String, MQConsumerInner>();

    public MQClientInstance(ClientConfig clientConfig, int instanceIndex, String clientId, RPCHook rpcHook) {
        // ...
        // 创建MQClientAPIImpl
        this.mQClientAPIImpl = new MQClientAPIImpl(this.nettyClientConfig, this.clientRemotingProcessor, rpcHook, clientConfig);
        // ...
        this.mQAdminImpl = new MQAdminImpl(this);
        // 创建拉取消息service
        this.pullMessageService = new PullMessageService(this);
        // 创建负载均衡service,并在构造函数中传入了当前对象
        this.rebalanceService = new RebalanceService(this);
        this.defaultMQProducer = new DefaultMQProducer(MixAll.CLIENT_INNER_PRODUCER_GROUP);
        this.defaultMQProducer.resetClientConfig(clientConfig);
        // ...
    }

    // 启动
    public void start() throws MQClientException {
        synchronized (this) {
            switch (this.serviceState) {
                case CREATE_JUST:
                    // ...
                    this.startScheduledTask();
                    // 启动拉取消息服务
                    this.pullMessageService.start();
                    // 启动负载均衡服务
                    this.rebalanceService.start();
                    // ...
                    break;
                case START_FAILED:
                    throw new MQClientException("The Factory object[" + this.getClientId() + "] has been created before, and failed.", null);
                default:
                    break;
            }
        }
    }
}
消息拉取服务启动
PullMessageService继承了ServiceThread,并且使用了阻塞队列pullRequestQueue存储消息拉取请求,PullMessageService被启动后,在run方法中等待pullRequestQueue中拉取请求的到来,然后调用pullMessage方法拉取消息, 在pullMessage中又是调用DefaultMQPushConsumerImpl 的pullMessage进行消息拉取的:
public class PullMessageService extends ServiceThread {
    // 拉取请求阻塞队列
    private final LinkedBlockingQueue<PullRequest> pullRequestQueue = new LinkedBlockingQueue<PullRequest>();

    @Override
    public void run() {
        log.info(this.getServiceName() + " service started");
        while (!this.isStopped()) {
            try {
                // 拉取消息
                PullRequest pullRequest = this.pullRequestQueue.take();
                this.pullMessage(pullRequest);
            } catch (InterruptedException ignored) {
            } catch (Exception e) {
                log.error("Pull Message Service Run Method exception", e);
            }
        }
        log.info(this.getServiceName() + " service end");
    }

    // 拉取消息
    private void pullMessage(final PullRequest pullRequest) {
        final MQConsumerInner consumer = this.mQClientFactory.selectConsumer(pullRequest.getConsumerGroup());
        if (consumer != null) {
            // 转换为DefaultMQPushConsumerImpl
            DefaultMQPushConsumerImpl impl = (DefaultMQPushConsumerImpl) consumer;
            // 调用pullMessage拉取消息
            impl.pullMessage(pullRequest);
        } else {
            log.warn("No matched consumer for the PullRequest {}, drop it", pullRequest);
        }
    }
}
这里可能会有一个疑问,既然PullMessageService在等待拉取请求的到来,那么什么时候会往pullRequestQueue中添加拉取消息的请求?
可以看到在PullMessageService的executePullRequestImmediately方法中,将拉取请求添加到了阻塞队列pullRequestQueue中:
public class PullMessageService extends ServiceThread {
    // 拉取请求阻塞队列
    private final LinkedBlockingQueue<PullRequest> pullRequestQueue = new LinkedBlockingQueue<PullRequest>();

  public void executePullRequestImmediately(final PullRequest pullRequest) {
        try {
            // 向队列中添加拉取消息的请求信息
            this.pullRequestQueue.put(pullRequest);
        } catch (InterruptedException e) {
            log.error("executePullRequestImmediately pullRequestQueue.put", e);
        }
    }
}
那么接下来只需看看哪里调用了PullMessageService的executePullRequestImmediately方法就可以找到在何时向队列中添加拉取请求的:
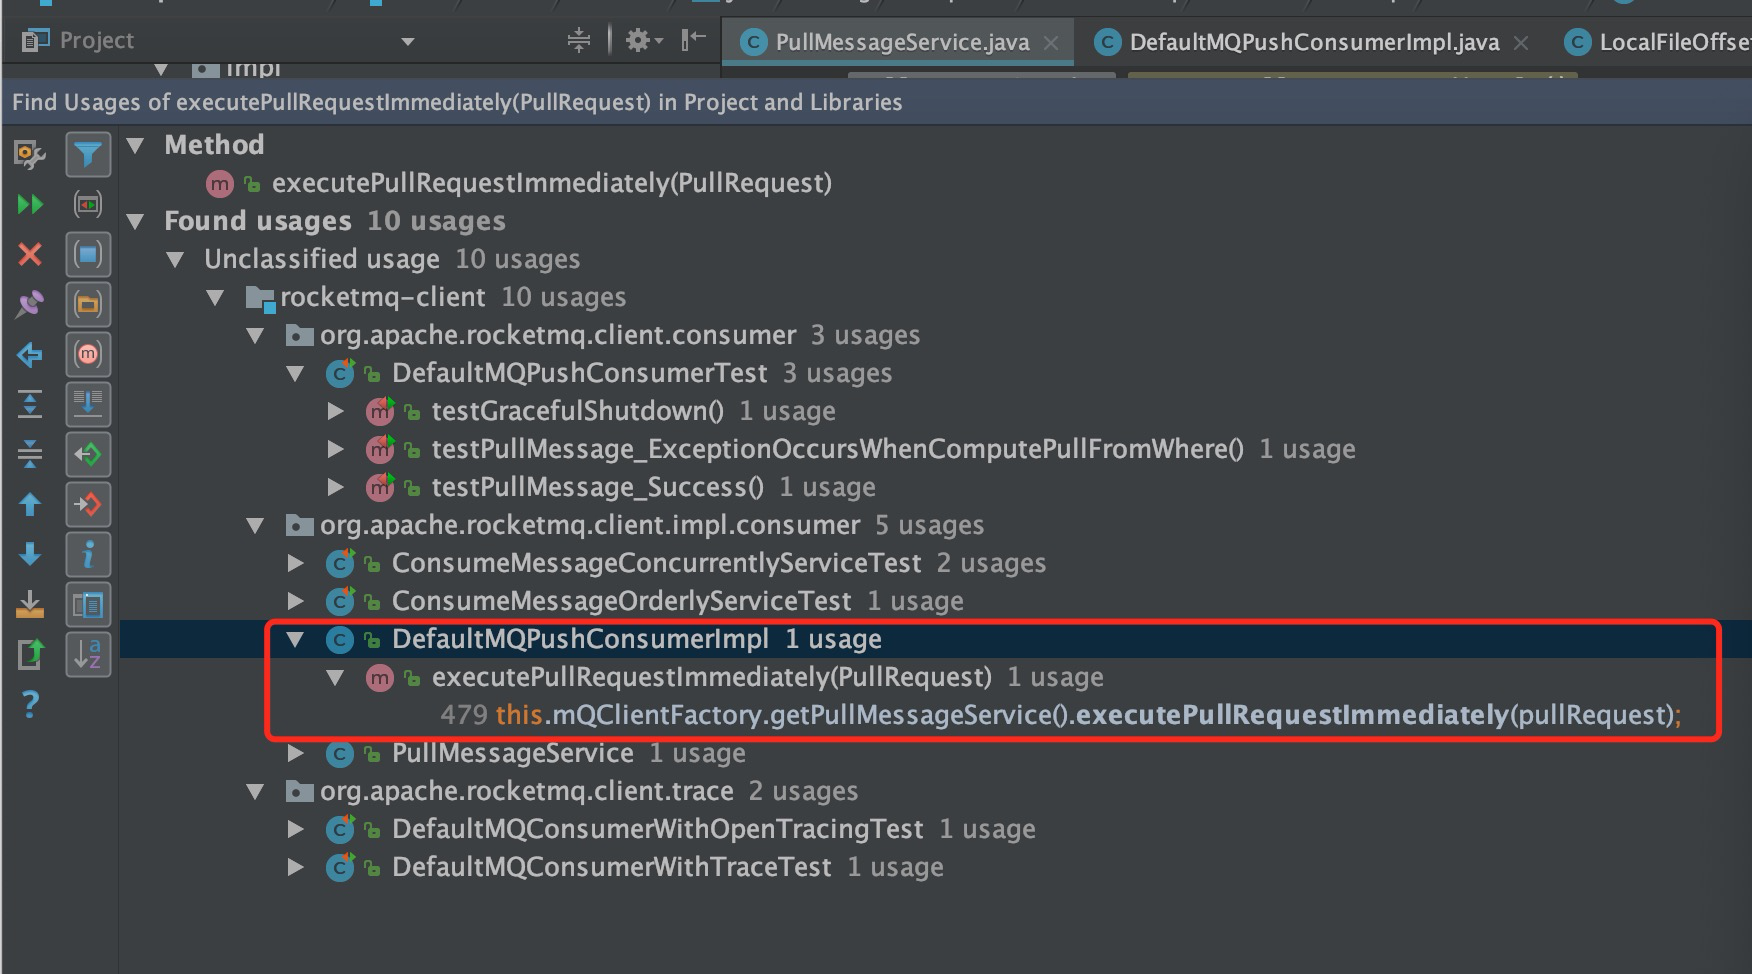
可以看到DefaultMQPushConsumerImpl的executePullRequestImmediately方法中调用了PullMessageService的executePullRequestImmediately方法:
  public void executePullRequestImmediately(final PullRequest pullRequest) {
     // 调用PullMessageService的executePullRequestImmediately方法
    this.mQClientFactory.getPullMessageService().executePullRequestImmediately(pullRequest);
    }
接下来再看看哪里调用了DefaultMQPushConsumerImpl的executePullRequestImmediately:
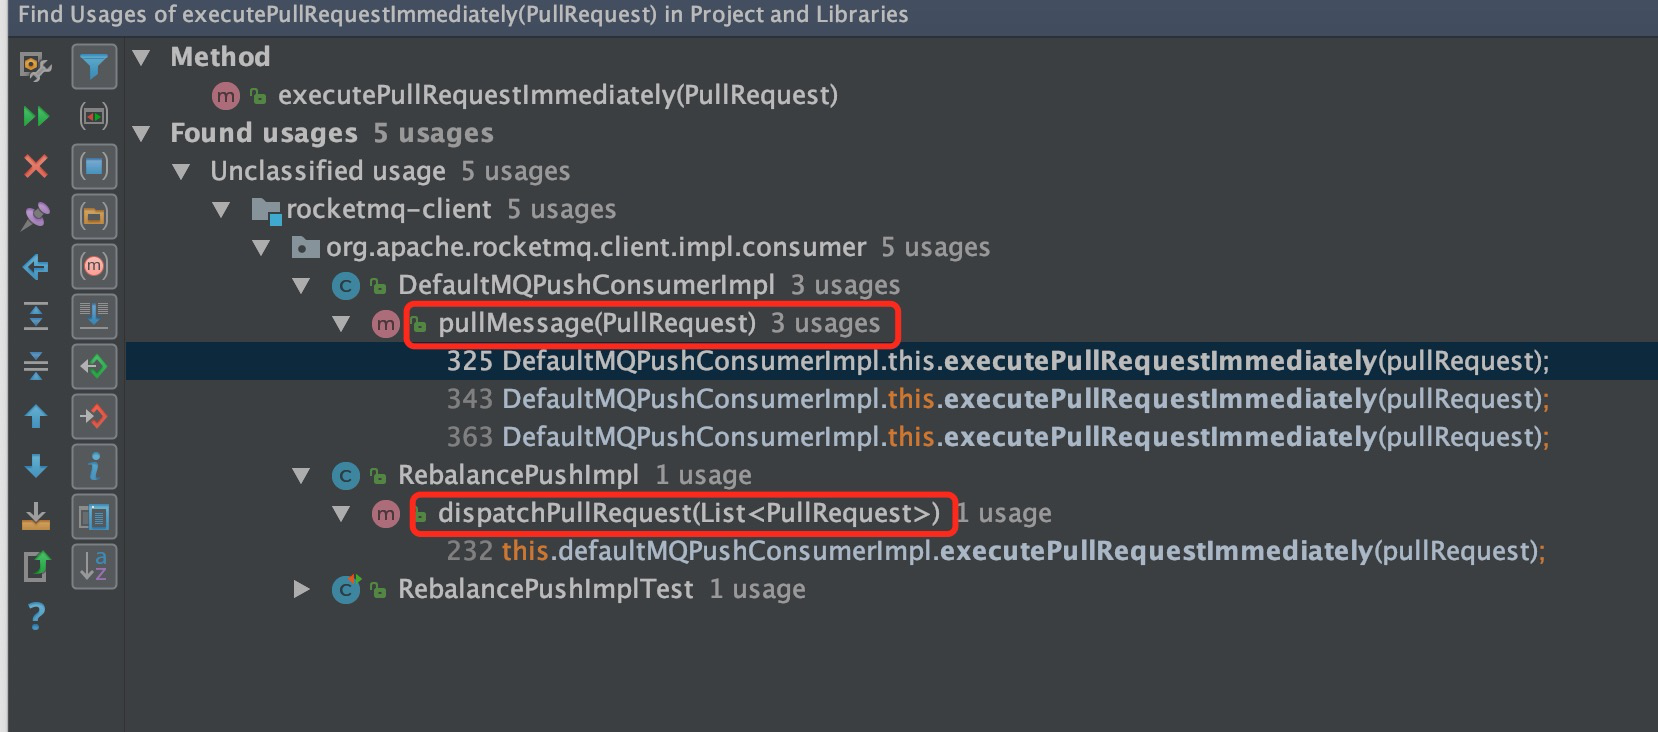
发现有两处进行了调用:
DefaultMQPushConsumerImpl的pullMessage方法RebalancePushImpl的dispatchPullRequest方法
前面可知PullMessageService处理拉取请求的时候就是调用的DefaultMQPushConsumerImpl的pullMessage方法进行处理的,所以如果是首次添加拉取请求,一定不是从这个入口添加的,那么首次大概就是从RebalancePushImpl这个地方添加的,接下来就去看看RebalancePushImpl如何添加拉取请求的。
负载均衡服务启动
MQClientInstance的start方法中,启动了负责均衡服务的线程,在RebalanceService的run方法中,调用了waitForRunning方法进行阻塞等待,如果负责均衡服务被唤醒,将会调用MQClientInstance的doRebalance进行负载均衡:
public class RebalanceService extends ServiceThread {
    private static long waitInterval =
        Long.parseLong(System.getProperty(
            "rocketmq.client.rebalance.waitInterval", "20000"));
    private final InternalLogger log = ClientLogger.getLog();
    private final MQClientInstance mqClientFactory; // 引用了MQClientInstance

    // 构造函数
    public RebalanceService(MQClientInstance mqClientFactory) {
        // 设置MQClientInstance
        this.mqClientFactory = mqClientFactory;
    }

    @Override
    public void run() {
        log.info(this.getServiceName() + " service started");
        while (!this.isStopped()) {
            // 等待运行
            this.waitForRunning(waitInterval);
            // 进行负载均衡
            this.mqClientFactory.doRebalance();
        }
        log.info(this.getServiceName() + " service end");
    }
}
负载均衡服务的唤醒
前面可知DefaultMQPushConsumerImpl在启动的时候调用了MQClientInstance的rebalanceImmediately方法,在rebalanceImmediately方法中可以看到,调用了rebalanceService的wakeup方法唤醒负载均衡线程,(关于wakeup方法的实现前面在讲解消息发送时已经分析过这里不再赘述):
public class DefaultMQPushConsumerImpl implements MQConsumerInner {
    public synchronized void start() throws MQClientException {
        // ...
        // 唤醒负载均衡服务,也就是调用MQClientInstance的rebalanceImmediately方法
        this.mQClientFactory.rebalanceImmediately();
    }
}

public class MQClientInstance {
    public void rebalanceImmediately() {
        // 唤醒负载均衡服务
        this.rebalanceService.wakeup();
    }
}
负载均衡
负责均衡服务被唤醒后,会调用MQClientInstance的doRebalance进行负载均衡,处理逻辑如下:
- 从consumerTable中获取注册的消费者组信息,前面可知consumerTable中存放了注册的消费者信息,Key为组名称,value为消费者
- 对consumerTable进行遍历,调用消费者的
doRebalance方法对每一个消费者进行负载均衡,前面可知消费者是DefaultMQPushConsumerImpl类型的
public class MQClientInstance {
    public void doRebalance() {
        // 遍历注册的消费者
        for (Map.Entry<String, MQConsumerInner> entry : this.consumerTable.entrySet()) {
            MQConsumerInner impl = entry.getValue();
            if (impl != null) {
                try {
                    // 负载均衡,前面可知消费者是DefaultMQPushConsumerImpl类型的
                    impl.doRebalance();
                } catch (Throwable e) {
                    log.error("doRebalance exception", e);
                }
            }
        }
    }
}
接下来进入到DefaultMQPushConsumerImpl的doRebalance,可以看到它又调用了rebalanceImpl的doRebalance进行负载均衡:
public class DefaultMQPushConsumerImpl implements MQConsumerInner {
  @Override
    public void doRebalance() {
        if (!this.pause) {
            // 这里又调用了rebalanceImpl的doRebalance进行负载均衡
            this.rebalanceImpl.doRebalance(this.isConsumeOrderly());
        }
    }
}
RebalanceImpl
RebalanceImpl的doRebalance处理逻辑如下:
- 获取订阅的主题信息集合,在订阅处理章节中,可以看到将订阅的主题信息封装成了SubscriptionData并加入到了RebalanceImpl中
- 对获取到的订阅主题信息集合进行遍历,调用
rebalanceByTopic对每一个主题进行负载均衡
public abstract class RebalanceImpl {
    public void doRebalance(final boolean isOrder) {
        // 获取订阅的主题信息
        Map<String, SubscriptionData> subTable = this.getSubscriptionInner();
        if (subTable != null) {
            // 遍历所有订阅的主题
            for (final Map.Entry<String, SubscriptionData> entry : subTable.entrySet()) {
                final String topic = entry.getKey();
                try {
                    // 根据主题进行负载均衡
                    this.rebalanceByTopic(topic, isOrder);
                } catch (Throwable e) {
                    if (!topic.startsWith(MixAll.RETRY_GROUP_TOPIC_PREFIX)) {
                        log.warn("rebalanceByTopic Exception", e);
                    }
                }
            }
        }
        this.truncateMessageQueueNotMyTopic();
    }
}
根据主题进行负载均衡
rebalanceByTopic方法中根据消费模式进行了判断然后对主题进行负载均衡,这里我们关注集群模式下的负载均衡:
-
从
topicSubscribeInfoTable中根据主题获取对应的消息队列集合 -
根据主题信息和消费者组名称,获取所有订阅了该主题的消费者ID集合
-
如果主题对应的消息队列集合和消费者ID都不为空,对消息队列集合和消费ID集合进行排序
-
获取分配策略,根据分配策略,为当前的消费者分配对应的消费队列,RocketMQ默认提供了以下几种分配策略:
-
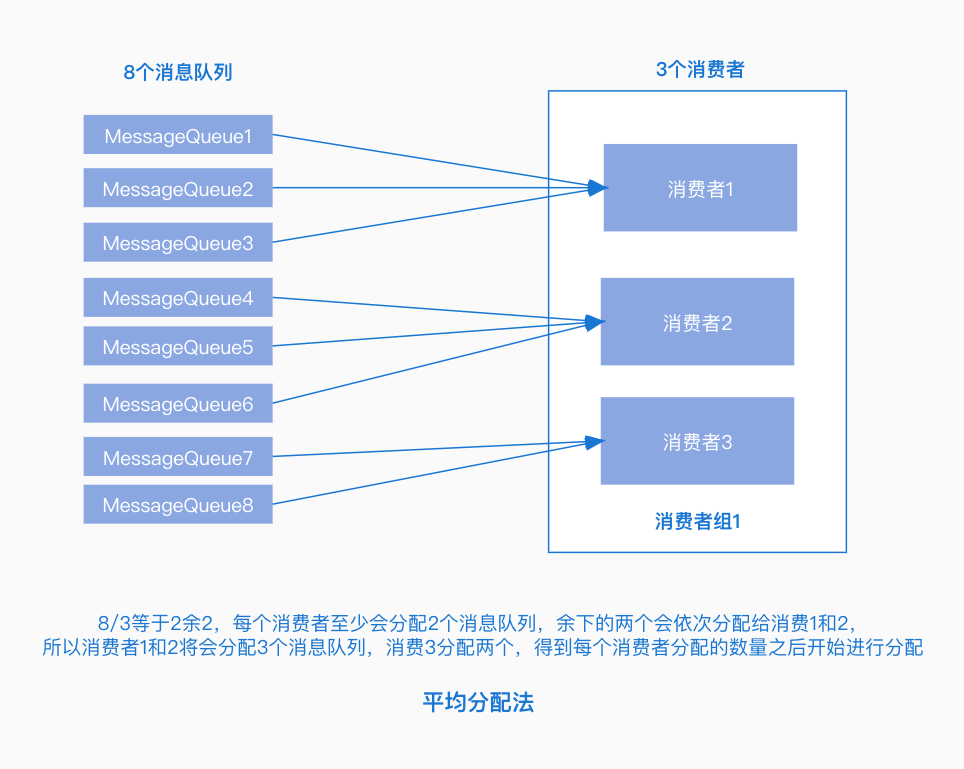
AllocateMessageQueueAveragely:平均分配策略,根据消息队列的数量和消费者的个数计算每个消费者分配的队列个数。
-
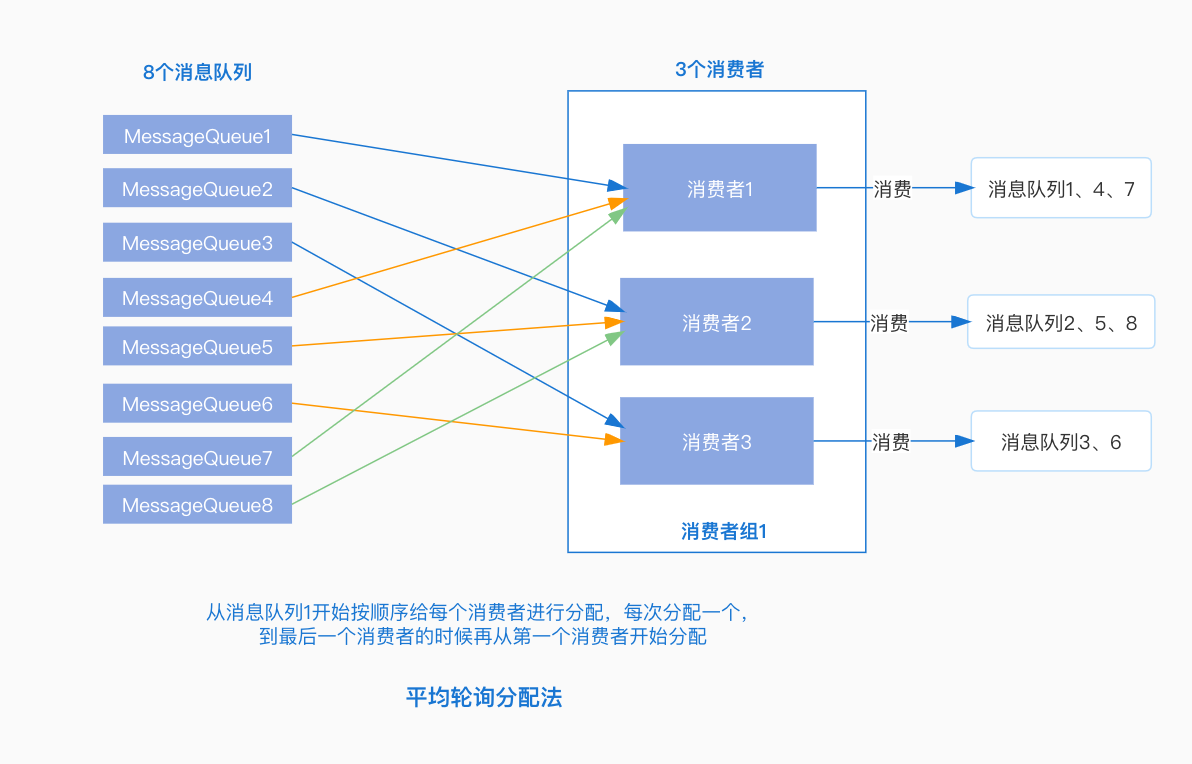
AllocateMessageQueueAveragelyByCircle:平均轮询分配策略,将消息队列逐个分发给每个消费者。
-
AllocateMessageQueueConsistentHash:根据一致性 hash进行分配。
-
llocateMessageQueueByConfig:根据配置,为每一个消费者配置固定的消息队列 。
-
AllocateMessageQueueByMachineRoom:分配指定机房下的消息队列给消费者。
-
AllocateMachineRoomNearby:优先分配给同机房的消费者。
-
-
根据最新分配的消息队列,调用
updateProcessQueueTableInRebalance更新当前消费者消费的队列信息
public abstract class RebalanceImpl {

    // 根据主题进行负载均衡
    private void rebalanceByTopic(final String topic, final boolean isOrder) {
        switch (messageModel) {
            case BROADCASTING: { // 广播模式
                Set<MessageQueue> mqSet = this.topicSubscribeInfoTable.get(topic);
                // ...
                break;
            }
            case CLUSTERING: { // 集群模式
                // 根据主题获取订阅的消息队列
                Set<MessageQueue> mqSet = this.topicSubscribeInfoTable.get(topic);
                // 获取所有订阅了该主题的消费者id
                List<String> cidAll = this.mQClientFactory.findConsumerIdList(topic, consumerGroup);
                // ...
                if (mqSet != null && cidAll != null) { // 如果都不为空
                    List<MessageQueue> mqAll = new ArrayList<MessageQueue>();
                    mqAll.addAll(mqSet);
                    // 对消息队列排序
                    Collections.sort(mqAll);
                    // 对消费者排序
                    Collections.sort(cidAll);
                    // 获取分配策略
                    AllocateMessageQueueStrategy strategy = this.allocateMessageQueueStrategy;
                    List<MessageQueue> allocateResult = null;
                    try {
                        // 根据分配策略,为当前的消费者分配消费队列
                        allocateResult = strategy.allocate(
                            this.consumerGroup,
                            this.mQClientFactory.getClientId(),
                            mqAll,
                            cidAll);
                    } catch (Throwable e) {
                        log.error("AllocateMessageQueueStrategy.allocate Exception. allocateMessageQueueStrategyName={}", strategy.getName(),
                            e);
                        return;
                    }
                    // 分配给当前消费的消费队列
                    Set<MessageQueue> allocateResultSet = new HashSet<MessageQueue>();
                    if (allocateResult != null) {
                        // 将分配结果加入到结果集合中
                        allocateResultSet.addAll(allocateResult);
                    }
                    // 根据分配信息更新处理队列
                    boolean changed = this.updateProcessQueueTableInRebalance(topic, allocateResultSet, isOrder);
                    // ...
                }
                break;
            }
            default:
                break;
        }
    }
}
更新处理队列
updateProcessQueueTableInRebalance方法同样在RebalanceImpl中,RebalanceImpl中使用了一个ConcurrentMap类型的处理队列表存储消息队列及对应的队列处理信息,updateProcessQueueTableInRebalance方法的入参中topic表示当前要进行负载均衡的主题,mqSet中记录了重新分配给当前消费者的消息队列,主要处理逻辑如下:
- 获取处理队列表
processQueueTable进行遍历,处理每一个消息队列,如果队列表为空直接进入第2步:- 判断消息队列所属的主题是否与方法中指定的主题一致,如果不一致继续遍历下一个消息队列
- 如果主题一致,判断mqSet中是否包含当前正在遍历的队列,如果不包含,说明此队列已经不再分配给当前的消费者进行消费,需要将消息队列置为dropped,表示删除
- 创建消息拉取请求集合pullRequestList,并遍历本次分配的消息队列集合,如果某个消息队列不在
processQueueTable中,需要进行如下处理:- 计算消息拉取偏移量,如果消息拉取偏移量大于0,创建ProcessQueue,并放入处理队列表中
processQueueTable - 构建
PullRequest,设置消息的拉取信息,并加入到拉取消息请求集合pullRequestList中
- 计算消息拉取偏移量,如果消息拉取偏移量大于0,创建ProcessQueue,并放入处理队列表中
- 调用dispatchPullRequest处理拉取请求集合中的数据
可以看到,经过这一步,如果分配给当前消费者的消费队列不在processQueueTable中,就会构建拉取请求PullRequest,然后调用dispatchPullRequest处理消息拉取请求。
public abstract class RebalanceImpl {
    // 处理队列表,KEY为消息队列,VALUE为对应的处理信息
    protected final ConcurrentMap<MessageQueue, ProcessQueue> processQueueTable = new ConcurrentHashMap<MessageQueue, ProcessQueue>(64);
    // 负载均衡,topic表示当前要进行负载均衡的主题,mqSet中记录了重新分配给当前消费者的消息队列
    private boolean updateProcessQueueTableInRebalance(final String topic, final Set<MessageQueue> mqSet,
        final boolean isOrder) {
        boolean changed = false;
        // 处理队列表
        Iterator<Entry<MessageQueue, ProcessQueue>> it = this.processQueueTable.entrySet().iterator();
        while (it.hasNext()) {
            Entry<MessageQueue, ProcessQueue> next = it.next();
            // 获取消息队列
            MessageQueue mq = next.getKey();
            // 获取处理队列
            ProcessQueue pq = next.getValue();
            // 主题是否一致
            if (mq.getTopic().equals(topic)) {
                // 如果队列集合中不包含当前的队列
                if (!mqSet.contains(mq)) {
                    // 设置为dropped
                    pq.setDropped(true);
                    if (this.removeUnnecessaryMessageQueue(mq, pq)) {
                        it.remove();
                        changed = true;
                        log.info("doRebalance, {}, remove unnecessary mq, {}", consumerGroup, mq);
                    }
                } else if (pq.isPullExpired()) { // 是否过期
                    switch (this.consumeType()) {
                        case CONSUME_ACTIVELY:
                            break;
                        case CONSUME_PASSIVELY:
                            pq.setDropped(true); // 设置为删除
                            // ...
                            break;
                        default:
                            break;
                    }
                }
            }
        }
        // 创建拉取请求集合
        List<PullRequest> pullRequestList = new ArrayList<PullRequest>();
        // 遍历本次分配的消息队列集合
        for (MessageQueue mq : mqSet) {
            // 如果之前不在processQueueTable中
            if (!this.processQueueTable.containsKey(mq)) {
                // ...
                // 创建ProcessQueue
                ProcessQueue pq = new ProcessQueue();
                long nextOffset = -1L;
                try {
                    // 计算消息拉取偏移量
                    nextOffset = this.computePullFromWhereWithException(mq);
                } catch (Exception e) {
                    log.info("doRebalance, {}, compute offset failed, {}", consumerGroup, mq);
                    continue;
                }
                // 如果偏移量大于等于0
                if (nextOffset >= 0) {
                    // 放入处理队列表中
                    ProcessQueue pre = this.processQueueTable.putIfAbsent(mq, pq);
                    // 如果之前已经存在,不需要进行处理
                    if (pre != null) {
                        log.info("doRebalance, {}, mq already exists, {}", consumerGroup, mq);
                    } else {
                        // 如果之前不存在,构建PullRequest,之后会加入到阻塞队列中,进行消息拉取
                        log.info("doRebalance, {}, add a new mq, {}", consumerGroup, mq);
                        PullRequest pullRequest = new PullRequest();
                        pullRequest.setConsumerGroup(consumerGroup);// 设置消费组
                        pullRequest.setNextOffset(nextOffset);// 设置拉取偏移量
                        pullRequest.setMessageQueue(mq);// 设置消息队列
                        pullRequest.setProcessQueue(pq);// 设置处理队列
                        pullRequestList.add(pullRequest);// 加入到拉取消息请求集合
                        changed = true;
                    }
                } else {
                    log.warn("doRebalance, {}, add new mq failed, {}", consumerGroup, mq);
                }
            }
        }
        // 添加消息拉取请求
        this.dispatchPullRequest(pullRequestList);
        return changed;
    }
}
添加拉取请求
在dispatchPullRequest方法中可以看到,对pullRequestList进行了遍历,然后将每一个拉取请求调用defaultMQPushConsumerImpl的executePullRequestImmediately方法添加到了PullMessageService的阻塞队列中等待进行消息拉取:
public class RebalancePushImpl extends RebalanceImpl {
    @Override
    public void dispatchPullRequest(List<PullRequest> pullRequestList) {
        for (PullRequest pullRequest : pullRequestList) {
            // 加入到阻塞队列中
            this.defaultMQPushConsumerImpl.executePullRequestImmediately(pullRequest);
            log.info("doRebalance, {}, add a new pull request {}", consumerGroup, pullRequest);
        }
    }
}
拉取消息
上面可知,如果阻塞队列中添加了拉取消息的请求,接下来会调用DefaultMQPushConsumerImpl的pullMessage方法进行消息拉取,处理逻辑如下:
- 从拉取请求中获取处理队列
processQueue,判断是否置为Dropped删除状态,如果处于删除状态不进行处理 - 从处理队列中获取消息的数量和大小,判断是否超过限制,如果超过限制延迟50毫秒后重新加入到拉取请求队列中进行处理
- 判断是否是顺序消费,这里先不讨论顺序消费,如果是非顺序消费,判断
processQueue中队列最大偏移量和最小偏移量的间距是否超过ConsumeConcurrentlyMaxSpan的值,如果超过需要进行流量控制,延迟50毫秒后重新加入队列中进行处理 - 获取拉取主题的订阅信息,如果为空,延迟3000毫秒后重新进行拉取
- 创建消息拉取后的回调函数PullCallback
- 构建消息拉取系统标记
- 通过
PullAPIWrapper的pullKernelImpl方法向Broker发送拉取消息请求
public class DefaultMQPushConsumerImpl implements MQConsumerInner {
    /**
     * 拉取延迟毫秒数
     */
   private static final long PULL_TIME_DELAY_MILLS_WHEN_FLOW_CONTROL = 50;

    /**
     * 出现异常后的延迟处理毫秒数
     */
   private long pullTimeDelayMillsWhenException = 3000;

   public void pullMessage(final PullRequest pullRequest) {
        // 从请求中获取处理队列
        final ProcessQueue processQueue = pullRequest.getProcessQueue();
        // 如果被置为Dropped,不进行处理
        if (processQueue.isDropped()) {
            log.info("the pull request[{}] is dropped.", pullRequest.toString());
            return;
        }
        // 设置拉取时间
        pullRequest.getProcessQueue().setLastPullTimestamp(System.currentTimeMillis());
        // ...
        // 获取消息数量
        long cachedMessageCount = processQueue.getMsgCount().get();
        // 获取消息大小
        long cachedMessageSizeInMiB = processQueue.getMsgSize().get() / (1024 * 1024);
        // 判断当前处理的消息条数是否超过限制
        if (cachedMessageCount > this.defaultMQPushConsumer.getPullThresholdForQueue()) {
            this.executePullRequestLater(pullRequest, PULL_TIME_DELAY_MILLS_WHEN_FLOW_CONTROL);
            // ...
            return;
        }
        // 判断当前处理的消息大小是否超过限制
        if (cachedMessageSizeInMiB > this.defaultMQPushConsumer.getPullThresholdSizeForQueue()) {
            // 延迟进行处理
            this.executePullRequestLater(pullRequest, PULL_TIME_DELAY_MILLS_WHEN_FLOW_CONTROL);
            // ...
            return;
        }
        if (!this.consumeOrderly) {// 非顺序消费
            // 队列最大偏移量和最小偏移量的间距是否超过ConsumeConcurrentlyMaxSpan
            if (processQueue.getMaxSpan() > this.defaultMQPushConsumer.getConsumeConcurrentlyMaxSpan()) {
                // 延迟处理
                this.executePullRequestLater(pullRequest, PULL_TIME_DELAY_MILLS_WHEN_FLOW_CONTROL);
                // ...
                return;
            }
        } else {
            // 顺序消费
            // ...
        }
        // 获取主题订阅信息
        final SubscriptionData subscriptionData = this.rebalanceImpl.getSubscriptionInner().get(pullRequest.getMessageQueue().getTopic());
        if (null == subscriptionData) {
            // 延迟处理
            this.executePullRequestLater(pullRequest, pullTimeDelayMillsWhenException);
            log.warn("find the consumer's subscription failed, {}", pullRequest);
            return;
        }
        final long beginTimestamp = System.currentTimeMillis();
        // 创建消息拉取成功后的回调函数
        PullCallback pullCallback = new PullCallback() {
            @Override
            public void onSuccess(PullResult pullResult) {
                // ...
            }
            // ...
        };

        boolean commitOffsetEnable = false;
        long commitOffsetValue = 0L;
        if (MessageModel.CLUSTERING == this.defaultMQPushConsumer.getMessageModel()) {
            commitOffsetValue = this.offsetStore.readOffset(pullRequest.getMessageQueue(), ReadOffsetType.READ_FROM_MEMORY);
            if (commitOffsetValue > 0) {
                commitOffsetEnable = true;
            }
        }

        String subExpression = null;
        boolean classFilter = false;
        // 获取主题的订阅信息
        SubscriptionData sd = this.rebalanceImpl.getSubscriptionInner().get(pullRequest.getMessageQueue().getTopic());
        if (sd != null) {
            if (this.defaultMQPushConsumer.isPostSubscriptionWhenPull() && !sd.isClassFilterMode()) {
                subExpression = sd.getSubString();
            }
            classFilter = sd.isClassFilterMode();
        }
        // 构建消息拉取系统标记
        int sysFlag = PullSysFlag.buildSysFlag(
            commitOffsetEnable, // commitOffset
            true, // suspend
            subExpression != null, // subscription
            classFilter // class filter
        );
        try {
            // 发送请求拉取消息
            this.pullAPIWrapper.pullKernelImpl(
                pullRequest.getMessageQueue(),
                subExpression,
                subscriptionData.getExpressionType(),
                subscriptionData.getSubVersion(),
                pullRequest.getNextOffset(),
                this.defaultMQPushConsumer.getPullBatchSize(),
                sysFlag,
                commitOffsetValue,
                BROKER_SUSPEND_MAX_TIME_MILLIS,
                CONSUMER_TIMEOUT_MILLIS_WHEN_SUSPEND,
                CommunicationMode.ASYNC,
                pullCallback
            );
        } catch (Exception e) {
            log.error("pullKernelImpl exception", e);
            this.executePullRequestLater(pullRequest, pullTimeDelayMillsWhenException);
        }
    }
}
发送拉取消息请求
PullAPIWrapper中主要是获取了Broker的地址,然后创建拉取请求头PullMessageRequestHeader,设置拉取的相关信息,然后调用MQClientAPIImpl的pullMessage拉取消息:
public class PullAPIWrapper {
    public PullResult pullKernelImpl(
        final MessageQueue mq,
        final String subExpression,
        final String expressionType,
        final long subVersion,
        final long offset,
        final int maxNums,
        final int sysFlag,
        final long commitOffset,
        final long brokerSuspendMaxTimeMillis,
        final long timeoutMillis,
        final CommunicationMode communicationMode,
        final PullCallback pullCallback
    ) throws MQClientException, RemotingException, MQBrokerException, InterruptedException {
        // 根据BrokerName获取Broker信息
        FindBrokerResult findBrokerResult =
            this.mQClientFactory.findBrokerAddressInSubscribe(mq.getBrokerName(),
                this.recalculatePullFromWhichNode(mq), false);
        // ...
        if (findBrokerResult != null) {
            // ...
            // 创建拉取消息的请求头
            PullMessageRequestHeader requestHeader = new PullMessageRequestHeader();
            requestHeader.setConsumerGroup(this.consumerGroup); // 设置消费组
            requestHeader.setTopic(mq.getTopic()); // 设置主题
            requestHeader.setQueueId(mq.getQueueId()); // 设置队列ID
            requestHeader.setQueueOffset(offset); // 设置拉取偏移量
            requestHeader.setMaxMsgNums(maxNums); // 设置拉取最大消息个数
            requestHeader.setSysFlag(sysFlagInner);// 设置系统标识
            requestHeader.setCommitOffset(commitOffset); // 设置commit偏移量
            requestHeader.setSuspendTimeoutMillis(brokerSuspendMaxTimeMillis);
            requestHeader.setSubscription(subExpression);// 设置订阅主题表达式
            requestHeader.setSubVersion(subVersion);
            requestHeader.setExpressionType(expressionType);
            // 获取Broker地址
            String brokerAddr = findBrokerResult.getBrokerAddr();
            if (PullSysFlag.hasClassFilterFlag(sysFlagInner)) {
                brokerAddr = computePullFromWhichFilterServer(mq.getTopic(), brokerAddr);
            }
            // 调MQClientAPIImpl的pullMessage拉取消息
            PullResult pullResult = this.mQClientFactory.getMQClientAPIImpl().pullMessage(
                brokerAddr,
                requestHeader,
                timeoutMillis,
                communicationMode,
                pullCallback);

            return pullResult;
        }
        throw new MQClientException("The broker[" + mq.getBrokerName() + "] not exist", null);
    }
}
MQClientAPIImpl的pullMessage中首先构建了远程请求RemotingCommand,可以看到请求类型设置的是拉取消息PULL_MESSAGE:
- 异步调用
pullMessageAsync方法拉取消息 - 同步调用
pullMessageSync方法拉取消息
以异步消息拉取pullMessageAsync为例,看一下请求的发送:
- 通过
invokeAsync向Broker发送拉取消息的请求 - 在请求返回响应的时候,进行判断,如果响应不为空,调用processPullResponse处理响应内容,然后调用回调函数PullCallback的
onSuccess方法处理消息
public class MQClientAPIImpl {

    /**
     * 发送请求拉取消息
     */
    public PullResult pullMessage(
        final String addr,
        final PullMessageRequestHeader requestHeader,
        final long timeoutMillis,
        final CommunicationMode communicationMode,
        final PullCallback pullCallback
    ) throws RemotingException, MQBrokerException, InterruptedException {
        // 构建请求,这里可以看到请求类型是拉取消息PULL_MESSAGE
        RemotingCommand request = RemotingCommand.createRequestCommand(RequestCode.PULL_MESSAGE, requestHeader);
        switch (communicationMode) {
            case ONEWAY:
                assert false;
                return null;
            case ASYNC: // 异步
                this.pullMessageAsync(addr, request, timeoutMillis, pullCallback);
                return null;
            case SYNC: // 同步
                return this.pullMessageSync(addr, request, timeoutMillis);
            default:
                assert false;
                break;
        }

        return null;
    }

    // 异步发送请求拉取消息
    private void pullMessageAsync(
        final String addr,
        final RemotingCommand request,
        final long timeoutMillis,
        final PullCallback pullCallback
    ) throws RemotingException, InterruptedException {
        // 发送请求
        this.remotingClient.invokeAsync(addr, request, timeoutMillis, new InvokeCallback() {
            @Override
            public void operationComplete(ResponseFuture responseFuture) {
                // 获取响应
                RemotingCommand response = responseFuture.getResponseCommand();
                if (response != null) {
                    try {
                        // 处理响应
                        PullResult pullResult = MQClientAPIImpl.this.processPullResponse(response, addr);
                        assert pullResult != null;
                        // 调用回调函数处理
                        pullCallback.onSuccess(pullResult);
                    } catch (Exception e) {
                        pullCallback.onException(e);
                    }
                } else {
                  // ...
                }
            }
        });
    }
}
Broker对消息拉取请求处理
Broker在启动的时候注册了消息拉取请求处理器PullMessageProcessor:
public class BrokerController {
    private final PullMessageProcessor pullMessageProcessor;
    public BrokerController(
        final BrokerConfig brokerConfig,
        final NettyServerConfig nettyServerConfig,
        final NettyClientConfig nettyClientConfig,
        final MessageStoreConfig messageStoreConfig
    ) {
        // ...
        // 创建PullMessageProcessor
        this.pullMessageProcessor = new PullMessageProcessor(this);
        // ...
    }

    public void registerProcessor() {
        // ...

        // 注册处理器
        this.remotingServer.registerProcessor(RequestCode.PULL_MESSAGE, this.pullMessageProcessor, this.pullMessageExecutor);

         // ...
     }
}
拉取请求处理
PullMessageProcessor的processRequest方法中用于处理消费者发送的消息拉取请求,处理逻辑如下:
- 调用
MessageStore的getMessage方法查找消息 - 设置响应信息,之后将消息查找结果响应给发送者
- 如果本次消息未查找到(有可能消息还未到达),并且允许将请求挂起,则将拉取请求提交到PullRequestHoldService中进行挂起,稍后重新拉取
public class PullMessageProcessor extends AsyncNettyRequestProcessor implements NettyRequestProcessor {
  private RemotingCommand processRequest(final Channel channel, RemotingCommand request, boolean brokerAllowSuspend)
        throws RemotingCommandException {

        // 根据消费者组获取订阅配置
        SubscriptionGroupConfig subscriptionGroupConfig =
            this.brokerController.getSubscriptionGroupManager().findSubscriptionGroupConfig(requestHeader.getConsumerGroup());
        if (null == subscriptionGroupConfig) {
            response.setCode(ResponseCode.SUBSCRIPTION_GROUP_NOT_EXIST);
            response.setRemark(String.format("subscription group [%s] does not exist, %s", requestHeader.getConsumerGroup(), FAQUrl.suggestTodo(FAQUrl.SUBSCRIPTION_GROUP_NOT_EXIST)));
            return response;
        }
        // ...

        // 拉取消息
        final GetMessageResult getMessageResult =
            this.brokerController.getMessageStore().getMessage(requestHeader.getConsumerGroup(), requestHeader.getTopic(),
                requestHeader.getQueueId(), requestHeader.getQueueOffset(), requestHeader.getMaxMsgNums(), messageFilter);
        if (getMessageResult != null) {
            // 设置拉取结果
            response.setRemark(getMessageResult.getStatus().name());
            // 设置下一次的拉取偏移量
            responseHeader.setNextBeginOffset(getMessageResult.getNextBeginOffset());
            // 设置最小偏移量
            responseHeader.setMinOffset(getMessageResult.getMinOffset());
            // 设置最大偏移量
            responseHeader.setMaxOffset(getMessageResult.getMaxOffset());

            // ...

            switch (response.getCode()) {
                case ResponseCode.SUCCESS:
                    // ...
                    break;
                case ResponseCode.PULL_NOT_FOUND: // 如果消息未找到
                    // 如果允许挂起
                    if (brokerAllowSuspend && hasSuspendFlag) {
                        // 挂起的超时时间
                        long pollingTimeMills = suspendTimeoutMillisLong;
                        // 如果未开启长轮询
                        if (!this.brokerController.getBrokerConfig().isLongPollingEnable()) {
                            // 从配置中获取
                            pollingTimeMills = this.brokerController.getBrokerConfig().getShortPollingTimeMills();
                        }
                        String topic = requestHeader.getTopic();
                        long offset = requestHeader.getQueueOffset();
                        int queueId = requestHeader.getQueueId();
                        // 构建拉取请求
                        PullRequest pullRequest = new PullRequest(request, channel, pollingTimeMills,
                            this.brokerController.getMessageStore().now(), offset, subscriptionData, messageFilter);
                        // 提交到PullRequestHoldService进行挂起
                        this.brokerController.getPullRequestHoldService().suspendPullRequest(topic, queueId, pullRequest);
                        response = null;
                        break;
                    }

                case ResponseCode.PULL_RETRY_IMMEDIATELY:
                    break;
                case ResponseCode.PULL_OFFSET_MOVED:
                    // ...
                    break;
                default:
                    assert false;
            }
        } else {
            response.setCode(ResponseCode.SYSTEM_ERROR);
            response.setRemark("store getMessage return null");
        }
        // ...
        return response;
    }
}
查找消息
DefaultMessageStore的getMessage用于根据消费者的拉取请求查找对应的消息数据,它首先根据主题名称和队列ID查找对应的消费队列,并获取消息队列对应的CommitLog文件的最小偏移量minOffset和最大偏移量maxOffset,然后校验本次拉取的偏移量是否在最小偏移量和最大偏移量之间,如果不在,会调用nextOffsetCorrection进行纠正,所以先来看一下nextOffsetCorrection方法:
// 纠正下一次拉取消息的偏移量
private long nextOffsetCorrection(long oldOffset, long newOffset) {
    long nextOffset = oldOffset;
    // 如果当前Broker不是从节点或者是设置了OffsetCheckInSlave校验
    if (this.getMessageStoreConfig().getBrokerRole() != BrokerRole.SLAVE || this.getMessageStoreConfig().isOffsetCheckInSlave()) {
        nextOffset = newOffset; //  更新拉取进度
    }
    // 返回nextOffset
    return nextOffset;
}
由nextOffsetCorrection方法可知**,如果当前Broker是主节点或者开启了OffsetCheckInSlave校验,才会纠正下次的拉取进度设置,否则依旧使用原来的拉取偏移量。**
根据拉取偏移量与CommitLog最大最小偏移量的值的对比,处理结果有以下几种情况:
-
NO_MESSAGE_IN_QUEUE:对应maxOffset最大偏移量为0的情况,说明当前消息队列中没有消息,调用nextOffsetCorrection设置下一次的拉取偏移量为0,从0开始拉取。
nextOffsetCorrection方法纠正拉取偏移量的条件为当前Broker是主节点或者开启了OffsetCheckInSlave校验,所以只有在这个条件下,才会更新为新的拉取偏移量,在当前这个情况下也就是会更新为0,下次从0开始拉取, 如果条件不成立,则不会进行更新,依旧使用原来的拉取偏移量。
-
OFFSET_TOO_SMALL:对应请待拉取偏移量offset小于CommitLog文件的最小偏移量的情况,说明拉取进度值过小,调用nextOffsetCorrection设置下一次的拉取偏移量为CommitLog文件的最小偏移量(需要满足nextOffsetCorrection的更新条件)。
-
OFFSET_OVERFLOW_ONE:对应待拉取偏移量offset等于CommitLog文件的最大偏移量的情况,此时虽然调用了nextOffsetCorrection进行纠正,但是设置的更新偏移量依旧为offset的值,也就是不进行更新。
-
OFFSET_OVERFLOW_BADLY:对应待拉取偏移量offset大于CommitLog文件最大偏移量的情况,说明拉取偏移量越界,此时有以下两种情况:
- 如果最小偏移量为0,将下一次拉取偏移量设置为最小偏移量的值
- 如果最小偏移量不为0,将下一次拉取偏移量的值设置为最大偏移量
-
NO_MATCHED_LOGIC_QUEUE:如果根据主题未找到消息队列,返回没有匹配的队列
-
FOUND:待拉取消息偏移量介于最大最小偏移量之间,此时根据拉取偏移量和大小从CommitLog中获取消息数据
public class DefaultMessageStore implements MessageStore {

   public GetMessageResult getMessage(final String group, final String topic, final int queueId, final long offset,
        final int maxMsgNums,
        final MessageFilter messageFilter) {
        // ...
        long beginTime = this.getSystemClock().now();
        GetMessageStatus status = GetMessageStatus.NO_MESSAGE_IN_QUEUE;
        long nextBeginOffset = offset;
        long minOffset = 0;
        long maxOffset = 0;
        GetMessageResult getResult = null;
        // 获取CommitLog文件的最大偏移量
        final long maxOffsetPy = this.commitLog.getMaxOffset();
        // 根据主题和队列ID查找消费队列
        ConsumeQueue consumeQueue = findConsumeQueue(topic, queueId);
        if (consumeQueue != null) { // 如果消费队列不为空
            // 获取消息队列最小偏移量
            minOffset = consumeQueue.getMinOffsetInQueue();
            // 获取消息队列最大偏移量
            maxOffset = consumeQueue.getMaxOffsetInQueue();
            // 如果最大偏移量为0,说明当前消息队列中没有消息
            if (maxOffset == 0) {
                status = GetMessageStatus.NO_MESSAGE_IN_QUEUE;
                // 设置下一次的拉取偏移量为0
                nextBeginOffset = nextOffsetCorrection(offset, 0);
            } else if (offset < minOffset) { // 如果待拉取偏移量小于最小偏移量
                status = GetMessageStatus.OFFSET_TOO_SMALL;
                // 设置下一次的拉取偏移量为minOffset
                nextBeginOffset = nextOffsetCorrection(offset, minOffset);
            } else if (offset == maxOffset) { // 如果待拉取偏移量等于最大偏移量
                status = GetMessageStatus.OFFSET_OVERFLOW_ONE;
                // 设置下一次的拉取偏移量为offset也就是不进行更新
                nextBeginOffset = nextOffsetCorrection(offset, offset);
            } else if (offset > maxOffset) { // 如果待拉取偏移量大于最大偏移量
                status = GetMessageStatus.OFFSET_OVERFLOW_BADLY;
                // 如果最小偏移量为0
                if (0 == minOffset) {
                    // 更新下次拉取偏移量为minOffset
                    nextBeginOffset = nextOffsetCorrection(offset, minOffset);
                } else {
                    // 更新下次拉取偏移量为maxOffset
                    nextBeginOffset = nextOffsetCorrection(offset, maxOffset);
                }
            } else {
                // 根据偏移量获取消息队列对应的ConsumeQueue
                SelectMappedBufferResult bufferConsumeQueue = consumeQueue.getIndexBuffer(offset);
                // 如果不为空
                if (bufferConsumeQueue != null) {
                    try {
                        status = GetMessageStatus.NO_MATCHED_MESSAGE;
                        long nextPhyFileStartOffset = Long.MIN_VALUE;
                        long maxPhyOffsetPulling = 0;

                        int i = 0;
                        // ...
                        // 创建获取消息结果对象GetMessageResult
                        getResult = new GetMessageResult(maxMsgNums);
                        ConsumeQueueExt.CqExtUnit cqExtUnit = new ConsumeQueueExt.CqExtUnit();
                        for (; i < bufferConsumeQueue.getSize() && i < maxFilterMessageCount; i += ConsumeQueue.CQ_STORE_UNIT_SIZE) {
                            // 获取偏移量
                            long offsetPy = bufferConsumeQueue.getByteBuffer().getLong();
                            // 获取大小
                            int sizePy = bufferConsumeQueue.getByteBuffer().getInt();
                            long tagsCode = bufferConsumeQueue.getByteBuffer().getLong();
                            maxPhyOffsetPulling = offsetPy;
                            // ...
                            // 根据拉取偏移量和大小从CommitLog中获取消息数据
                            SelectMappedBufferResult selectResult = this.commitLog.getMessage(offsetPy, sizePy);
                            // ...
                            this.storeStatsService.getGetMessageTransferedMsgCount().add(1);
                            // 设置消息内容
                            getResult.addMessage(selectResult);
                            // 设置查找状态为FOUND
                            status = GetMessageStatus.FOUND;
                            nextPhyFileStartOffset = Long.MIN_VALUE;
                        }

                        // ...
                        // 计算下次拉取偏移量
                        nextBeginOffset = offset + (i / ConsumeQueue.CQ_STORE_UNIT_SIZE);
                        long diff = maxOffsetPy - maxPhyOffsetPulling;
                        long memory = (long) (StoreUtil.TOTAL_PHYSICAL_MEMORY_SIZE
                            * (this.messageStoreConfig.getAccessMessageInMemoryMaxRatio() / 100.0));
                        getResult.setSuggestPullingFromSlave(diff > memory);
                    } finally {
                        bufferConsumeQueue.release();
                    }
                } else {
                    // 未查找到
                    status = GetMessageStatus.OFFSET_FOUND_NULL;
                    nextBeginOffset = nextOffsetCorrection(offset, consumeQueue.rollNextFile(offset));
                    log.warn("consumer request topic: " + topic + "offset: " + offset + " minOffset: " + minOffset + " maxOffset: "
                        + maxOffset + ", but access logic queue failed.");
                }
            }
        } else {
            // 如果未查找到消息队列
            status = GetMessageStatus.NO_MATCHED_LOGIC_QUEUE;
            nextBeginOffset = nextOffsetCorrection(offset, 0);
        }

        // ...
        // 设置查找结果
        getResult.setStatus(status); // 查找结果状态
        getResult.setNextBeginOffset(nextBeginOffset); // 下一次拉取的偏移量
        getResult.setMaxOffset(maxOffset);// CommitLog最大偏移量
        getResult.setMinOffset(minOffset);// CommitLog最小偏移量
        return getResult;
    }
}
消费者对拉取消息的处理
前面知道,异步拉取消息的时候注册了回调函数PullCallback,当请求返回响应结果之后,会执行回调函数,这次进入到DefaultMQPushConsumerImpl的pullMessage回调函数中看一下都做了什么。
在onSuccess方法中,首先调用了PullAPIWrapper的processPullResult方法处理返回的响应信息,然后根据拉取结果进行处理,拉取结果有以下几种情况:
FOUND:对应GetMessageResult.FOUND的情况,此时判断是否拉取到了消息
-
如果未拉取到消息,将拉取请求放入到阻塞队列中再进行一次拉取
-
如果拉取到了消息,将消息提交到ConsumeMessageService中进行消费(异步处理),然后判断拉取间隔PullInterval是否大于0,如果大于0,表示需要等待一段时间后再进行拉取,此时调用
executePullRequestLater方法延迟下一次拉取,如果PullInterval小于0表示需要立刻进行下一次拉取,此时调用executePullRequestImmediately将拉取请求加入队列中进行下一次拉取。
NO_MATCHED_MSG:没有匹配的消息,此时更新下一次的拉取偏移量,调用executePullRequestImmediately将拉取请求加入队列中重新进行拉取。
OFFSET_ILLEGAL:拉取偏移量不合法,此时设置下一次拉取偏移量,并将拉取请求中存放的ProcessQueue置为dropped删除状态,然后通过DefaultMQPushConsumerImpl提交异步任务,在任务中重新更新拉取偏移量,并将ProcessQueue删除
       PullCallback pullCallback = new PullCallback() {
        @Override
        public void onSuccess(PullResult pullResult) {
            if (pullResult != null) {
                // 处理拉取结果
                pullResult = DefaultMQPushConsumerImpl.this.pullAPIWrapper.processPullResult(pullRequest.getMessageQueue(), pullResult,
                        subscriptionData);
                // 判断拉取结果
                switch (pullResult.getPullStatus()) {
                    case FOUND:
                        // 获取上一次拉取的偏移量
                        long prevRequestOffset = pullRequest.getNextOffset();
                        // 更新下一次拉取的偏移量
                        pullRequest.setNextOffset(pullResult.getNextBeginOffset());
                        long pullRT = System.currentTimeMillis() - beginTimestamp;
                        DefaultMQPushConsumerImpl.this.getConsumerStatsManager().incPullRT(pullRequest.getConsumerGroup(),
                                pullRequest.getMessageQueue().getTopic(), pullRT);

                        long firstMsgOffset = Long.MAX_VALUE;
                        // 如果未拉取到消息
                        if (pullResult.getMsgFoundList() == null || pullResult.getMsgFoundList().isEmpty()) {
                            // 将拉取请求放入到阻塞队列中再进行一次拉取
                            DefaultMQPushConsumerImpl.this.executePullRequestImmediately(pullRequest);
                        } else {
                            firstMsgOffset = pullResult.getMsgFoundList().get(0).getQueueOffset();

                            DefaultMQPushConsumerImpl.this.getConsumerStatsManager().incPullTPS(pullRequest.getConsumerGroup(),
                                    pullRequest.getMessageQueue().getTopic(), pullResult.getMsgFoundList().size());
                            // 将消息加入到processQueue
                            boolean dispatchToConsume = processQueue.putMessage(pullResult.getMsgFoundList());
                            // 将消息提交到ConsumeMessageService中进行消费(异步处理)
                            DefaultMQPushConsumerImpl.this.consumeMessageService.submitConsumeRequest(
                                    pullResult.getMsgFoundList(),
                                    processQueue,
                                    pullRequest.getMessageQueue(),
                                    dispatchToConsume);
                            // 如果PullInterval大于0,等待PullInterval毫秒后将对象放入到阻塞队列中
                            if (DefaultMQPushConsumerImpl.this.defaultMQPushConsumer.getPullInterval() > 0) {
                                // 根据间隔时间稍后再进行拉取
                                DefaultMQPushConsumerImpl.this.executePullRequestLater(pullRequest,
                                        DefaultMQPushConsumerImpl.this.defaultMQPushConsumer.getPullInterval());
                            } else {
                                // 立刻进行下一次拉取
                                DefaultMQPushConsumerImpl.this.executePullRequestImmediately(pullRequest);
                            }
                        }

                        // ...
                        break;
                    case NO_NEW_MSG:
                    case NO_MATCHED_MSG: // 没有匹配的消息
                        // 更新下一次的拉取偏移量
                        pullRequest.setNextOffset(pullResult.getNextBeginOffset());
                        DefaultMQPushConsumerImpl.this.correctTagsOffset(pullRequest);
                        // 再次进行拉取
                        DefaultMQPushConsumerImpl.this.executePullRequestImmediately(pullRequest);
                        break;
                    case OFFSET_ILLEGAL: // 不合法
                        log.warn("the pull request offset illegal, {} {}",
                                pullRequest.toString(), pullResult.toString());
                        // 设置下一次拉取偏移量
                        pullRequest.setNextOffset(pullResult.getNextBeginOffset());
                        // 设置为dropped,进行丢弃
                        pullRequest.getProcessQueue().setDropped(true);
                        DefaultMQPushConsumerImpl.this.executeTaskLater(new Runnable() {

                            @Override
                            public void run() {
                                try {
                                    // 更新拉取偏移量
                                    DefaultMQPushConsumerImpl.this.offsetStore.updateOffset(pullRequest.getMessageQueue(),
                                            pullRequest.getNextOffset(), false);
                                    // 持久化
                                    DefaultMQPushConsumerImpl.this.offsetStore.persist(pullRequest.getMessageQueue());
                                    // 移除处理队列,等待下一次负责均衡
                                    DefaultMQPushConsumerImpl.this.rebalanceImpl.removeProcessQueue(pullRequest.getMessageQueue());

                                    log.warn("fix the pull request offset, {}", pullRequest);
                                } catch (Throwable e) {
                                    log.error("executeTaskLater Exception", e);
                                }
                            }
                        }, 10000);
                        break;
                    default:
                        break;
                }
            }
        }

        @Override
        public void onException(Throwable e) {
            if (!pullRequest.getMessageQueue().getTopic().startsWith(MixAll.RETRY_GROUP_TOPIC_PREFIX)) {
                log.warn("execute the pull request exception", e);
            }
            // 如果出现异常,稍后再进行拉取
            DefaultMQPushConsumerImpl.this.executePullRequestLater(pullRequest, pullTimeDelayMillsWhenException);
        }
    };
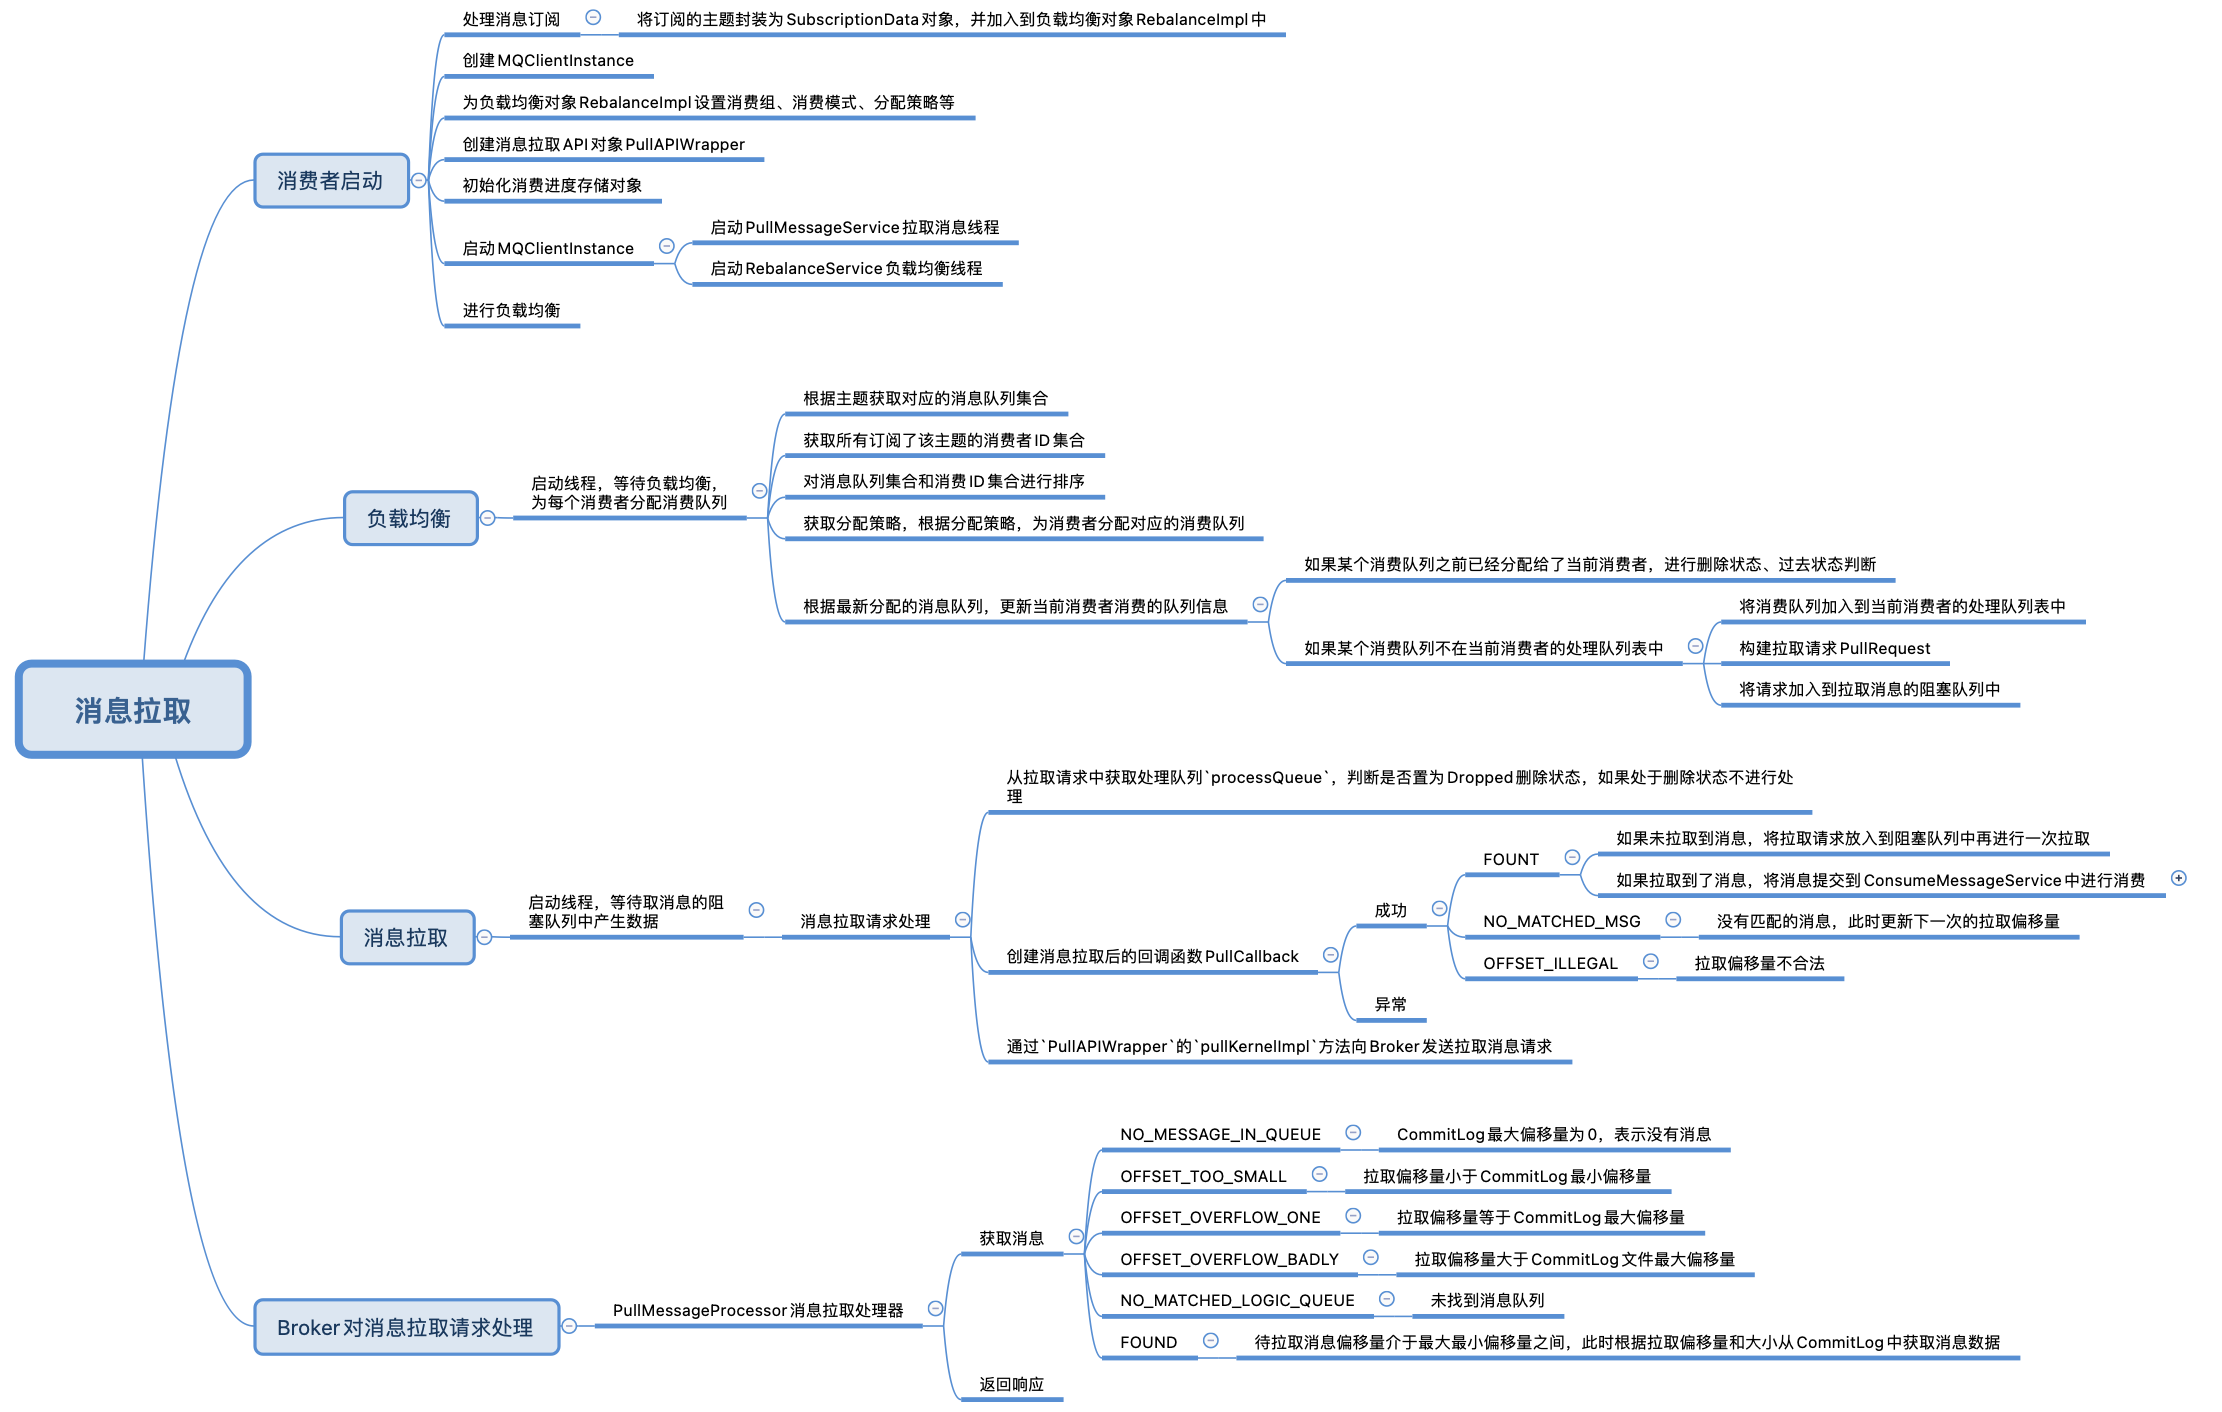
总结
参考
丁威、周继锋《RocketMQ技术内幕》
RocketMQ版本:4.9.3
