【STM32】STM32中断体系

一、STM32的NVIC和起始代码中的ISP
1.NVIC(嵌套向量中断控制器)
(1)数据手册中相关部分浏览
(2)地址映射时0地址映射到Flash或SRAM
(3)中断向量表可以被人为重新映射,一般用来IAP中
(4)STM32采用一维的中断向量表
(5)中断优先级设置有点复杂,后面细说
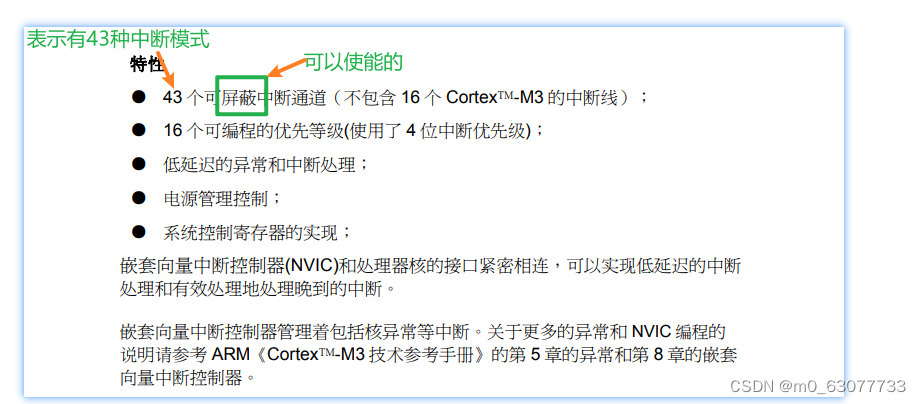
1.特征
2.系统嘀嗒(SysTick)校准值寄存器

3.向量表
在每一个中断函数在startup_stm32f10x_md.s中都有进行定义


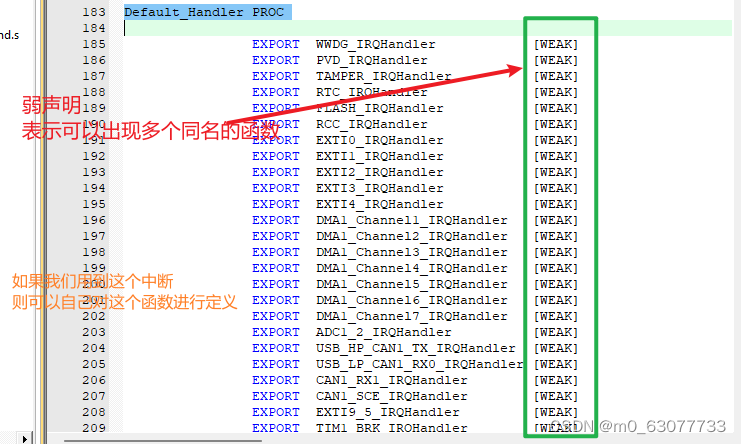
2、起始代码中的ISR
(1)其实代码中定义了一个Vector数组
(2)WEAK声明的默认ISR
(3)用户根据需要提供自己真正有用的ISR
(4)中断要配置使能,ISR中要清挂起等,这一点和其他CPU一样

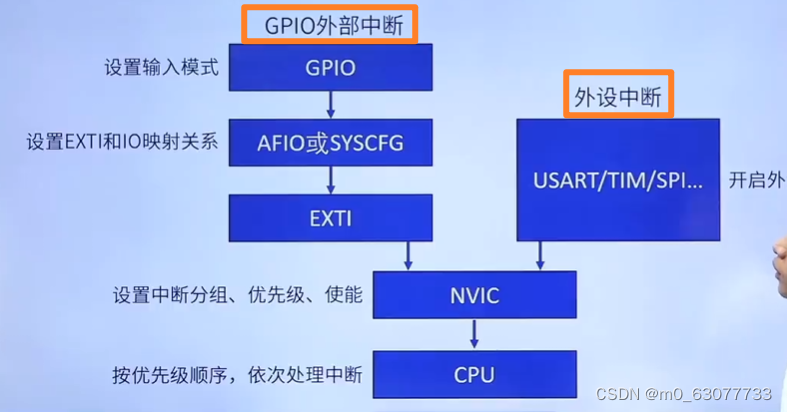
二、STM32的外部中断(EXTI)


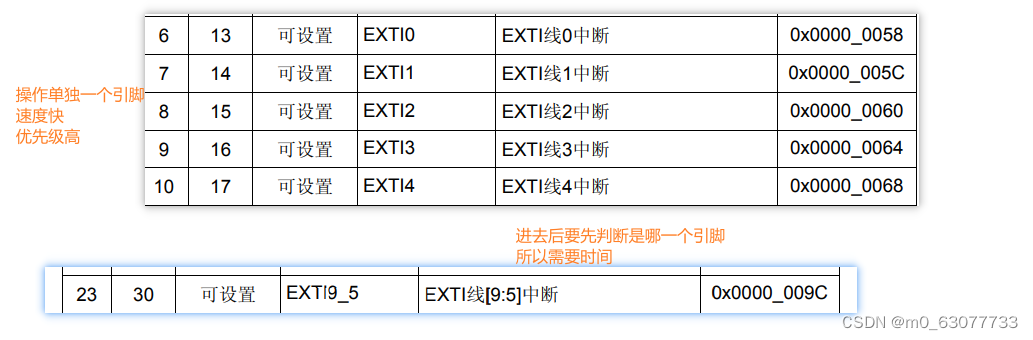
1.EXTI 控制器的主要特性如下:

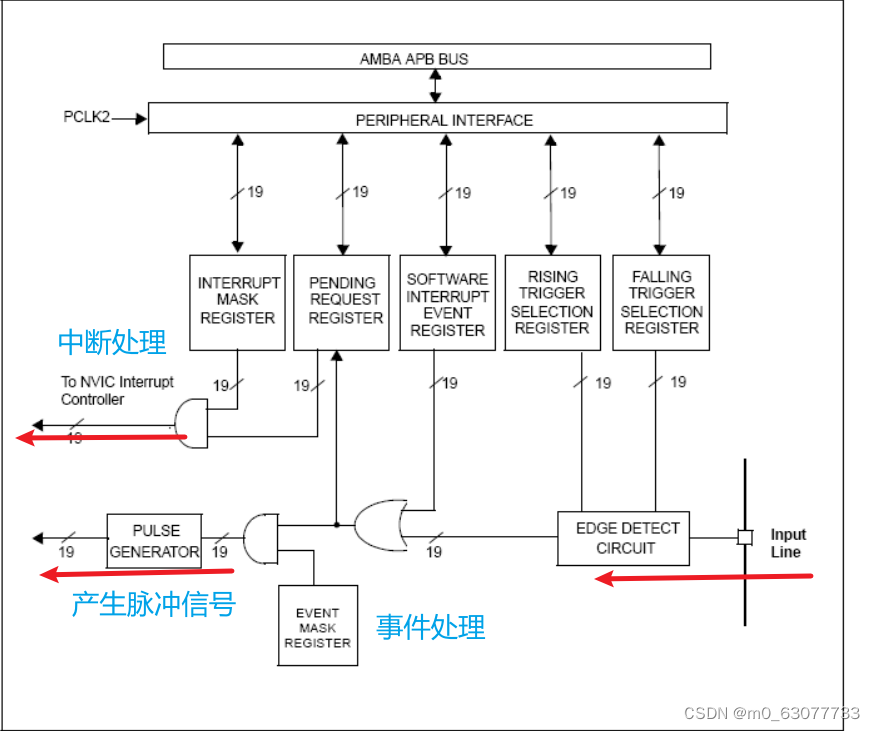
2.外部中断/事件控制器框图


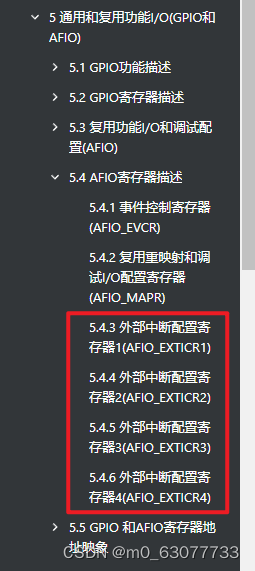
3.外部中断与I/O 映像(AFIO的的中断)
AFIO中与中断相关的寄存器有4个
记得再使用之前一定要使能时钟!!!!!
我们有4个AFIO的中断寄存器,则一个寄存器中应该可以处理16个引脚。

最好使用引脚时,设置PA0,PA1....
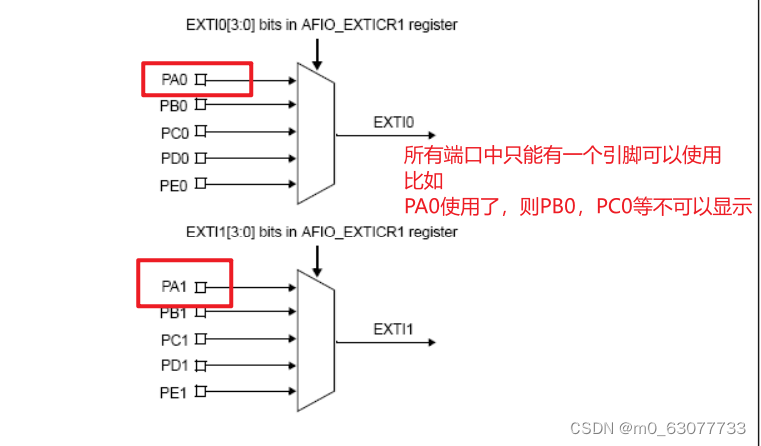
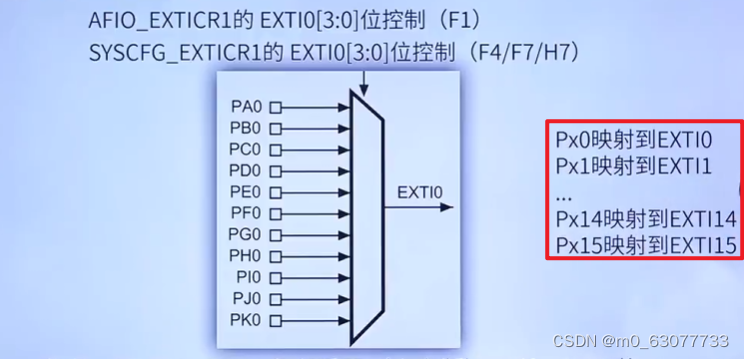
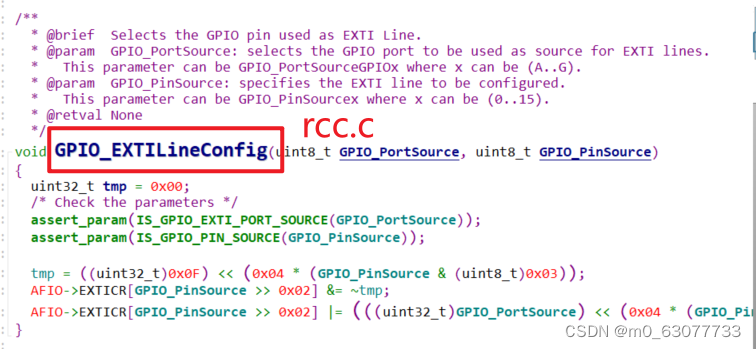
使用AFIO中的EXTICRx寄存器进行操作

/**
  * @brief  Selects the GPIO pin used as EXTI Line.
  * @param  GPIO_PortSource: selects the GPIO port to be used as source for EXTI lines.
  *   This parameter can be GPIO_PortSourceGPIOx where x can be (A..G).
  * @param  GPIO_PinSource: specifies the EXTI line to be configured.
  *   This parameter can be GPIO_PinSourcex where x can be (0..15).
  * @retval None
  */
void GPIO_EXTILineConfig(uint8_t GPIO_PortSource, uint8_t GPIO_PinSource)
{
  uint32_t tmp = 0x00;
  /* Check the parameters */
  assert_param(IS_GPIO_EXTI_PORT_SOURCE(GPIO_PortSource));
  assert_param(IS_GPIO_PIN_SOURCE(GPIO_PinSource));

  tmp = ((uint32_t)0x0F) << (0x04 * (GPIO_PinSource & (uint8_t)0x03));
  AFIO->EXTICR[GPIO_PinSource >> 0x02] &= ~tmp;
  AFIO->EXTICR[GPIO_PinSource >> 0x02] |= (((uint32_t)GPIO_PortSource) << (0x04 * (GPIO_PinSource & (uint8_t)0x03)));
}
1.外部中断配置寄存器 1(AFIO_EXTICR1)

2.外部中断配置寄存器 2(AFIO_EXTICR2)

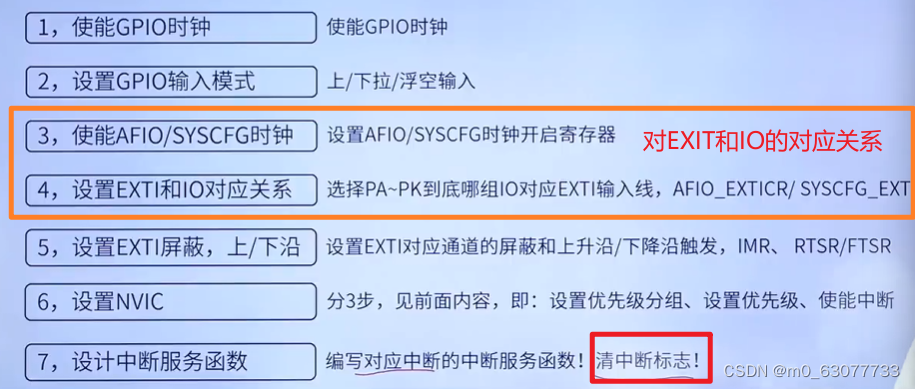
4.如何实际编程使用外部中断
(1)时钟设置并打开相应GPIO模块时钟
(2)将相应GPIO配置为浮空输入
(3)NVIC设置
(4)将外部中断线和配套的GPIO进行连接映射
(5)外部中断线使能触发
(6)准备好ISR,并在ISR处等待执行中断程序即可(7)记得!!!!!!!!!执行完ISR后记得将中断清除。
5.外部中断 VS 外部事件中断
外部中断:需要CPU,中断处理程序的参与
外部事件中断:不需要CPU参与
我们一般使用外部中断,不使用外部事件中断,因为我们不知道该器件是否接受脉冲信号。
6.相关寄存器
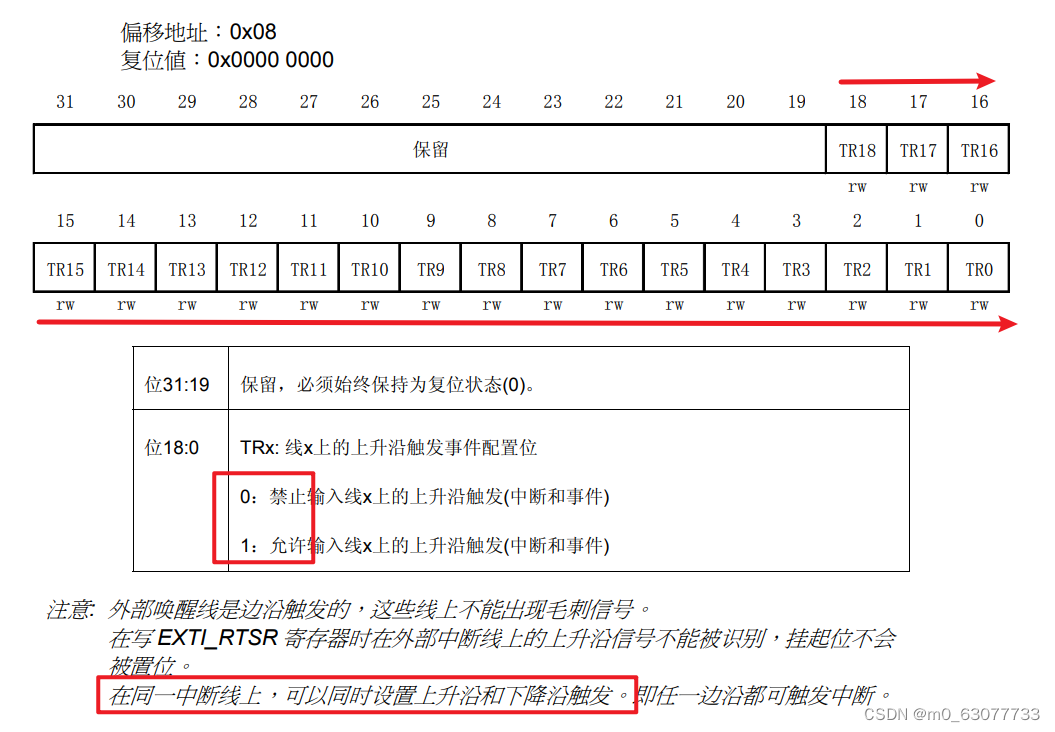
1. 上升沿触发选择寄存器(EXTI_RTSR)
2.下降沿触发选择寄存器(EXTI_FTSR)

3.中断屏蔽寄存器(EXTI_IMR)

4.挂起寄存器(EXTI_PR)


三、标准库中NVIC(中断优先级)模块分析
因为中断处理是在CPU内部进行的,所以没有单独的.c和.h文件
NVIC在【misc.c】中
1.抢占优先级 VS 次优先级
当抢占优先级的不同时,抢占优先级小的先执行,然后在执行优先级大的。
当抢占优先级相同时,次优先级小的不能抢占次优先级大的
当相同抢占优先级的程序进行中断时,次优先级小的可以抢先执行,在执行次优先级大的。
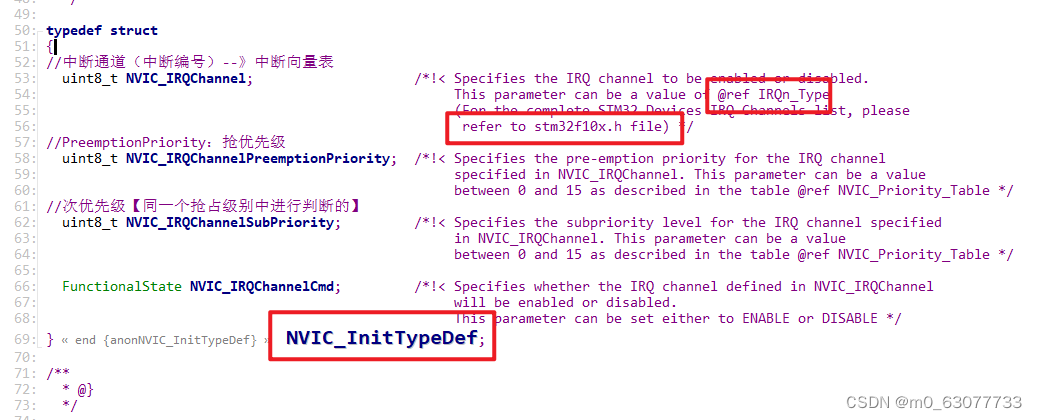
//PreemptionPriority:抢优先级
  uint8_t NVIC_IRQChannelPreemptionPriority;  /*!< Specifies the pre-emption priority for the IRQ channel
                                                   specified in NVIC_IRQChannel. This parameter can be a value
                                                   between 0 and 15 as described in the table @ref NVIC_Priority_Table */
//次优先级【同一个抢占级别中进行判断的】
  uint8_t NVIC_IRQChannelSubPriority;         /*!< Specifies the subpriority level for the IRQ channel specified
                                                   in NVIC_IRQChannel. This parameter can be a value
                                                   between 0 and 15 as described in the table @ref NVIC_Priority_Table */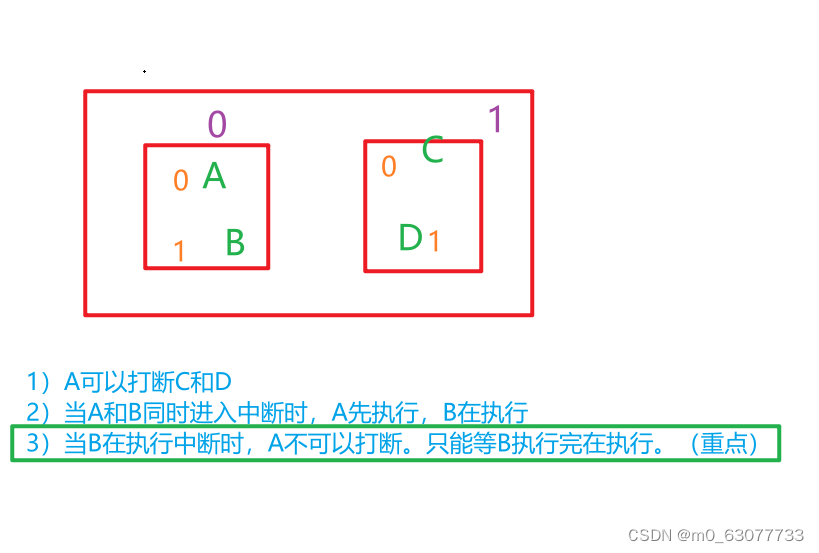
2.优先级组

/**
	pre-emption:抢占优先级
	subpriority:次优先级
*/
#define NVIC_PriorityGroup_0         ((uint32_t)0x700) /*!< 0 bits for pre-emption priority
                                                            4 bits for subpriority=》2的4次方*/
#define NVIC_PriorityGroup_1         ((uint32_t)0x600) /*!< 1 bits for pre-emption priority
                                                            3 bits for subpriority=>2的3次方*/
#define NVIC_PriorityGroup_2         ((uint32_t)0x500) /*!< 2 bits for pre-emption priority
                                                            2 bits for subpriority */
#define NVIC_PriorityGroup_3         ((uint32_t)0x400) /*!< 3 bits for pre-emption priority
                                                            1 bits for subpriority */
#define NVIC_PriorityGroup_4         ((uint32_t)0x300) /*!< 4 bits for pre-emption priority
                                                            0 bits for subpriority */
3.启动方式
RAM或者FLASH
/**
	启动方式:RAM或者FLASH
	从0x0000 0000到0x080 0000之间的地址是用来设置映射关系
	因为我们使用FLASH启动,所以将其映射到0x0800 0000

*/
#define NVIC_VectTab_RAM             ((uint32_t)0x20000000)
#define NVIC_VectTab_FLASH           ((uint32_t)0x08000000)
#define IS_NVIC_VECTTAB(VECTTAB) (((VECTTAB) == NVIC_VectTab_RAM) || \
                                  ((VECTTAB) == NVIC_VectTab_FLASH))
4.函数
1.NVIC_PriorityGroupConfig
在使用时一定设置使用哪一个优先级
/**
* @brief Configures the priority grouping: pre-emption priority and subpriority.
* @param NVIC_PriorityGroup: specifies the priority grouping bits length.
* This parameter can be one of the following values:
* @arg NVIC_PriorityGroup_0: 0 bits for pre-emption priority
* 4 bits for subpriority
* @arg NVIC_PriorityGroup_1: 1 bits for pre-emption priority
* 3 bits for subpriority
* @arg NVIC_PriorityGroup_2: 2 bits for pre-emption priority
* 2 bits for subpriority
* @arg NVIC_PriorityGroup_3: 3 bits for pre-emption priority
* 1 bits for subpriority
* @arg NVIC_PriorityGroup_4: 4 bits for pre-emption priority
* 0 bits for subpriority
* @retval None
*/
void NVIC_PriorityGroupConfig(uint32_t NVIC_PriorityGroup)
{
/* Check the parameters */
assert_param(IS_NVIC_PRIORITY_GROUP(NVIC_PriorityGroup));
/* Set the PRIGROUP[10:8] bits according to NVIC_PriorityGroup value */
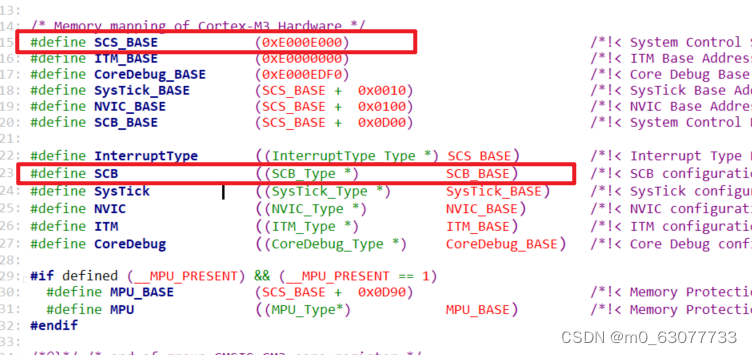
SCB->AIRCR = AIRCR_VECTKEY_MASK | NVIC_PriorityGroup;
}

2.NVIC_Init

void NVIC_Init(NVIC_InitTypeDef* NVIC_InitStruct)
{
  uint32_t tmppriority = 0x00, tmppre = 0x00, tmpsub = 0x0F;

  /* Check the parameters */
  assert_param(IS_FUNCTIONAL_STATE(NVIC_InitStruct->NVIC_IRQChannelCmd));
  assert_param(IS_NVIC_PREEMPTION_PRIORITY(NVIC_InitStruct->NVIC_IRQChannelPreemptionPriority));
  assert_param(IS_NVIC_SUB_PRIORITY(NVIC_InitStruct->NVIC_IRQChannelSubPriority));

  if (NVIC_InitStruct->NVIC_IRQChannelCmd != DISABLE)
  {
    /* Compute the Corresponding IRQ Priority --------------------------------*/
    tmppriority = (0x700 - ((SCB->AIRCR) & (uint32_t)0x700))>> 0x08;
    tmppre = (0x4 - tmppriority);
    tmpsub = tmpsub >> tmppriority;

    tmppriority = (uint32_t)NVIC_InitStruct->NVIC_IRQChannelPreemptionPriority << tmppre;
    tmppriority |=  NVIC_InitStruct->NVIC_IRQChannelSubPriority & tmpsub;
    tmppriority = tmppriority << 0x04;

    NVIC->IP[NVIC_InitStruct->NVIC_IRQChannel] = tmppriority;

    /* Enable the Selected IRQ Channels --------------------------------------*/
    NVIC->ISER[NVIC_InitStruct->NVIC_IRQChannel >> 0x05] =
      (uint32_t)0x01 << (NVIC_InitStruct->NVIC_IRQChannel & (uint8_t)0x1F);
  }
  else
  {
    /* Disable the Selected IRQ Channels -------------------------------------*/
    NVIC->ICER[NVIC_InitStruct->NVIC_IRQChannel >> 0x05] =
      (uint32_t)0x01 << (NVIC_InitStruct->NVIC_IRQChannel & (uint8_t)0x1F);
  }
}
3.NVIC_SetVectorTable
设置中断向量表,看要设置到RAM还是FLASH
void NVIC_SetVectorTable(uint32_t NVIC_VectTab, uint32_t Offset)
{
  /* Check the parameters */
  assert_param(IS_NVIC_VECTTAB(NVIC_VectTab));
  assert_param(IS_NVIC_OFFSET(Offset));

  SCB->VTOR = NVIC_VectTab | (Offset & (uint32_t)0x1FFFFF80);
}
四、标准库中外部中断模块分析

1.EXTI_DeInit
 //完全去始化
void EXTI_DeInit(void)
{
  EXTI->IMR = 0x00000000;
  EXTI->EMR = 0x00000000;
  EXTI->RTSR = 0x00000000;
  EXTI->FTSR = 0x00000000;
  EXTI->PR = 0x000FFFFF;
}
2.EXTI_Init
将我们设置好的结构体变量写入到寄存器中
/**
  * @brief  Initializes the EXTI peripheral according to the specified
  *         parameters in the EXTI_InitStruct.
  * @param  EXTI_InitStruct: pointer to a EXTI_InitTypeDef structure
  *         that contains the configuration information for the EXTI peripheral.
  * @retval None
  */
void EXTI_Init(EXTI_InitTypeDef* EXTI_InitStruct)
{
  uint32_t tmp = 0;

  /* Check the parameters */
  assert_param(IS_EXTI_MODE(EXTI_InitStruct->EXTI_Mode));
  assert_param(IS_EXTI_TRIGGER(EXTI_InitStruct->EXTI_Trigger));
  assert_param(IS_EXTI_LINE(EXTI_InitStruct->EXTI_Line));
  assert_param(IS_FUNCTIONAL_STATE(EXTI_InitStruct->EXTI_LineCmd));

  tmp = (uint32_t)EXTI_BASE;

  if (EXTI_InitStruct->EXTI_LineCmd != DISABLE)//表示要使能
  {
    /* Clear EXTI line configuration */
    EXTI->IMR &= ~EXTI_InitStruct->EXTI_Line;
    EXTI->EMR &= ~EXTI_InitStruct->EXTI_Line;

    tmp += EXTI_InitStruct->EXTI_Mode;

    *(__IO uint32_t *) tmp |= EXTI_InitStruct->EXTI_Line;

    /* Clear Rising Falling edge configuration */
    EXTI->RTSR &= ~EXTI_InitStruct->EXTI_Line;
    EXTI->FTSR &= ~EXTI_InitStruct->EXTI_Line;

    /* Select the trigger for the selected external interrupts */
    if (EXTI_InitStruct->EXTI_Trigger == EXTI_Trigger_Rising_Falling)
    {
      /* Rising Falling edge */
      EXTI->RTSR |= EXTI_InitStruct->EXTI_Line;
      EXTI->FTSR |= EXTI_InitStruct->EXTI_Line;
    }
    else
    {
      tmp = (uint32_t)EXTI_BASE;
      tmp += EXTI_InitStruct->EXTI_Trigger;

      *(__IO uint32_t *) tmp |= EXTI_InitStruct->EXTI_Line;
    }
  }
  else
  {
    tmp += EXTI_InitStruct->EXTI_Mode;

    /* Disable the selected external lines */
    *(__IO uint32_t *) tmp &= ~EXTI_InitStruct->EXTI_Line;
  }
}
3.EXTI_StructInit
如果用户不想自己设置中断值,则可以调用这个函数,这个函数中有默认值可以使用
void EXTI_StructInit(EXTI_InitTypeDef* EXTI_InitStruct)
{
  EXTI_InitStruct->EXTI_Line = EXTI_LINENONE;
  EXTI_InitStruct->EXTI_Mode = EXTI_Mode_Interrupt;
  EXTI_InitStruct->EXTI_Trigger = EXTI_Trigger_Falling;
  EXTI_InitStruct->EXTI_LineCmd = DISABLE;
}
4.EXTI_GenerateSWInterrupt
软件中断,可以对寄存器中其中一位进行中断操作
void EXTI_GenerateSWInterrupt(uint32_t EXTI_Line)
{
  /* Check the parameters */
  assert_param(IS_EXTI_LINE(EXTI_Line));

  EXTI->SWIER |= EXTI_Line;
}
5.EXTI_GetFlagStatus
共享中断:判断中断标志位是否真的置1了(判断是哪一个标志进行中断的)
/**
  * @brief  Checks whether the specified EXTI line flag is set or not.
  * @param  EXTI_Line: specifies the EXTI line flag to check.
  *   This parameter can be:
  *     @arg EXTI_Linex: External interrupt line x where x(0..19)
  * @retval The new state of EXTI_Line (SET or RESET).
  */
FlagStatus EXTI_GetFlagStatus(uint32_t EXTI_Line)
{
  FlagStatus bitstatus = RESET;
  /* Check the parameters */
  assert_param(IS_GET_EXTI_LINE(EXTI_Line));

  if ((EXTI->PR & EXTI_Line) != (uint32_t)RESET)
  {
    bitstatus = SET;
  }
  else
  {
    bitstatus = RESET;
  }
  return bitstatus;
}
6.EXTI_ClearITPendingBit(中断挂起)
中断进入后,就会有一个中断挂起
/**
  * @brief  Clears the EXTI's line pending bits.
  * @param  EXTI_Line: specifies the EXTI lines to clear.
  *   This parameter can be any combination of EXTI_Linex where x can be (0..19).
  * @retval None
  */
void EXTI_ClearITPendingBit(uint32_t EXTI_Line)
{
  /* Check the parameters */
  assert_param(IS_EXTI_LINE(EXTI_Line));

  EXTI->PR = EXTI_Line;
}
6.EXTI_ClearFlag
清除中断
void EXTI_ClearFlag(uint32_t EXTI_Line)
{
/* Check the parameters */
assert_param(IS_EXTI_LINE(EXTI_Line));
EXTI->PR = EXTI_Line;
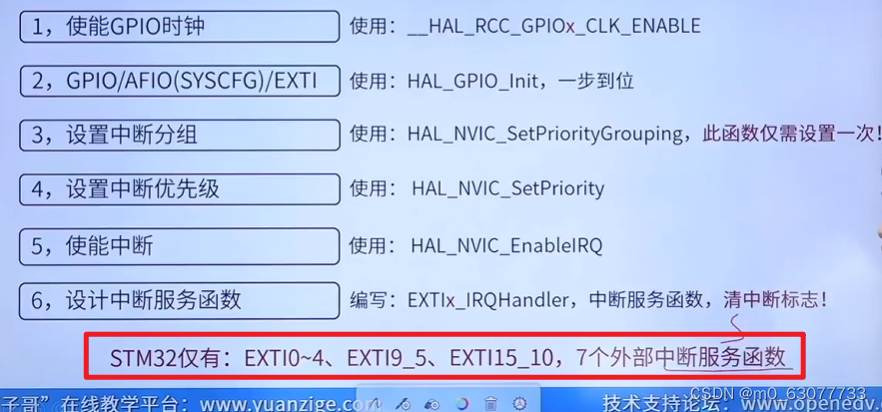
}五、GPIO外部中断程序的移植和调试
0.GPIO外部中断的配置步骤
使用HAL_GPIO_Init一步到位(步骤2-步骤5)
1.EXTI的HAL库设置步骤(GPIO外部中断)
2.通用外设驱动模型

3.HAL库中断回调处理机制介绍

1.建立工程模板
STM32项目工程的搭建-CSDN博客
2.查看官方示例代码
以ARM3.0的按键示例程序作为参考,移植到PZ6806L开发板上。

stm32f10x_it.c
将我们在初始化文件(STM32F10x_md.c)中的中断函数进行覆盖重写。

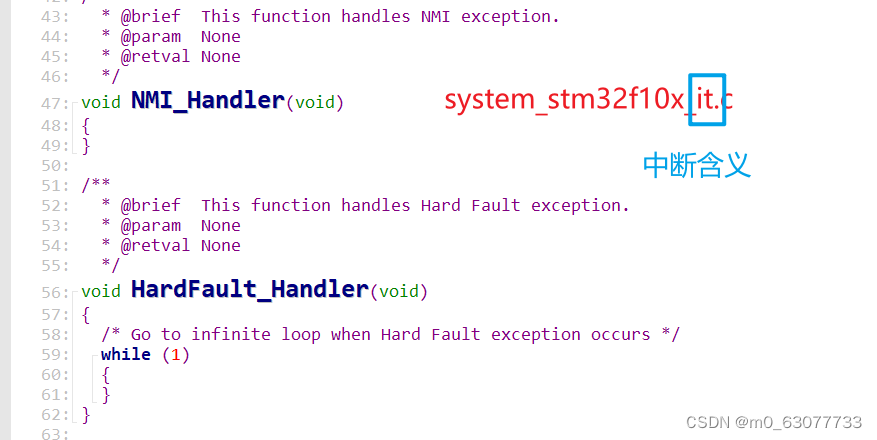
startup_stm32f10x_md.s
这个文件中存放是有中断处理函数的定义
我们如果想要执行(使用)这个中断,则将在md文件中将函数名字复制出来,然后再stm32f10x_it.c文件中使用

stm32f10x_it.h
我们上面再stm32f10x_it.c中重写了一个函数,则要再这个.h文件中进行声明

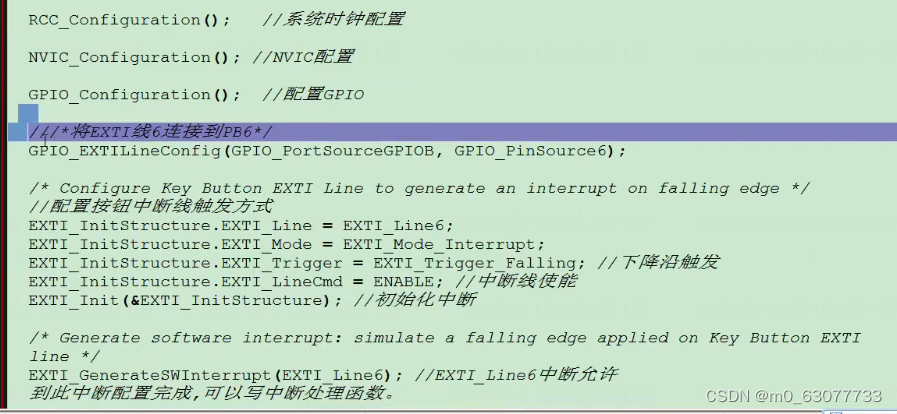
main.c
RCC_Configuragtion
作用:将时钟设置为72MHZ,将相关的开关打开。


GPIO_Configuration

NVIC_Configuration
NVIC中断优先级的初始化

3.整个main函数的流程
1)初始化RCC
2)初始化GPIO
3)初始化NVIC
4)设置外部中断(将中断线和GPIO线连接起来)
5)外部中断线的模式选择(我们一般选择外部中断,不使用外部事件中断)
6)产生软件中断触发事件
4.开始移植
1.按键的接线问题
这个程序的执行结果是:按下按键一(KEY1),使得LED16(也就是4*4矩阵显示屏上最后一排灯亮起)
独立按键的JP1接到PB0-PB7
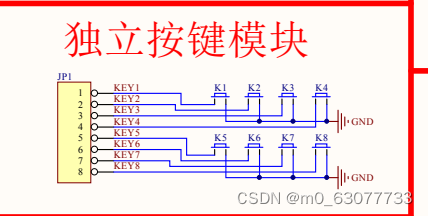
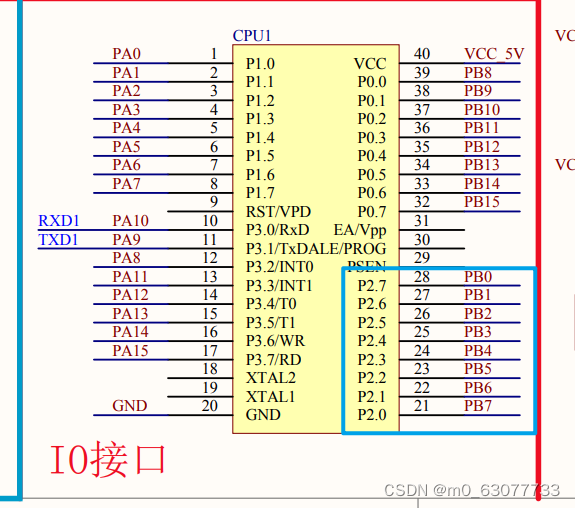
LED8-LED16的J34接到PA0-PA7


因为操作库函数的时候只能一位一位操作,所以我们只能选择其中一个引脚进行操作。
我们选择KEY1和LED16进行操作,分别对应PB0和PA7

2.关于中断几的选择
由上面可知我们KEY1对应的是PB0,由0可知应该选择EXIT0
确定好后,再stm32f10x.c和stm32f10x.h文件中进行重写和声明【我们可以再stm32f10x_md.c文件中查看应该调用哪一个函数】
3.EXTI0_IRQHandler的移植
注意点:本来我们应该再stm32f10x_it.c文件中去查找这个中断函数的初始化,但是普中科技的AMR3.0的官方代码将这个中断函数的初始化写再了exit.c文件中。

stm32f10x_it.c
  */
void EXTI0_IRQHandler(void)
{
	//检测制定的EXTI线路触发
	if(EXTI_GetITStatus(EXTI_Line0)==1)
	{
		/*
		delay_ms(10);
		if(KEY1==0)
		{
			led2=0;
		}
		*/
	}
	//清除EXTI线路挂起位
	EXTI_ClearITPendingBit(EXTI_Line0);
}
stm32f10x_it.h
//声明自己写的EXIT0
void EXTI0_IRQHandler(void);
4.RCC_Configuration的移植
1.RCC的使能
//RCC的配置
void RCC_Configuration(void){

	//因为起始代码中已经调用SystemInit将主时钟设置为72MHZ
	//所以我们这里RCC直接使能时钟就可以

	//使能GPIO端口
	//因为我们使用到的是PB0和PB8,所以只使用到GPIOB
	RCC_APB2PeriphClockCmd(RCC_APB2Periph_GPIOB|
												RCC_APB2Periph_AFIO,ENABLE);

}
2.GPIO_Configuration的移植
//GPIO初始化
void CPIO_Configuration(void){

	GPIO_InitTypeDef GPIO_InitStructure;

	//PB0 -- Key1 -- EXIT2		PA7 ---LED16
	//PB0 -- Key1 -- EXIT2【按键是输入获取】
  GPIO_InitStructure.GPIO_Pin = GPIO_Pin_0;
  GPIO_InitStructure.GPIO_Mode = GPIO_Mode_IN_FLOATING;	  //配置浮空输入
  GPIO_Init(GPIOB, &GPIO_InitStructure);

	//PA7 ---LED16【LED的显示输出】
	GPIO_InitStructure.GPIO_Pin = GPIO_Pin_7;
  GPIO_InitStructure.GPIO_Speed = GPIO_Speed_50MHz;
  GPIO_InitStructure.GPIO_Mode = GPIO_Mode_Out_PP;       //推挽输出
  GPIO_Init(GPIOA, &GPIO_InitStructure);
  GPIO_WriteBit(GPIOA, GPIO_Pin_7, Bit_RESET);			// 默认输出0让LED亮

}
3.NVIC优先级的移植
NVIC_IRQChannel:在misc.h中定义

void NVIC_Configuration(void)
{
  NVIC_InitTypeDef NVIC_InitStructure;

#ifdef  VECT_TAB_RAM
  /* Set the Vector Table base location at 0x20000000 */
  NVIC_SetVectorTable(NVIC_VectTab_RAM, 0x0);   //分配中断向量表
#else  /* VECT_TAB_FLASH  */
	//表示从FLASH中启动
  /* Set the Vector Table base location at 0x08000000 */
  NVIC_SetVectorTable(NVIC_VectTab_FLASH, 0x0);
#endif

  /* Configure one bit for preemption priority */
  // NVIC_PriorityGroup_1:2个抢占优先级,8个次优先级
  NVIC_PriorityGroupConfig(NVIC_PriorityGroup_1);  //设置中断优先级

  /* Enable the EXTI2 Interrupt */
  NVIC_InitStructure.NVIC_IRQChannel = EXTI0_IRQn; //中断通道
  NVIC_InitStructure.NVIC_IRQChannelPreemptionPriority =  0;  //强占优先级
  NVIC_InitStructure.NVIC_IRQChannelSubPriority = 0;//次优先级
  NVIC_InitStructure.NVIC_IRQChannelCmd = ENABLE;  //通道中断使能
  NVIC_Init(&NVIC_InitStructure);//初始化中断
}
4.main函数
//函数声明
//RCC的配置
void RCC_Configuration(void);
//GPIO初始化
void GPIO_Configuration(void);
void NVIC_Configuration(void);
//全局变量定义
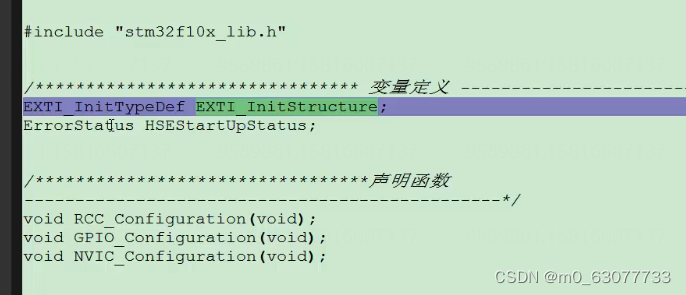
EXTI_InitTypeDef EXTI_InitStructure;
ErrorStatus HSEStatartUpStatus;
int main(){
//系统时钟配置
RCC_Configuration();
//NVIC配置
NVIC_Configuration();
//配置GPIO
GPIO_Configuration();
//将EXTI线0连接到PB0【处理按键中断】
GPIO_EXTILineConfig(GPIO_PortSourceGPIOB,GPIO_PinSource0);
/* Configure Key Button EXTI Line to generate an interrupt on falling edge */
//配置按钮中断线触发方式
EXTI_InitStructure.EXTI_Line = EXTI_Line0;
EXTI_InitStructure.EXTI_Mode = EXTI_Mode_Interrupt;
EXTI_InitStructure.EXTI_Trigger = EXTI_Trigger_Falling; //下降沿触发
EXTI_InitStructure.EXTI_LineCmd = ENABLE; //中断线使能
EXTI_Init(&EXTI_InitStructure); //初始化中断
/* Generate software interrupt: simulate a falling edge applied on Key Button EXTI line */
// EXTI_GenerateSWInterrupt(EXTI_Line0); //EXTI_Line2中断允许 到此中断配置完成,可以写中断处理函数。
while (1);
return 0;
}5.中断函数的处理(stm32f10x_it.c)
因为我们要在中断函数中对LED进行点亮/熄灭,所以需要对LED进行读取和写入。
所以要使用到我们的【GPIO_ReadInputDataBit】和【GPIO_WriteBit】
void EXTI0_IRQHandler(void)
{
	//检测制定的EXTI线路触发
	if(EXTI_GetITStatus(EXTI_Line0)==1)
	{
		//此时控制的是LED,LED对应的是PA0
		//我们想要对LED进行点亮/熄灭
		//则应该先将此时LED的状态位读取出来,然后在取反写进去
		GPIO_WriteBit(GPIOA,GPIO_Pin_0,(BitAction)((1-GPIO_ReadInputDataBit(GPIOA,GPIO_Pin_0))));
	}
	//清除EXTI线路挂起位
	EXTI_ClearITPendingBit(EXTI_Line0);
}
6.对LED的初始化
在对GPIO初始化的时候一起将lED一起点亮

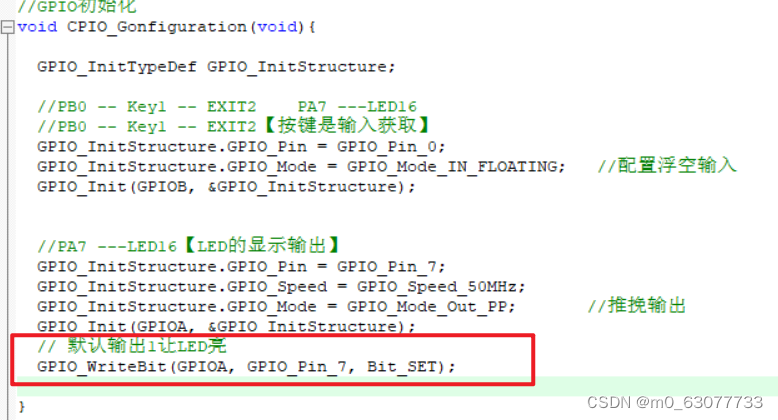
	// 默认输出1让LED亮
  GPIO_WriteBit(GPIOA, GPIO_Pin_7, Bit_SET);
3.完整代码
main.c
#include "stm32f10x.h"                  // Device header

/**
	使用库函数对STM32进行GPIO的外部中断
	按下KEY1对LED16进行点亮/熄灭
*/


//函数声明
//RCC的配置
void RCC_Configuration(void);
//GPIO初始化
void GPIO_Configuration(void);
void NVIC_Configuration(void);

//全局变量定义
EXTI_InitTypeDef EXTI_InitStructure;
ErrorStatus HSEStatartUpStatus;

int main(){

	//系统时钟配置
	RCC_Configuration();
	//NVIC配置
	NVIC_Configuration();
	//配置GPIO
	GPIO_Configuration();

	//将EXTI线0连接到PB0【处理按键中断】
	GPIO_EXTILineConfig(GPIO_PortSourceGPIOB,GPIO_PinSource0);

		/* Configure Key Button EXTI Line to generate an interrupt on falling edge */
	//配置按钮中断线触发方式
	EXTI_InitStructure.EXTI_Line = EXTI_Line0;
	EXTI_InitStructure.EXTI_Mode = EXTI_Mode_Interrupt;
	EXTI_InitStructure.EXTI_Trigger = EXTI_Trigger_Falling; //下降沿触发
	EXTI_InitStructure.EXTI_LineCmd = ENABLE; //中断线使能
  EXTI_Init(&EXTI_InitStructure); //初始化中断

  /* Generate software interrupt: simulate a falling edge applied on Key Button EXTI line */
	//人为产生中断
	//如果不想要一进来就产生中断,则应该注释掉
	//EXTI_Line0中断允许 到此中断配置完成,可以写中断处理函数。
 EXTI_GenerateSWInterrupt(EXTI_Line0);

  	while (1);


	return 0;
}


//RCC的配置
void RCC_Configuration(void){

	//因为起始代码中已经调用SystemInit将主时钟设置为72MHZ
	//所以我们这里RCC直接使能时钟就可以

	//使能GPIO端口
	//因为我们使用到的是PB0和PB8,所以只使用到GPIOB
	RCC_APB2PeriphClockCmd(RCC_APB2Periph_GPIOB|
												RCC_APB2Periph_GPIOA | RCC_APB2Periph_AFIO,ENABLE);

}

//GPIO初始化
void CPIO_Gonfiguration(void){

	GPIO_InitTypeDef GPIO_InitStructure;

	//PB0 -- Key1 -- EXIT2		PA7 ---LED16
	//PB0 -- Key1 -- EXIT2【按键是输入获取】
  GPIO_InitStructure.GPIO_Pin = GPIO_Pin_0;
  GPIO_InitStructure.GPIO_Mode = GPIO_Mode_IN_FLOATING;	  //配置浮空输入
  GPIO_Init(GPIOB, &GPIO_InitStructure);


	//PA7 ---LED16【LED的显示输出】
	GPIO_InitStructure.GPIO_Pin = GPIO_Pin_7;
  GPIO_InitStructure.GPIO_Speed = GPIO_Speed_50MHz;
  GPIO_InitStructure.GPIO_Mode = GPIO_Mode_Out_PP;       //推挽输出
  GPIO_Init(GPIOA, &GPIO_InitStructure);
	// 默认输出1让LED亮
  GPIO_WriteBit(GPIOA, GPIO_Pin_7, Bit_SET);

}

void NVIC_Configuration(void)
{
  NVIC_InitTypeDef NVIC_InitStructure;

#ifdef  VECT_TAB_RAM
  /* Set the Vector Table base location at 0x20000000 */
  NVIC_SetVectorTable(NVIC_VectTab_RAM, 0x0);   //分配中断向量表
#else  /* VECT_TAB_FLASH  */
	//表示从FLASH中启动
  /* Set the Vector Table base location at 0x08000000 */
  NVIC_SetVectorTable(NVIC_VectTab_FLASH, 0x0);
#endif

  /* Configure one bit for preemption priority */
  // NVIC_PriorityGroup_1:2个抢占优先级,8个次优先级
  NVIC_PriorityGroupConfig(NVIC_PriorityGroup_1);  //设置中断优先级

  /* Enable the EXTI2 Interrupt */
  NVIC_InitStructure.NVIC_IRQChannel = EXTI0_IRQn; //中断通道
  NVIC_InitStructure.NVIC_IRQChannelPreemptionPriority =  0;  //强占优先级
  NVIC_InitStructure.NVIC_IRQChannelSubPriority = 0;//次优先级
  NVIC_InitStructure.NVIC_IRQChannelCmd = ENABLE;  //通道中断使能
  NVIC_Init(&NVIC_InitStructure);//初始化中断
}
stm32f10x_it.c
void EXTI0_IRQHandler(void)
{
	//检测制定的EXTI线路触发
	if(EXTI_GetITStatus(EXTI_Line0)==1)
	{
		//此时控制的是LED,LED对应的是PA0
		//我们想要对LED进行点亮/熄灭
		//则应该先将此时LED的状态位读取出来,然后在取反写进去
		GPIO_WriteBit(GPIOA,GPIO_Pin_0,(BitAction)((1-GPIO_ReadInputDataBit(GPIOA,GPIO_Pin_0))));
	}
	//清除EXTI线路挂起位
	EXTI_ClearITPendingBit(EXTI_Line0);
}