Linux篇之在Centos环境下搭建Nvidia显卡驱动
一、前提条件
1、首先确认内核版本和发行版本,再确认显卡型号
uname -a
// Linux localhost.localdomain 4.18.0-408.el8.x86_64 #1 SMP Mon Jul 18 17:42:52 UTC 2022 x86_64 x86_64 x86_64 GNU/Linux
1.2
cat /etc/redhat-release
// CentOS Stream release 8
1.3
查看Linux服务器上是否有GPU显卡可以使用lspci命令
PCI(Peripheral Component Interconnect,外设部件互连标准),即定义连接外部设备的一个标准;
主板上有很多 PCI 接口,用来连接显卡、网卡、声卡等外部设备,而 lspci 命令就是用来列出所有连接 PCI 接口的外部设备
安装lspci命令
yum install -y pciutils
1.4、Linux查看显卡信息:
lspci | grep -i vga
1.5、使用nvidia GPU也可以:
lspci | grep -i nvidia
// 01:00.0 VGA compatible controller: NVIDIA Corporation TU104 [GeForce RTX 2080] (rev a1)
// 我的显卡是: GeForce RTX 2080
根据显卡类型下载驱动
下载驱动url:
https://www.nvidia.cn/Download/index.aspx?lang=cn

二、部署步骤
1、安装驱动
1.1、进入root 模式
su - root
1.2、进入命令行模式
init 3
2、安装依赖包
yum install -y kernel-devel
yum install gcc
yum install mak
yum install elfutils-libelf-devel
yum install libglvnd-devel pkg-config
注意:如果没有yum镜像源,需要mount镜像源
手动挂载镜像源,可参考我的这篇文章:
https://blog.csdn.net/xu710263124/article/details/134784226?spm=1001.2014.3001.5501
3、禁用自带的驱动项目nouveau
先查看nouveau驱动是否开启
lsmod | grep nouveau
注:默认情况下,Linux机器的nouveau驱动是开启的
执行以下动作关闭默认驱动:
修改dist-blacklist.conf文件
vim /lib/modprobe.d/dist-blacklist.conf
# 注释blacklist nvidiafb
#blacklist nvidiafb

添加下面两句:
blacklist nouveau
options nouveau modeset=0
4、重建initramfs image
执行如下步骤
#备份一份成bak文件
mv /boot/initramfs-$(uname -r).img /boot/initramfs-$(uname -r).img.bak
#重启镜像
dracut /boot/initramfs-$(uname -r).img $(uname -r)
#修改运行级别为文本模式
systemctl set-default multi-user.target
5、重启机器
reboot
重启后:
检查nouveau是否开启

6、执行安装文件
将显卡安装文件的执行权限调至可运行
chmod u+x NVIDIA-Linux-x86_64-515.48.07.run
// 执行安装脚本
// 根据uname -r 输出的信息替换下面
uname -r

bash ./NVIDIA-Linux-x86_64-515.48.07.run -no-x-check -no-nouveau-check -k $(uname -r) --kernel-source-path=/usr/src/kernels/3.10.0-1160.el7.x86_64
注:请将上面内容改成你自己的位置,不要直接复制
开始安装

7、检查安装
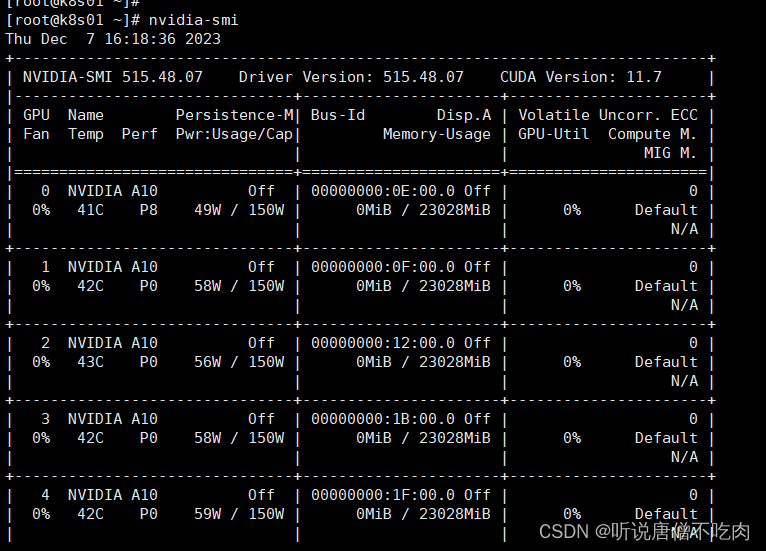
nvidia-smi

至此i,说明Nvidia显卡驱动安装成功~
常见报错:
Using the kernel source path ‘/usr/src/kernels/3.10.0-1160.el7.x86_64’ as specified by the ‘–kernel-source-path’ commandline option.
ERROR: The kernel header file ‘/usr/src/kernels/3.10.0-1160.el7.x86_64/include/linux/kernel.h’ does not exist. The most likely reason for this is that the kernel source path ‘/usr/src/kernels/3.10.0-1160.el7.x86_64’ is incorrect. Please make sure you have installed the kernel source files for your kernel and that they are properly configured; on Red Hat Linux systems, for example, be sure you have the ‘kernel-source’ or ‘kernel-devel’ RPM installed. If you know the correct kernel source files are installed, you may specify the kernel source path with the ‘–kernel-source-path’ command line option.
ERROR: Installation has failed. Please see the file ‘/var/log/nvidia-installer.log’ for details. You may find suggestions on fixing installation problems in the README available on the Linux driver download page at www.nvidia.com.
报错原因:没有安装kernel-devel
yum install -y kernel-devel
