【RabbitMQ(二)】:Exchange 详解 | Message Convert 消息转换器
文章目录
- 03. 使用 Java 代码去操控 RabbitMQ
- 3.1 快速入门
- 3.1.1 创建父子项目
- 3.1.2 编写代码
- 3.2 Work 模型
- 3.3 RabbitMQ 中的三类交换机
- 3.3.1 Fanout 扇出交换机
- 3.3.2 Direct 交换机
- 3.3.3 Topic 交换机
- 3.4 声明队列交换机
- 3.4.1 方式一:书写 Config 类
- 3.4.2 方式二:注解方式创建
- 3.5 消息转换器
03. 使用 Java 代码去操控 RabbitMQ
💡 Spring 提供了对 RabbitMQ 的支持:Spring AMQP
💡AMQP和Spring AMQP
AMQP(Advanced Message Queuing Protocol):是用在应用程序之间传递业务消息的开放标准。该协议与语言和平台无关,更符合微服务中独立性的要求。Spring AMQP:是 Spring 基于 AMQP 设计的一套 API 规范,提供了 发送和接收消息 的 API。
- 声明式配置:Spring AMQP 提供了一组注解和 XML 配置来声明和配置消息队列、交换机、绑定等 AMQP 元素,使得配置变得简单和灵活。
- 消息发送和接收:Spring AMQP 提供了
AmqpTemplate接口,用于发送和接收消息。开发者可以使用AmqpTemplate接口中的方法来发送消息到队列或交换机,并从队列或交换机中接收消息。- 消息监听容器:Spring AMQP 提供了
@RabbitListener注解和SimpleMessageListenerContainer类来简化消息监听的配置和管理。开发者可以使用@RabbitListener注解将方法标记为消息监听器,并通过配置SimpleMessageListenerContainer来管理消息监听器的运行。- 消息转换:Spring AMQP 提供了一组消息转换器(
MessageConverter),用于在消息发送和接收之间进行消息 格式 的转换。开发者可以使用消息转换器来将消息对象转换为字节流,或将字节流转换为消息对象,以实现消息的序列化和反序列化。- 事务管理:Spring AMQP 提供了对事务的支持,开发者可以使用
RabbitTransactionManager类来管理消息发送和接收的事务,以确保消息的可靠传递。
3.1 快速入门
3.1.1 创建父子项目
💡 这里使用 maven 创建父子项目来演示,父项目命名为
mq-demo,下面包含两个子项目publisher和consumer来分别扮演消息发送者和消息消费者。
👉 创建父项目
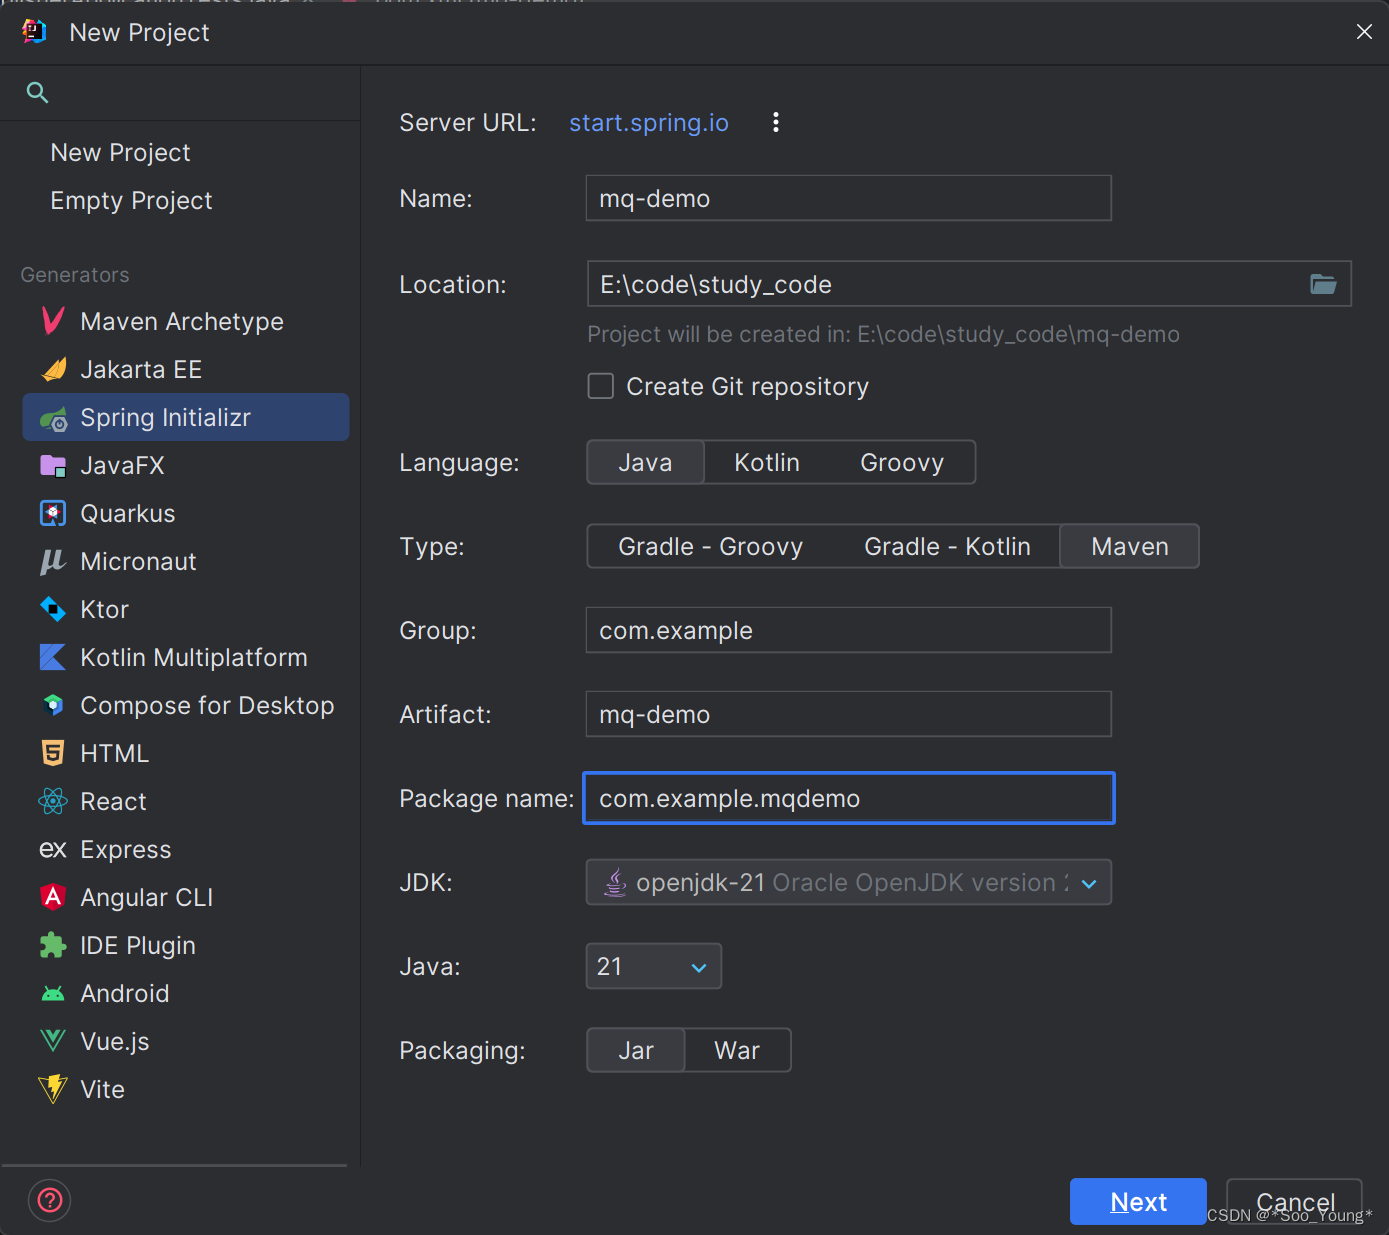
👉 依赖中选择 Lombok Spring Web Spring for RabbitMQ
👉 删除掉不需要的部分
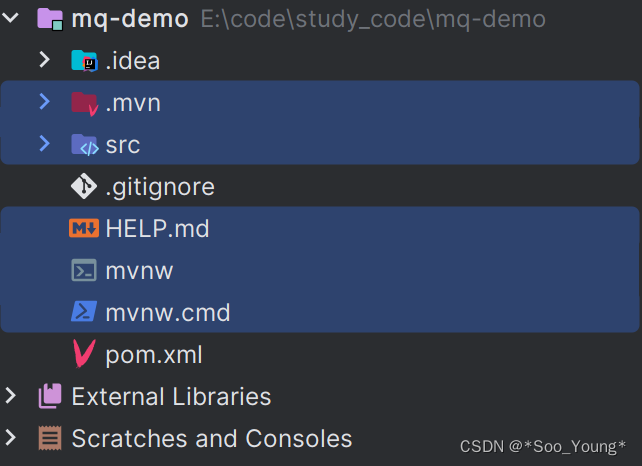
👉 更改 pom.xml 文件中的打包方式为 pom,且需要注册 modules
<packaging>pom</packaging>
<modules>
    <module>publisher</module>
    <module>consumer</module>
</modules>
👉 创建子项目 publisher,无需选择依赖
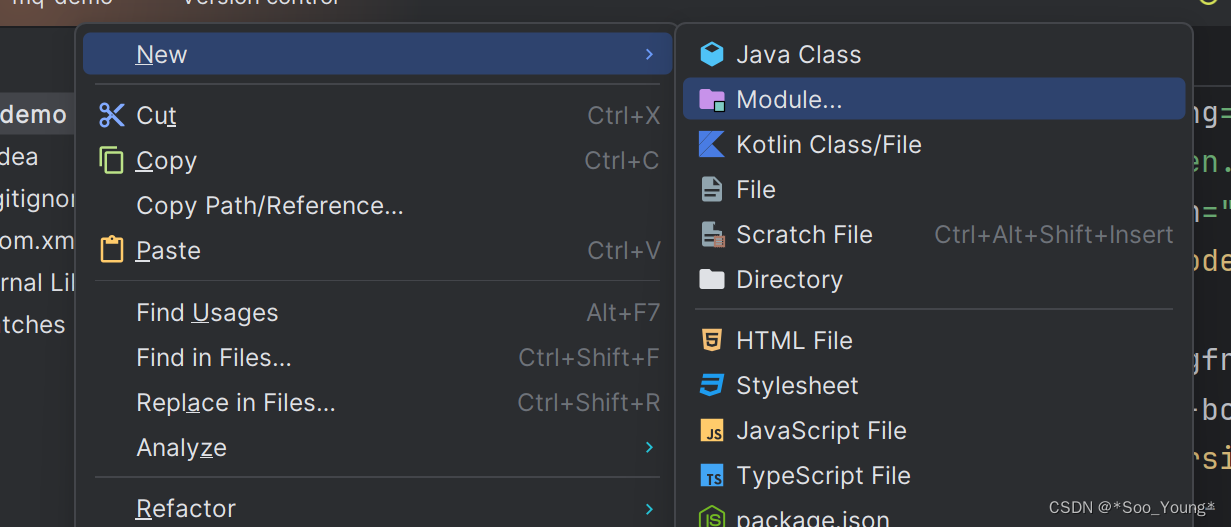
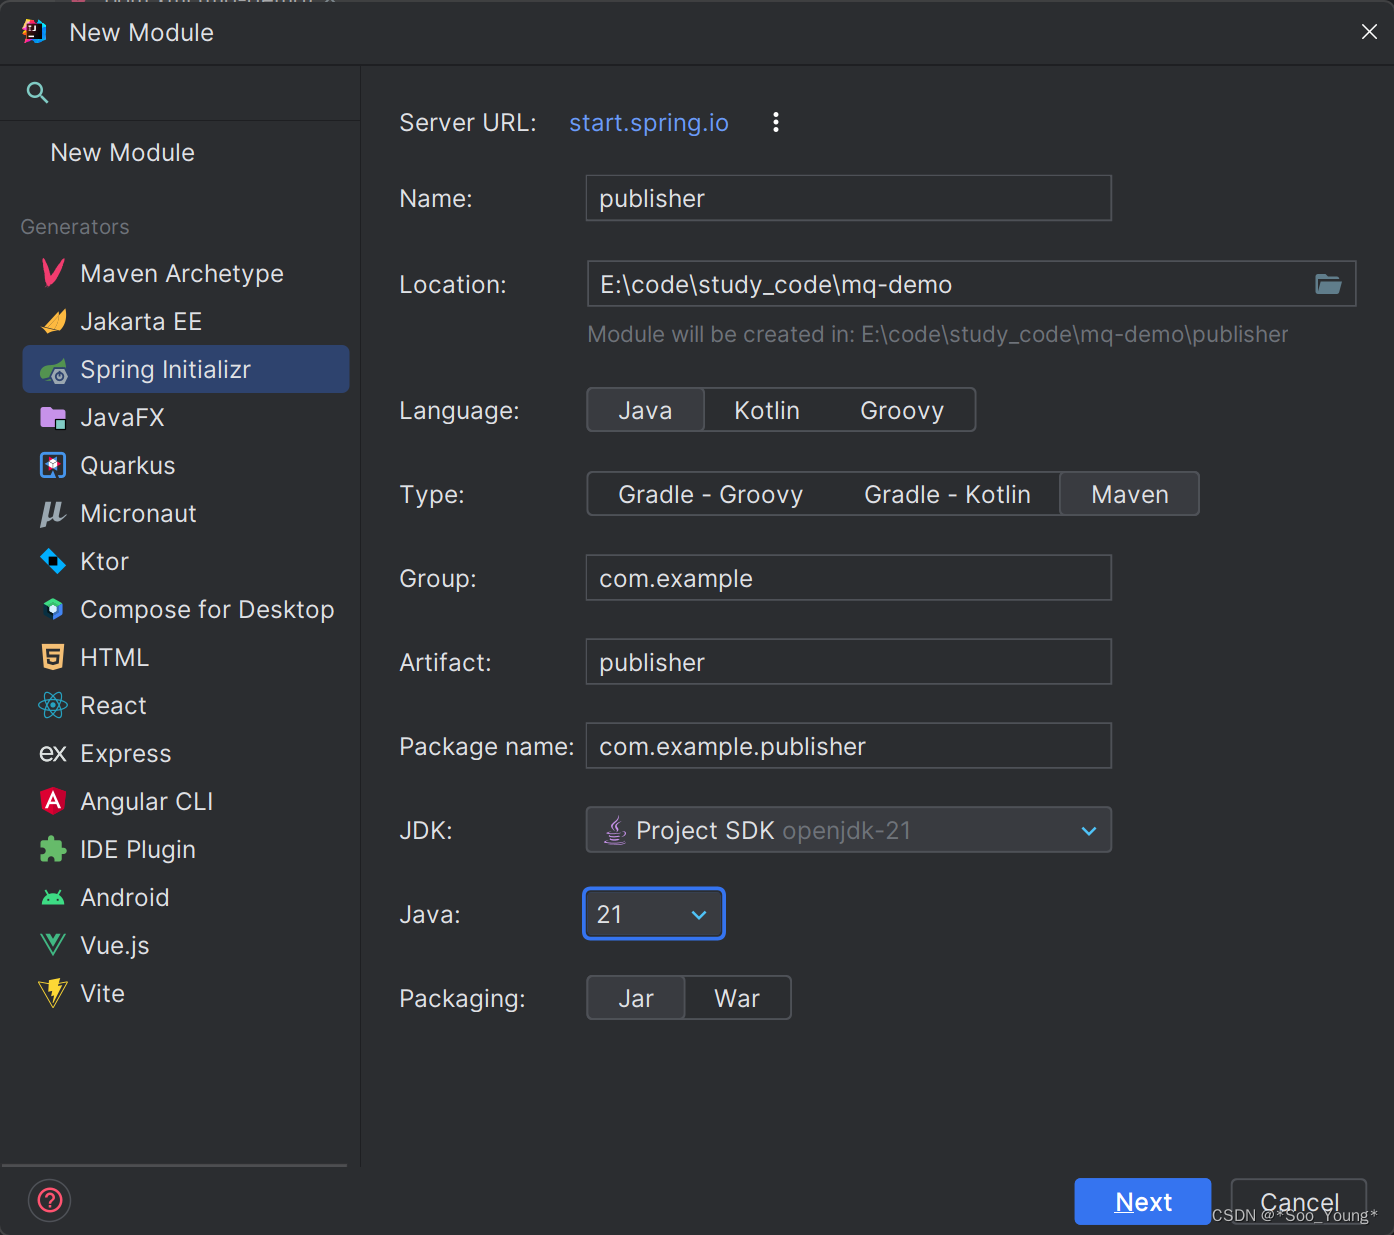
👉 修改其父项目为 mq-demo
	<parent>
		<groupId>com.example</groupId>
		<artifactId>mq-demo</artifactId>
		<version>0.0.1-SNAPSHOT</version>
	</parent>
👉 以相同的方法创建 consumer Module
👉 打开 maven 的 Group Modules 选项
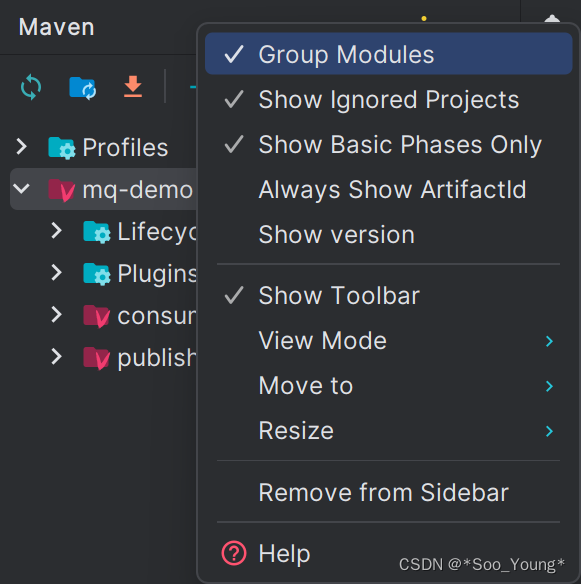
👉 最终父项目配置文件参考
<?xml version="1.0" encoding="UTF-8"?>
<project xmlns="http://maven.apache.org/POM/4.0.0" xmlns:xsi="http://www.w3.org/2001/XMLSchema-instance"
         xsi:schemaLocation="http://maven.apache.org/POM/4.0.0 https://maven.apache.org/xsd/maven-4.0.0.xsd">
    <modelVersion>4.0.0</modelVersion>
    <parent>
        <groupId>org.springframework.boot</groupId>
        <artifactId>spring-boot-starter-parent</artifactId>
        <version>3.2.2</version>
        <relativePath/> <!-- lookup parent from repository -->
    </parent>
    <groupId>com.example</groupId>
    <artifactId>mq-demo</artifactId>
    <version>0.0.1-SNAPSHOT</version>
    <name>mq-demo</name>
    <modules>
        <module>publisher</module>
        <module>consumer</module>
    </modules>
    <packaging>pom</packaging>
    <description>mq-demo</description>
    <properties>
        <java.version>21</java.version>
    </properties>
    <dependencies>
        <dependency>
            <groupId>org.springframework.boot</groupId>
            <artifactId>spring-boot-starter-amqp</artifactId>
        </dependency>
        <dependency>
            <groupId>org.springframework.boot</groupId>
            <artifactId>spring-boot-starter-web</artifactId>
        </dependency>

        <dependency>
            <groupId>org.projectlombok</groupId>
            <artifactId>lombok</artifactId>
            <optional>true</optional>
        </dependency>
        <dependency>
            <groupId>org.springframework.boot</groupId>
            <artifactId>spring-boot-starter-test</artifactId>
            <scope>test</scope>
        </dependency>
        <dependency>
            <groupId>org.springframework.amqp</groupId>
            <artifactId>spring-rabbit-test</artifactId>
            <scope>test</scope>
        </dependency>
        <!-- https://mvnrepository.com/artifact/com.fasterxml.jackson.core/jackson-core -->
        <dependency>
            <groupId>com.fasterxml.jackson.core</groupId>
            <artifactId>jackson-core</artifactId>
            <version>2.15.2</version>
        </dependency>
        <dependency>
            <groupId>com.fasterxml.jackson.dataformat</groupId>
            <artifactId>jackson-dataformat-xml</artifactId>
        </dependency>
    </dependencies>

    <build>
        <plugins>
            <plugin>
                <groupId>org.springframework.boot</groupId>
                <artifactId>spring-boot-maven-plugin</artifactId>
                <configuration>
                    <excludes>
                        <exclude>
                            <groupId>org.projectlombok</groupId>
                            <artifactId>lombok</artifactId>
                        </exclude>
                    </excludes>
                </configuration>
            </plugin>
        </plugins>
    </build>

</project>
3.1.2 编写代码
💡 这里使用将消息添加到队列和监听队列的方式去演示
上面父项目中已经导入了相关的包,子项目可以直接引用
👉 在 application.yaml 中配置 RabbitMQ 服务器
spring:
  rabbitmq:
    host: 192.168.88.3 # 服务器的 ip 地址
    port: 5672 # 服务器端口
    virtual-host: /myHost # 主机名
    username: root # 账号
    password: 123456 # 密码
👉 创建一个测试使用的队列
👉 将 publisher 的代码写在 test 文件中,首先要引入 RabbitTemplate,这是对请求代码的 高级封装。
@SpringBootTest
class PublisherApplicationTests {
    @Resource
    RabbitTemplate rabbitTemplate;

    @Test
    void contextLoads() {
        String queueName = "simple.queue";
        String message = "Hello RabbitMq!";
        rabbitTemplate.convertAndSend(queueName, message);
    }
}
👉 consumer 中的代码写在 /listeners/MqListener 中,使用 @RabbitListener 来指定监听的队列
package com.example.consumer.listeners;

import lombok.extern.slf4j.Slf4j;
import org.springframework.amqp.rabbit.annotation.RabbitListener;
import org.springframework.stereotype.Component;

@Slf4j
@Component
public class MqListener {
    @RabbitListener(queues = "simple.queue")
    public void listen(String message) {
        log.info("收到消息{}", message);
    }
}
💡 需要注意的是两个子模块的配置文件中都需要表明服务器的相关配置。
👉 运行 consumer 和 publisher 中的代码,检查是否成功接收到消息

3.2 Work 模型
💡
RabbitMQ的Work模型是一种简单的消息队列模型,也被称为简单队列模式(Simple Queue Pattern)。在Work模型中,多个消费者共享同一个队列,并从该队列中获取消息进行处理。
- 这个模型有一个特点叫做 消息均衡消费,即:
RabbitMQ会将消息均匀地分配给各个消费者进行处理,以实现负载均衡。即使消费者的处理能力不同,RabbitMQ也会尽量将消息均匀分发,以保证每个消费者都能够参与到消息的处理中。
👉 先来测试一下这个模型,在 consumer 中创建两个 方法 去监听同一个端口,一个方法处理完后休眠 1000ms,另一个不休眠,统计它们处理消息的数量:
    int listener1 = 1;
    int listener2 = 1;

    @RabbitListener(queues = "work.queue")
    public void listenerWorkQueue1(String msg) throws InterruptedException {
        log.info("listener1 收到消息{},目前共处理消息{}条", msg, listener1++);
    }

    @RabbitListener(queues = "work.queue")
    public void listenerWorkQueue2(String msg) throws InterruptedException {
        log.error("listener2 收到消息{},目前共处理消息{}条", msg, listener2++);
        Thread.sleep(1000);
    }
💡 后面不再每次强调队列的创建,大家可以自主创建队列来进行模拟或者参考我代码中的队列。
👉 利用 publisher 发送消息
    @Test
    void publishTest() throws InterruptedException {
        String queueName = "work.queue";
        for (int i = 0; i < 50; i++) {
            String message = "Hello RabbitMq! id = " + i;
            rabbitTemplate.convertAndSend(queueName, message);
        }
    }
👉 观察控制台,可以发现两个方法分别处理了 25 条消息,即使它们的处理速度差别非常大。
❗ 但肯定希望能力强的
consumer多处理一些部分,这就需要了解RabbitMQ的预取机制,在RabbitMQ中,预取(Prefetch)是指消费者在处理消息之前,从RabbitMQ服务器预取一定数量的消息到本地缓冲区的行为。预取机制允许消费者一次性从服务器获取多个消息,以提高消息处理的效率和吞吐量。💡
Spring AMQP会根据消费者的数量来 平均 分配预取的数量,这就导致了上面出现的各25条的现象。
👉 所以为了使得预取数量可以按照自己的能力来取得,可以手动将预取的数量设定为 1 也就是 consumer 处理完这一条消息后再去取下一条,这样就实现了按照工作能力来分配消息。
application.xml
spring:
  rabbitmq:
    host: 192.168.88.3
    port: 5672
    virtual-host: /myHost # 主机名
    username: root
    password: 123456
    listener:
      simple:
        prefetch: 1
👉 再次测试

- 处理速度快的直接就处理了
49条消息。
3.3 RabbitMQ 中的三类交换机
💡 真实的生产活动中都是通过
exchange也就是交换机,来发送消息❓为什么要通过交换机来发消息而不是直接发送到队列呢?
- 首先是后续拓展的问题,后续如果加入一个
consumer而它的队列又不是已有的队列,这时候就需要新增publisher中的代码;而通过交换机则不同consumer可以将自己指定的队列接入到交换机(这在consumer方是很容易实现的),publisher只需要将消息发布到exchange就可以实现分配,实现了生产者和消费者的 解耦,提高了系统的灵活性。- 交换机可以 根据路由规则 将消息转发到符合条件的队列中,从而实现消息的 过滤和转发。通过合理设置交换机的绑定规则,可以实现精确的消息路由和分发,满足不同业务场景下的需求。
- RabbitMQ 提供了不同类型的交换机,如直连交换机(
Direct Exchange)、主题交换机(Topic Exchange)、扇出交换机(Fanout Exchange)等。每种交换机类型都有不同的路由规则和特点,可以根据实际需求选择合适的交换机类型来实现灵活的消息路由。
3.3.1 Fanout 扇出交换机
💡
Fanout Exchange会将其接收到的消息发布到每一个和其bind的队列
- 可以实现发布/订阅模式(Pub/Sub),
publisher将消息通过该交换机广播出去,所以也被称为广播模式。
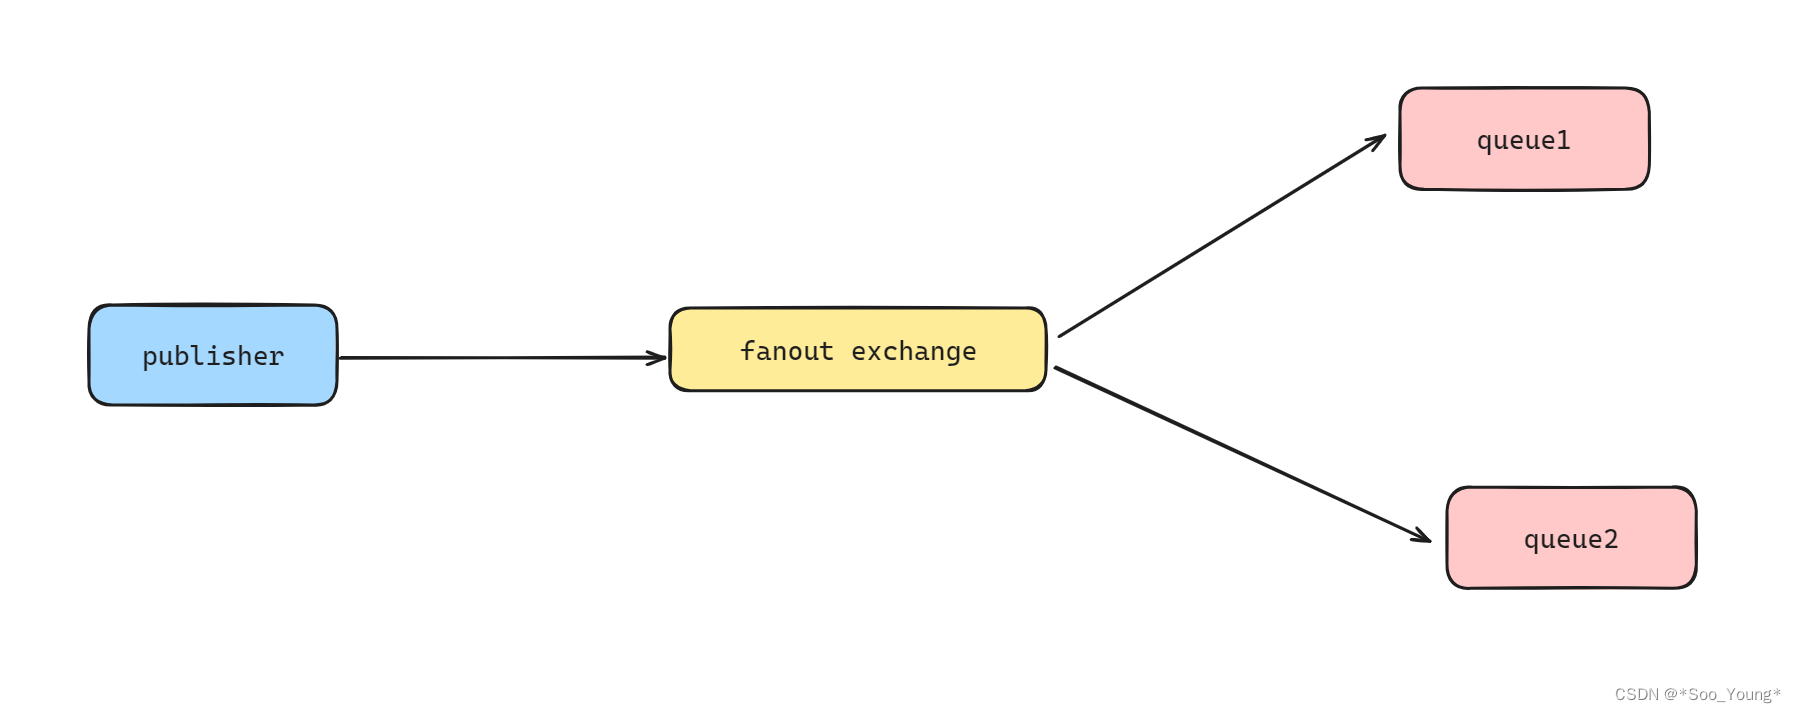
👉 监听端和上面的代码相同,没什么变化,仍然指向监听的队列即可,将这两个队列绑定到 amq.fanout 上
    @RabbitListener(queues = "fanout.queue1")
    public void listenerFanoutQueue1(String msg) throws InterruptedException {
        log.info("Fanout listener1 收到消息{}", msg);
    }

    @RabbitListener(queues = "fanout.queue2")
    public void listenerFanoutQueue2(String msg) throws InterruptedException {
        log.error("Fanout listener2 收到消息{}", msg);
    }
💡
amq.fanout是系统创建时默认携带的交换机,当然也可以根据业务去创建自己的交换机
- 通过在图形化控制界面指定新创建的交换机的
type来创建不同的交换机
👉 编写 publisher 代码
    @Test
    void FanoutTest() throws InterruptedException {
        String exchangeName = "amq.fanout";
            String message = "Hello Everyone!";
            rabbitTemplate.convertAndSend(exchangeName, "",message);
            Thread.sleep(20);
    }
💡 这里仍然使用上面的
convertAndSent的 API
通过指定
routingKey(必须要有,没有的话以空字符串填充)和exchangeName这里看一下两个重写方法的区别:
// 交换机
rabbitTemplate.convertAndSend(exchangeName, "",message);
// 队列
rabbitTemplate.convertAndSend(queueName, message);
👉 发送信息,查看效果

3.3.2 Direct 交换机
💡 显然只通过广播方式无法满足实际开发的需求
Direct交换机可以根据消息的路由键(Routing Key)将消息直接发送到与之匹配的队列中。Direct的路由键就是其绑定队列时的绑定键,这与后面提到的Topic交换机有区别Direct交换机通常用于 点对点 的消息传递模式,即一条消息只能被一个消费者处理,当生产者发送一条消息时,Direct 交换机会根据消息的路由键将消息发送到一个特定的队列中,然后只有这个队列的一个消费者能够接收和处理该消息。
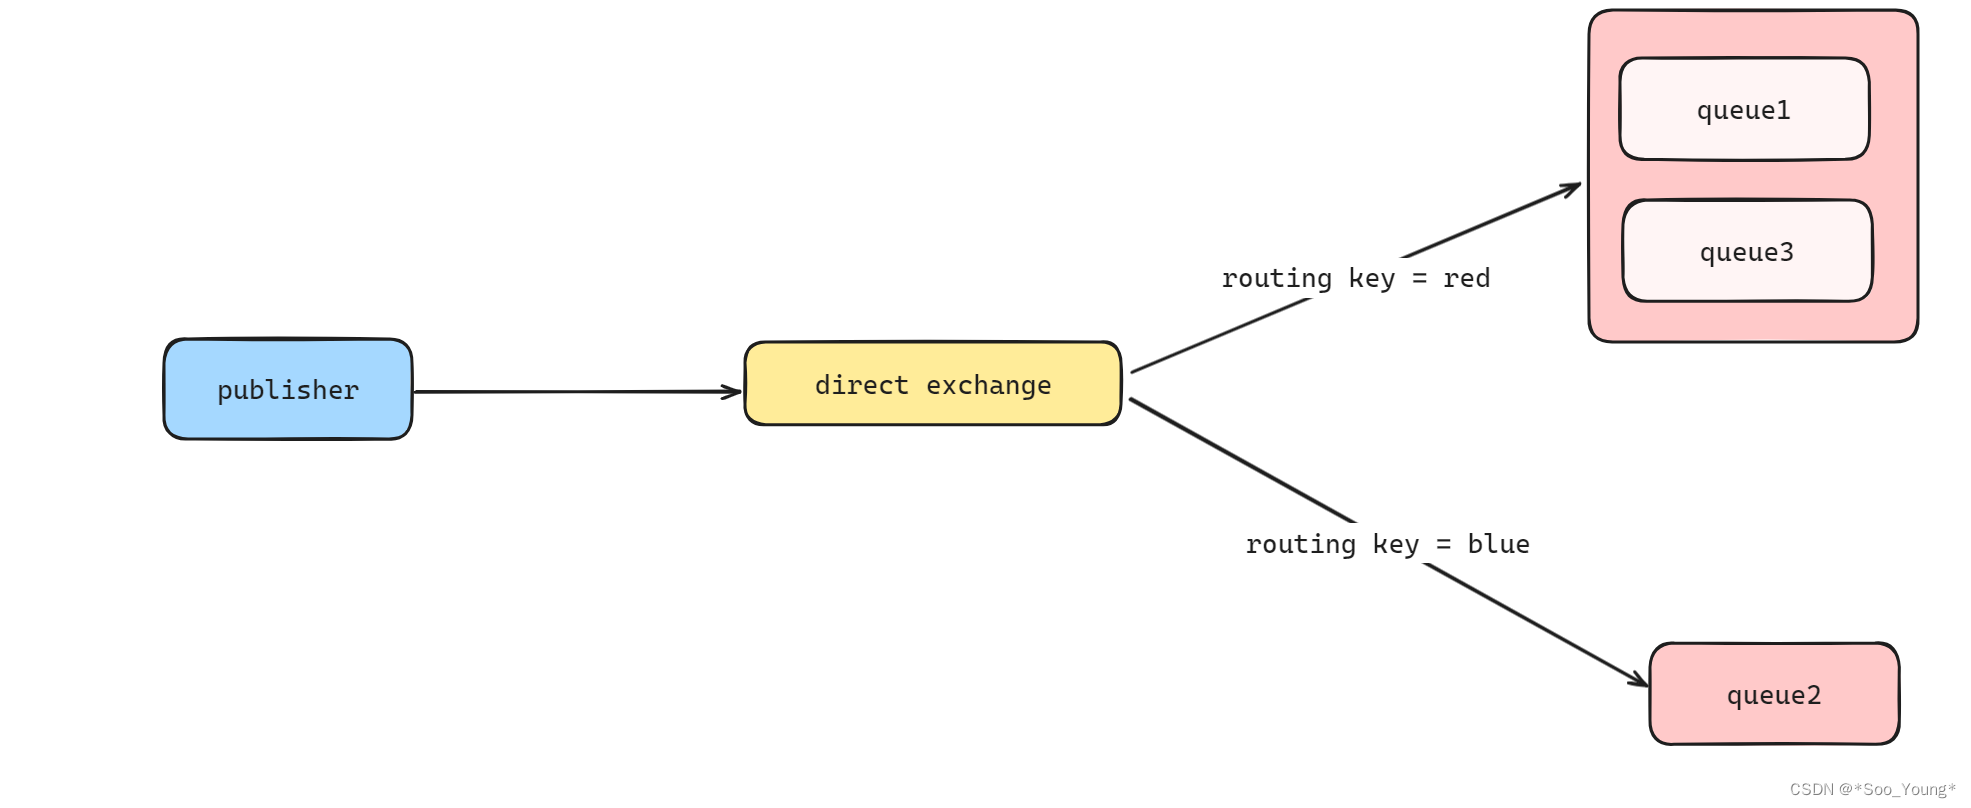
👉 按照上图的形式去创建队列
- 但一般不会采用这种将一个
routing key去绑定多个队列的场景,这里只是作为演示。
👉 编写 publisher 的 test 方法
    @Test
    void DirectTest() throws InterruptedException {
        String exchangeName = "amq.direct";
        String message = "Hello Everyone!";
        rabbitTemplate.convertAndSend(exchangeName, "blue",message);
        Thread.sleep(20);
    }
👉 编写接收消息的方法,仍然是只需要指定监听的队列
    @RabbitListener(queues = "direct.queue1")
    public void listenerDirectQueue1(String msg) throws InterruptedException {
        log.error("Direct listener1 收到消息{}", msg);
    }

    @RabbitListener(queues = "direct.queue2")
    public void listenerDirectQueue2(String msg) throws InterruptedException {
        log.info("Fanout listener2 收到消息{}", msg);
    }

    @RabbitListener(queues = "direct.queue3")
    public void listenerDirectQueue3(String msg) throws InterruptedException {
        log.error("Fanout listener3 收到消息{}", msg);
    }
👉 发送消息并且测试

3.3.3 Topic 交换机
💡
Topic交换机是RabbitMQ中的一种高级交换机类型,它允许消息根据路由键(Routing Key)的模式匹配将消息路由到 一个或多个队列 中。Topic 交换机使用 通配符 匹配路由键,使得消息能够更灵活地进行路由和分发。
Topic 交换机通常用于 多对多 的消息传递模式,即一条消息可以被多个消费者处理。
可以将
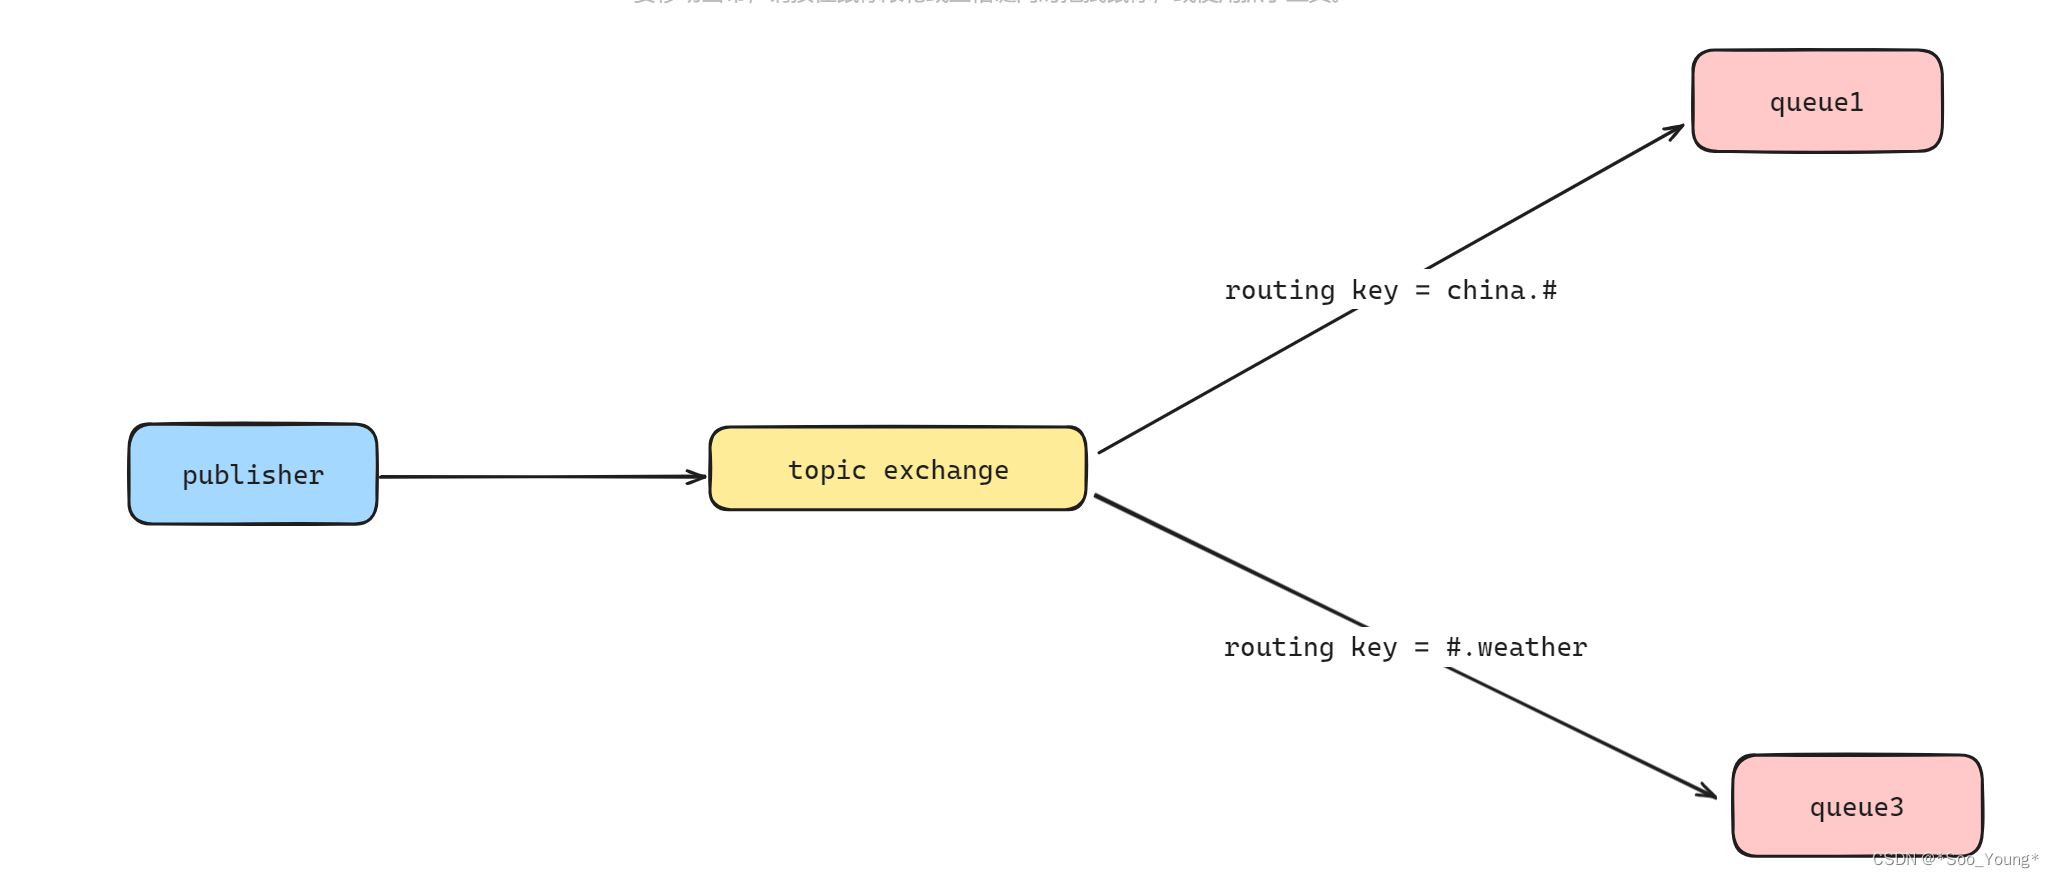
Topic Exchange看作是对Direct Exchange的一种拓展,它的Routing Key可以是多个单词,中间以.来进行分割,比如china.news和china.weather,而Binding Key支持 通配符。
#代表一个或者多个单词*代表一个单词比如将
Binding Key设置为china.#则Routing Key为两个中的任意一个都会导航到这个队列
👉 编写 publisher 代码
    @Test
    void TopicTest() throws InterruptedException {
        String exchangeName = "amq.topic";
        String news = "Hello Everyone!";
        String weather = "晴朗";
        rabbitTemplate.convertAndSend(exchangeName, "china.weather", weather);
        rabbitTemplate.convertAndSend(exchangeName, "china.news", news);
        Thread.sleep(20);
    }
👉 编写 consumer 代码
    @RabbitListener(queues = "topic.queue1")
    public void listenerTopicQueue1(String msg) throws InterruptedException {
        log.info("Topic listener1 收到消息{}", msg);
    }

    @RabbitListener(queues = "topic.queue2")
    public void listenerTopicQueue2(String msg) throws InterruptedException {
        log.info("Topic listener2 收到消息{}", msg);
    }
👉 发送消息测试结果

3.4 声明队列交换机
💡
Spring AMQP提供了一些 API 去创建新的队列和交换机可以在代码中去创建新的交换机
- 在生产环境(development environment)中使用的
RabbitMQ和运行环境中使用的肯定是不同的,所以在部署的时候需要重新设置交换机和队列,而在控制台上创建这些队列就可能会导致很多由于人工出现的错误。- 所以可以选择在代码中去创建类和属性,这样可以避免大部分的人工问题。
3.4.1 方式一:书写 Config 类
💡
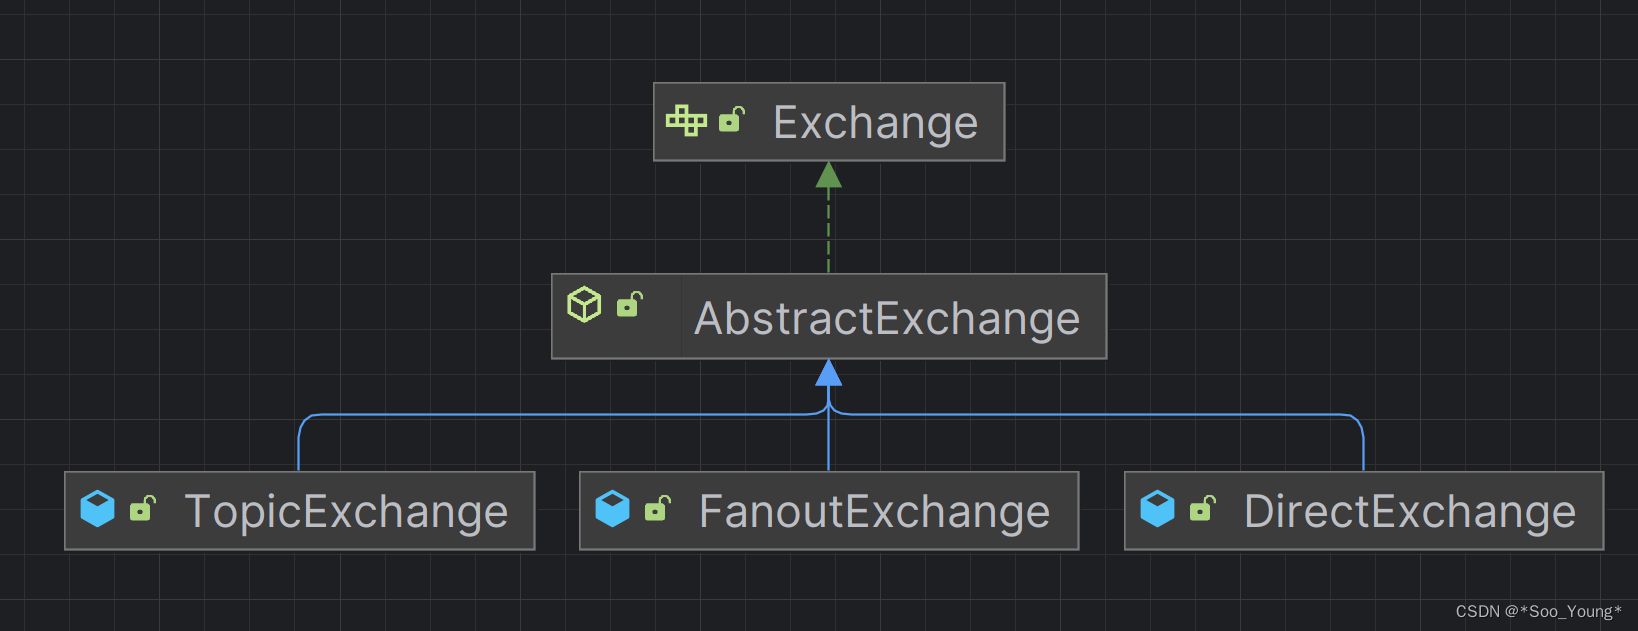
Spring AMQP提供了几个类用来声明队列、交换机以及其绑定关系
Queue类:用于声明队列,可以使用QueueBuilder中的build()方法Exchange类:声明交换机Binding类:声明队列与交换机的关系
👉 通过将这些 Bean 交给 spring 去管理就可以实现自主的创建。
package com.example.consumer.config;

import org.springframework.amqp.core.*;
import org.springframework.context.annotation.Bean;
import org.springframework.context.annotation.Configuration;

@Configuration
public class FanoutConfiguration {
    @Bean
    public FanoutExchange fanoutExchange() {
//        ExchangeBuilder.fanoutExchange("").build();
        return new FanoutExchange("fanout2");
    }

    @Bean
    public Queue fanout2Queue() {
//        return QueueBuilder.durable("").build();
        return new Queue("fanout2.queue1");
    }

    @Bean
    public Binding binding() {
        return BindingBuilder.bind(fanout2Queue()).to(fanoutExchange());
    }
}
3.4.2 方式二:注解方式创建
👉 代码示例
    @RabbitListener(bindings = @QueueBinding(
            value = @Queue(name = "object.queue1", declare = "true"),
            exchange = @Exchange(name = "object", type = ExchangeTypes.DIRECT),
            key = {"object"}
    ))
	public void listenerObject(Map<String, String> map) {
        System.out.println(map.get("name"));
    }
💡 通过这样的注解就可以声明出队列、交换机和它们之间的
binding
通过
value指定queue,后面的declare是是否持久化的选项,默认为true(后面详细讲)通过
exchange指定交换机,ExchangeTypes为枚举类,指定创建的类型通过
key来指定Binding Key,是一个字符串数组,可以指定多个Binding Key当使用
@RabbitListener注解时,如果指定的队列不存在,Spring Boot会 自动创建该队列。如果指定的交换机不存在,Spring Boot也会 自动创建该交换机。然后将 队列与交换机进行绑定,以便消息可以正确地路由到指定的队列。
3.5 消息转换器
💡 在发送 对象 的时候
Spring对消息对象的处理是基于 JDK 的ObjectOutputStream来序列化的
这就导致了下面几个问题
JDK序列化有安全风险
JDK序列化后的消息体积很大
JDK序列化的消息可读性很差
👉 所以在处理发送对象的时候使用 JSON 格式来对信息进行序列化,首先引入依赖
        <dependency>
            <groupId>com.fasterxml.jackson.dataformat</groupId>
            <artifactId>jackson-dataformat-xml</artifactId>
        </dependency>
👉 配置消息转换器到 ApplicationContext 中,即声明 Bean,
- 可以通过写
Config类的方式实现,这里直接将声明写到主方法中
@SpringBootApplication
public class PublisherApplication {

    public static void main(String[] args) {
        SpringApplication.run(PublisherApplication.class, args);
    }

    @Bean
    public MessageConverter MessageConverter() {
        return new Jackson2JsonMessageConverter();
    }
}
@SpringBootApplication
public class ConsumerApplication {

    public static void main(String[] args) {
        SpringApplication.run(ConsumerApplication.class, args);
    }
    @Bean
    public MessageConverter MessageConverter() {
        return new Jackson2JsonMessageConverter();
    }
}
❗ 注意:在
publisher和consumer中的序列化以及反序列化的转换器 必须相同
👉 实现对象的传递
    @Test
    void ObjectTest() throws JsonProcessingException {
        Map<String, String> map = new HashMap<>();
        map.put("name", "Jack");
        map.put("age", "18");
        String exchangeName = "object";
        CorrelationData correlationData = new CorrelationData(UUID.randomUUID().toString());
        rabbitTemplate.convertAndSend(exchangeName, "object", map);
    }
    @RabbitListener(bindings = @QueueBinding(
            value = @Queue(name = "object.queue1", declare = "true"),
            exchange = @Exchange(name = "object", type = ExchangeTypes.DIRECT),
            key = {"object"}
    ))
    public void listenerObject(Map<String, String> map) {
        System.out.println(map.get("name"));
    }

